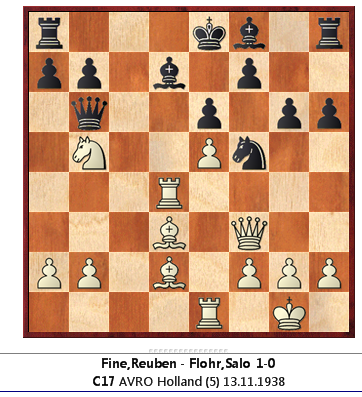
Cordingley puzzle 55
White to play and win
(a very interesting puzzle: worth setting the pieces out for, and working on, including finding defensive resources)
Solution
After yesterday's cooked puzzle, this is a corker. I suspect the more time spent analysing it, the more will be found.
Here is how I solved it, and what happened when I checked Houdini. In brief, Houdini– I tell you no lie- laughed at me, or maybe the entire human race, finding unforeseen depths.
My first thought was 1 Rd7, but couldn't see that white had enough. Seeing nothing much else, I turned to process. There are only two checks, with the N, and both can easily be discounted: white's position is hanging by a thread: black only needs a few moves to push back white, and one can easily see black might then have an advantage. So time is of the essence,
Next, LPDO: both black's rooks, and particularly his Rh8, due to the weakness at f6. Smites like Ba5 seem insufficient, because 1 Ba5 Nd4 hits the queen, though 2 Qf6 might be something: worth holding in memory, and noting that (1 Ba5) 1…Qa5 leaves the b7 pawn en prise, which, if the king were on d7, would be a double attack, and the LPDO rook would fall off: though from a5, the black queen hits white's LPDO Re1.
Then jump checks, and this led me to the solution: Qf7+ is a jump check, so the knight is pinned. So 1 Rd7! d7 2 g4 Nh4 and we are on to something. A bit more analysis, satisfaction, look at Cordingley's solution, further satisfaction, find in Megabase, load Houdini, and…disaster. I had missed so much, and I wonder if the player's ever knew what treasures lied beneath?
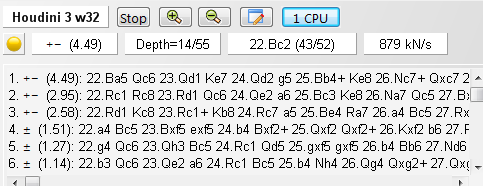
First shock: 2 g4 is only fifth choice.
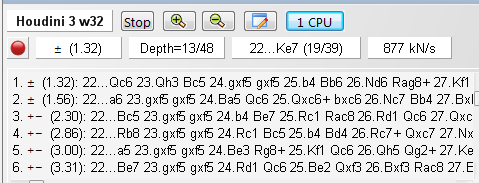
Second shock: black's Nh4 is not one of black's top replies. There is a lesson here, which I have seen before. Just because a piece is threatened, doesn't mean it has to move. In a similar way, it is not always best to respond with a capture after a capture- auto pilot re-captures are I think a fairly common mistake.
Third shock: g4 creates a weakness on the g file, especially after gf gf, when the Rh8 can spring to life.The diagram below shows the position after the far better 2 Ba5!, and after studying it, it can be seen how strong the retreat 3 Qd1! is. I wonder how many humans would see this? I wonder if Reuben Fine or Salo Flohr saw in the post mortem or later that the play could have been greatly improved?

Position after 1 Rd7 Kd7 2 Ba5! Qc6 3 Qd1!!
I think it is really special how much play there is in this. In the above line, a discovered check is threatened; if Qd5 is played to block the d file, then there is a mate by Be4!! Qd1 Rd1+- or maybe black can squeeze out with ruinous loss of material.
The attached PDF gives more analysis: though I suspect I haven't found all the depths, by far. One thing to note is that Reuben missed an even stronger line a move or two earlier: there are themes such as 'the threat is stronger than the execution' exemplified here.
I have really enjoyed this puzzle. I fear, though, that if I stumble across this position in a few years time, I won't be able to fully appreciate its depth, and in particular, whilst I might well find again Rd7 g4, I wouldn't be certain I could find Ba5! Qd1!!
