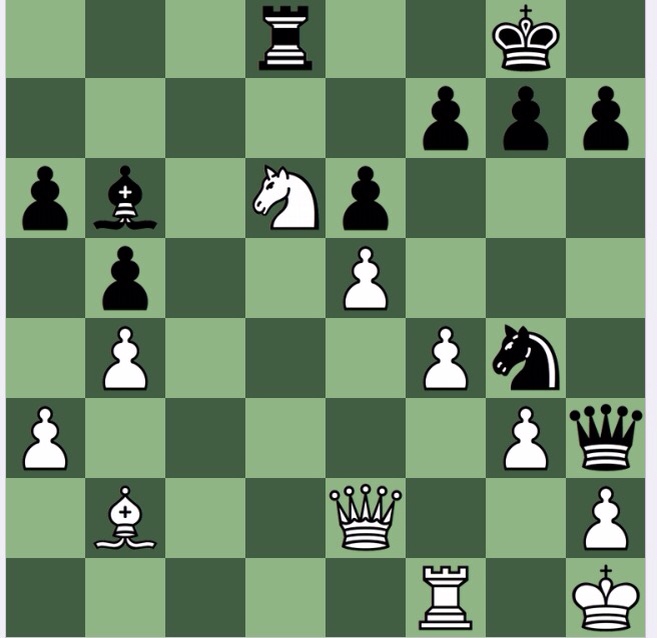
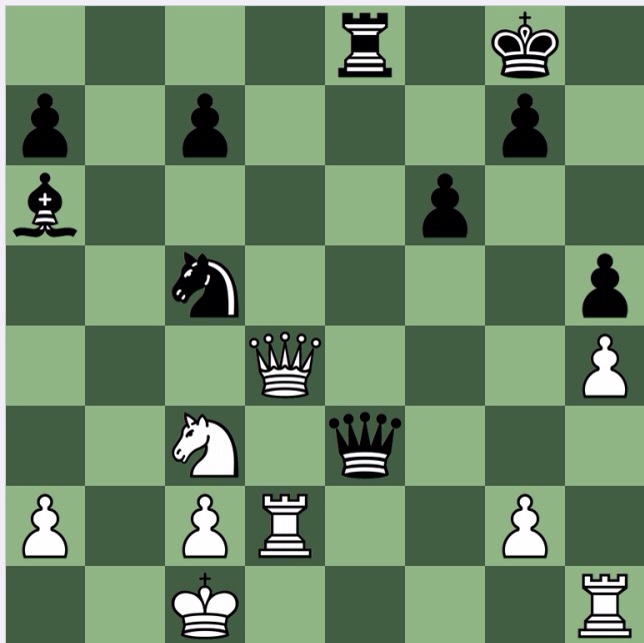
White to play: evaluate the Greek gift sacrifice
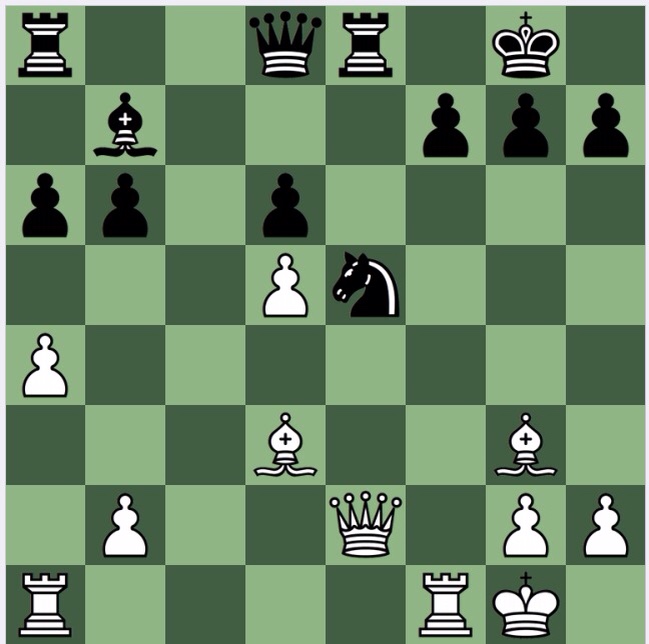
(Refinement of piece placing from position 139)
Solution
Here, with the only difference being that the white rook is on a1 and not on c1, the Greek gift is nowhere near as strong. I saw the line when looking at the game position, noting how 'lucky' white was that his rook was well placed.
What's the difference? 1 Bh7? Kh7! 2 Qh5+ Kg8[] 3 Be5 Re5! 4 Qf7+ Kh8!
And now 5 Qb7?? loses to 5…Re7! 6 Qc6 Rc8! and white's queen is trapped.
So, instead of 5 Qb7, white is left with the rook lift 5 Ra3! met by 5…Bc8 , 6 Rg3 (the reason why 4…Kh8! is better than 4…Kh7: Rg7 won't be check) 6…Qe7 and black defends everything (again, if 4…Kh7?, 6…Qe7 would simply lose, 7 Rg7+ and 8 Qe7 1-0)

The position after 6…Qe7 still has some interest: 7 Qe7 Re7 8 Rf8+ Kh8[] 9 Rc3! and if 9…Bb7, to keep the piece, then 10 Rh3+! with perpetual! Black's choice is to go for an equal rook plus four pawns ending.
—-
Nice: the trapping of the queen in particular.
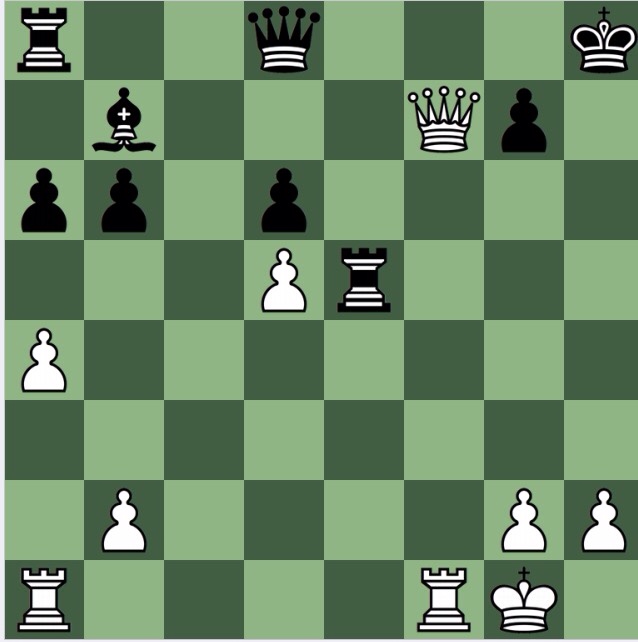
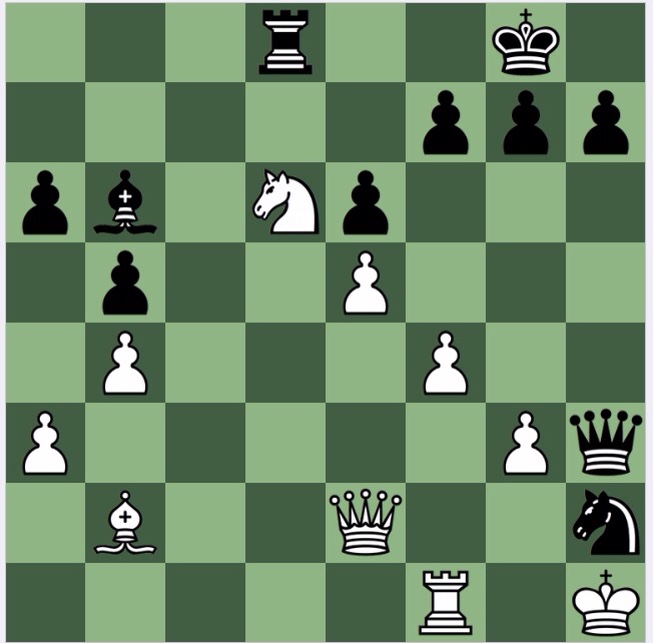
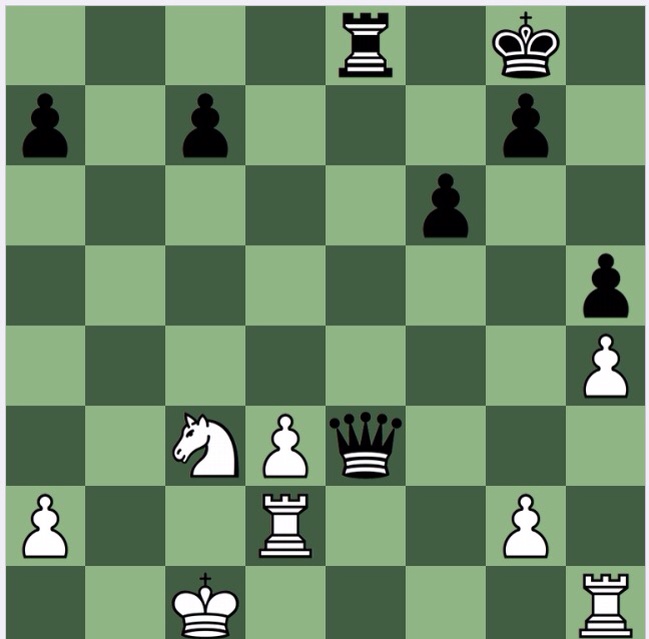
Black to play and win
D Lewis v W Heidenfeld 1959
Solution
Yet another example (see for instance puzzle 133 of a few days ago) of Purdy's maxim of for a moment, ignore a threat : what would you want to play absent the threat, and if it is powerful, consider if the threat can be ignored.
Here, the threat is 1 Rf8+, but 1…Qc4! is a double attack, on the LPDO Rf1 and LPDO Pa2, both of which are lethal. So 2 Rf8+ Kg7 and white has only spite checks left, so 0-1.

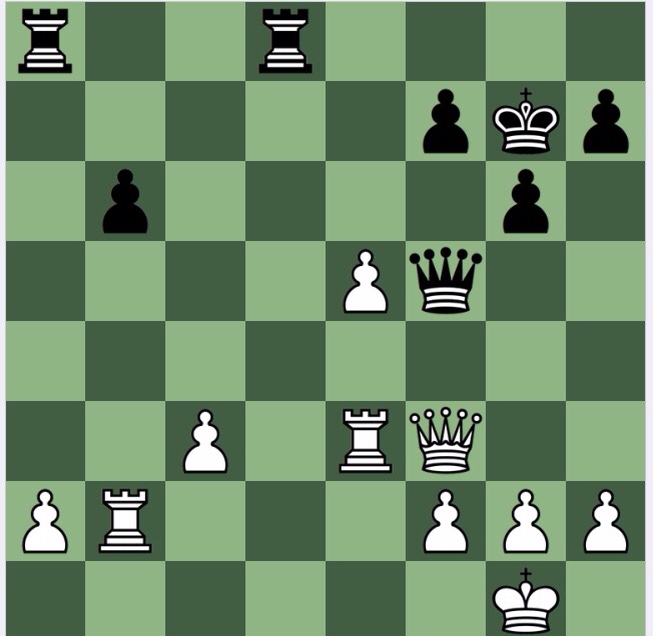
White to play and win

CC de Villiers v C Van der Merwe 2005
Solution
1 Nd6+! comes to mind fairly easily, mainly with the idea of 1…Bd6 2 Qe6+, when the queen is 'in', followed by 3 Bd6+ 1-0.
Black has no options, either. If e.g. 1…Kg8, then say 2 Bb7 is also 1-0.
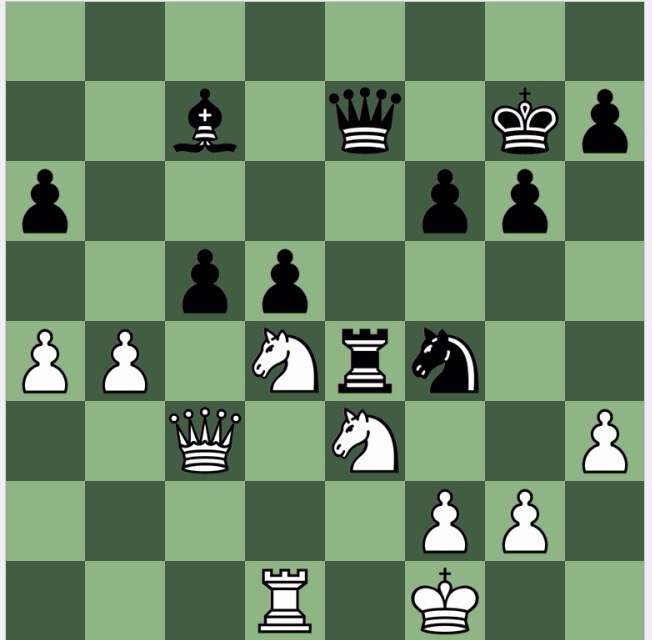
Black to play and win
White has just played 1 Bc1-d2

K Hursky v F Koronstenski 1980
Solution
1…Nb2 (my choice) 2 Rb2! Bb2 3 Bb4! and black is the exchange up, but the game continues, is not as good as 1…Ne5! winning a piece. The knight is overloaded, and, arguably is (because Rd2 comes with check) is LPDO.
Black to play and win
H Durham v H Meihuizen 1910
Solution
Examine all biffs again: 1…Nh2! and it is all over: 2 Qh2 Qf1+ doesn't just win the exchange, but mates after 3 Qg1[] Qg1mate.
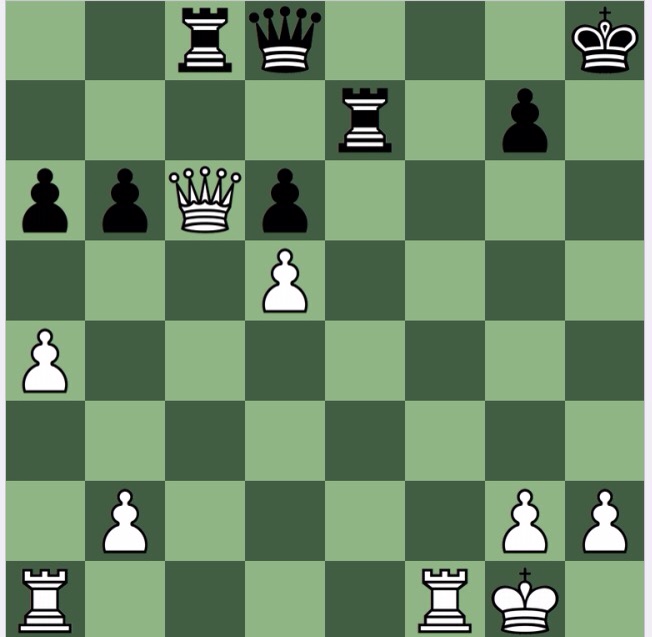
Black to play and win
White played 1 Qd5-f3 here
M Findlay v J Gluckman 1993
Solution
The motif is clearly back rank mate, and since the Qf5 spies b1, it is only natural to try 1…Ra2!! seeking to deflect the rook. Then, if 2 Qf5, 2….Ra1+ mates; 2 Ra2 Qb1+ mates, 2 Rbe2 Re2 3 Qe2 Qb1+ 4 Qe1 Rd1 skewers the queen.

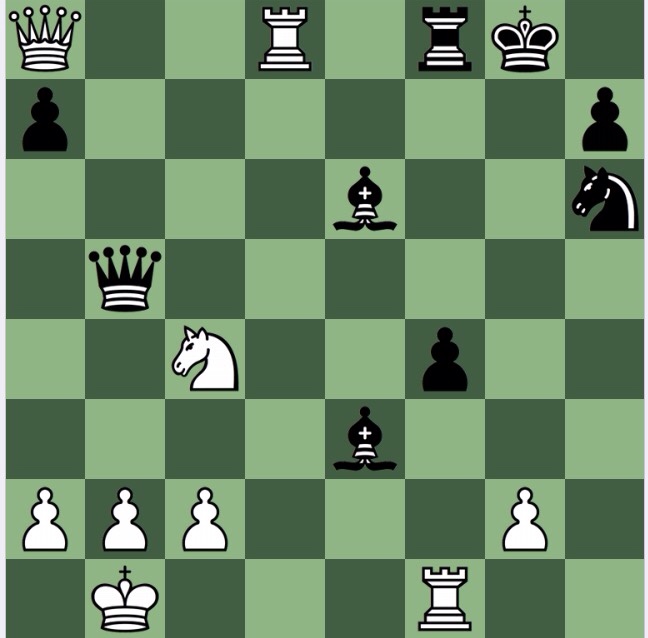
White to play and win
Black has just played Pb6*c5
DJ Cawdrey v CH Van der Merwe 2005
Solution
Straightforward today: whilst your eye is initially focused on recapturing the pawn, whether by Qc5 or bc, Purdy's two mantras of examine all biffs and ignore threats, at least for a moment, and decide, absent the threat, what you would like to do, apply here, and quickly lead to 1 Ndf5+ (or 1 Nef5+) winning the queen for two pieces.
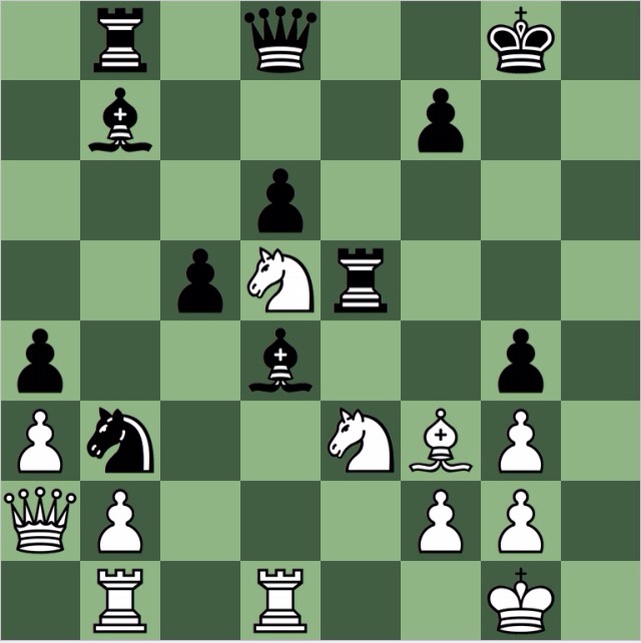
Black to play and win
R Van Tonder v W Kobese 2002
Solution
Fairly straightforward today: the Rd2 is tied to defending the queen, but is itself pinned to the king. So 'examine all biffs' includes looking at 1…Nd3+! which after 2 cd has the effect of making the Qd4 a LPDO, which by its name, drops off. So 2 Qd3[] Bd3 3 cd and white can drag the game on, but it is hopeless. A rook lift is bound to increase the pressure, and white won't be able to resist for long.
Black to play and win
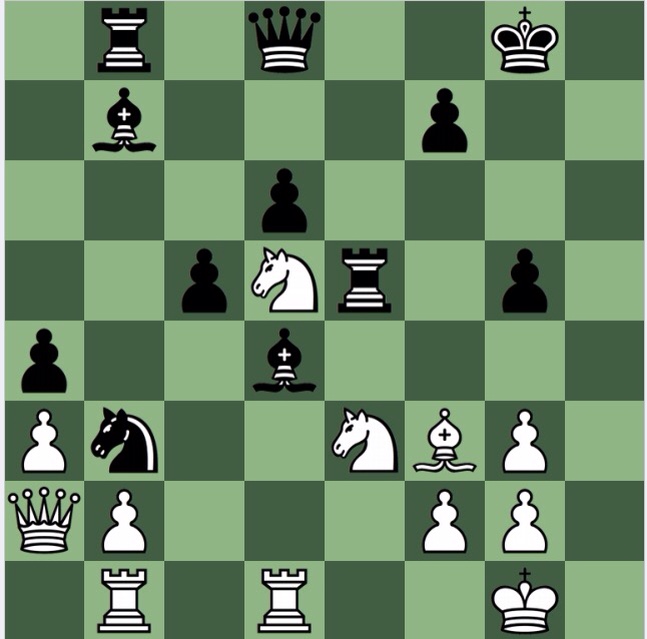
A Pedro v G Michelakis 1995
Solution
With white's queen so offside, and pieces in a tangle, black is clearly better after 1…f5, but 1…g4! is clearly more forcing, and, depending on how white reacts, black gets dominant central pieces.
2 Ng4 Rd5 3 Bd5 Bd5 is one typical outcome, when black dominates.
Black to play and win
A Pedro v G Michelakis 1995
Solution
With white's queen so offside, and pieces in a tangle, black is clearly better after 1…f5, but 1…g4! is clearly more forcing, and, depending on how white reacts, black gets dominant central pieces.
2 Ng4 Rd5 3 Bd5 Bd5 is one typical outcome, when black dominates.
