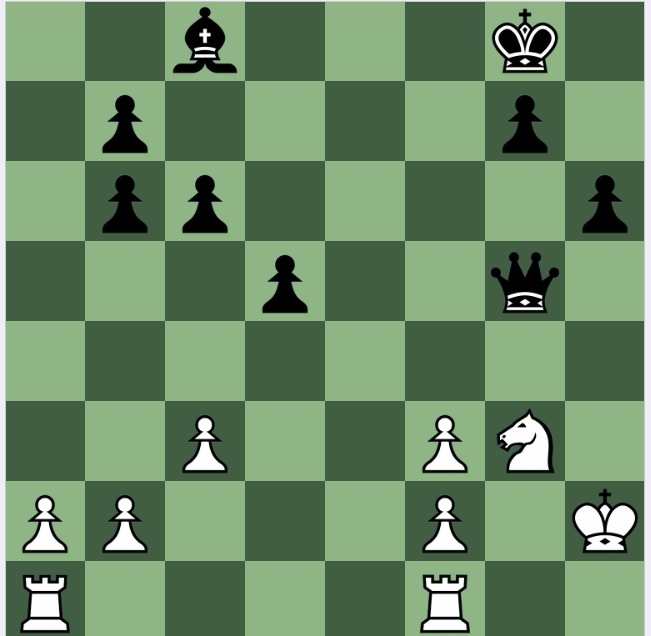
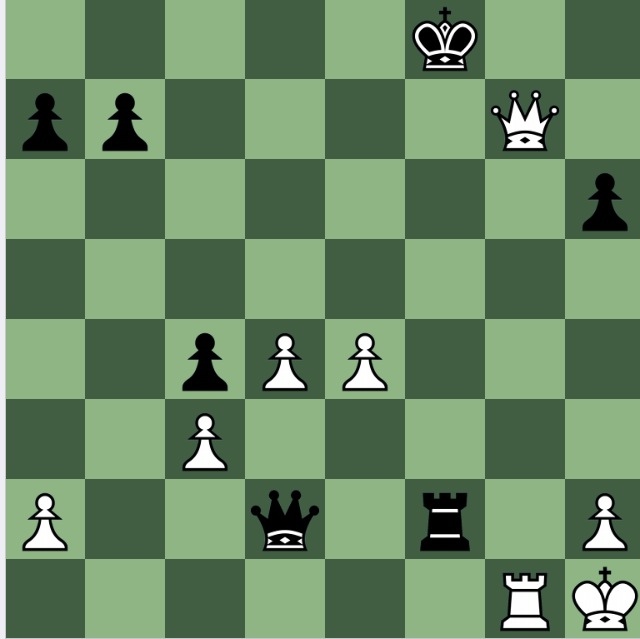
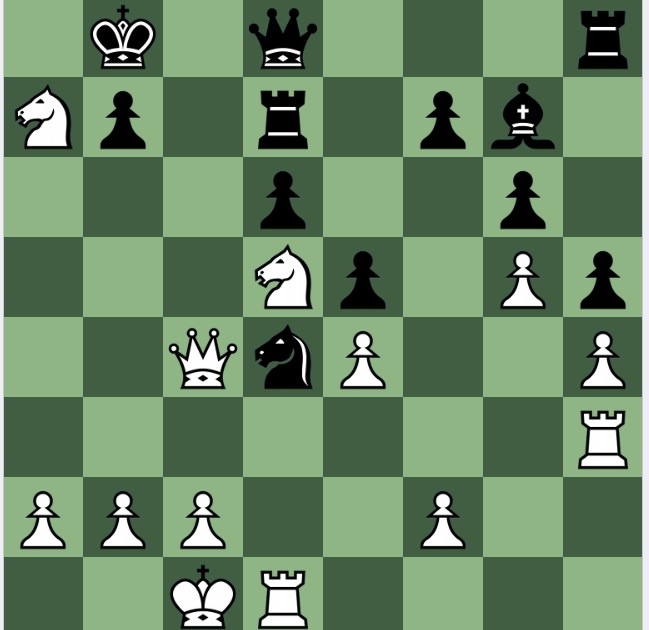
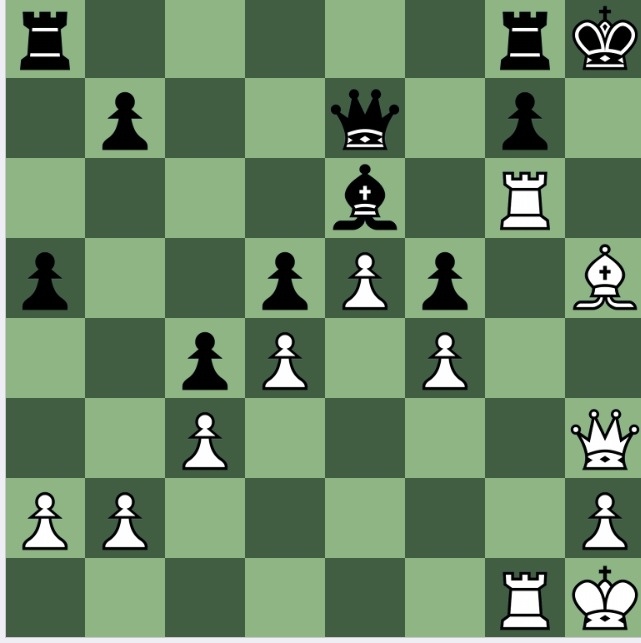
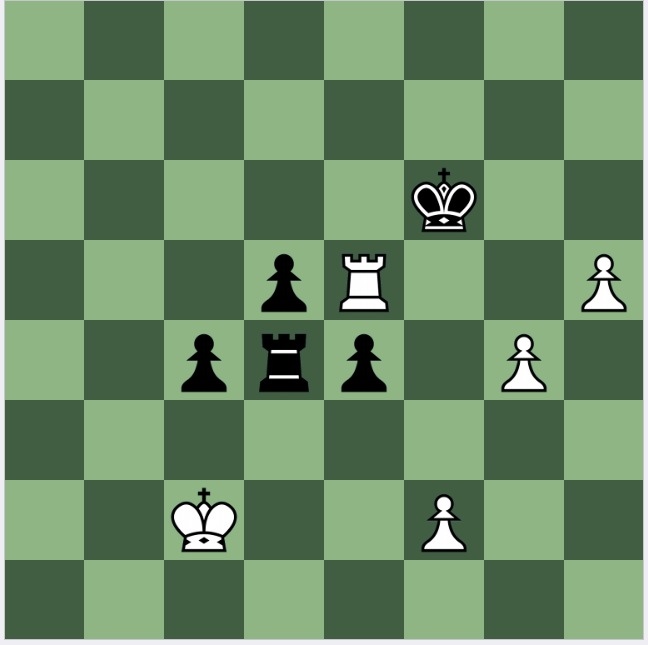
White to play and win
Black has just played Nb8-d7
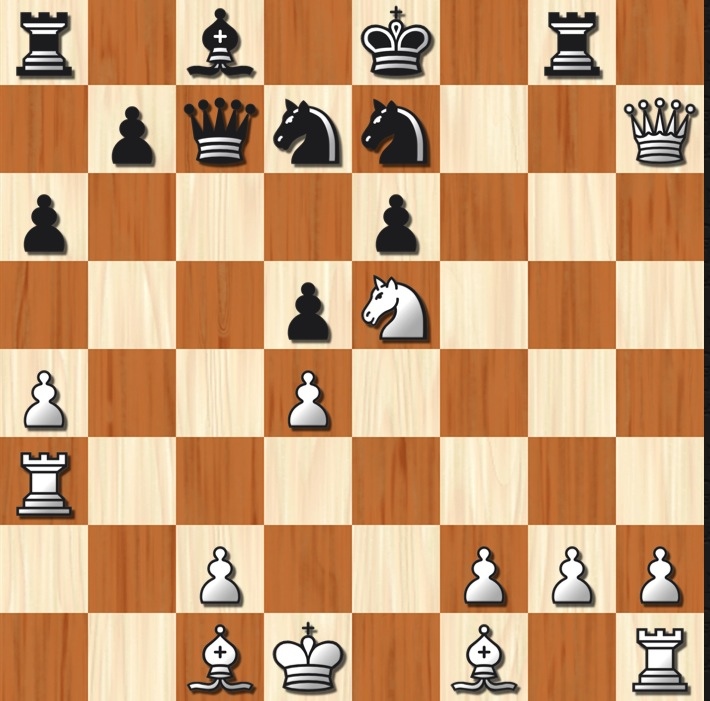
MM Millar v I Lewittom , correspondence, 1956
Solution
Reitstein makes a point of telling his readers that this was a correspondence game and the position was not found OTB, but I don't think it is particularly hard: not easy, but not a brain basher.
1 Qh5+! (consider all biffs) and black can either intervene a piece, losing it, move 1…Kf8, being mated by 2 Qf7, or permit the classic smothered mate: 1…Kd8 2 Nf7+ Ke8[] 3 Nd6+ Kd8 4 Qe8+ Re8 5 Nf7 mate.
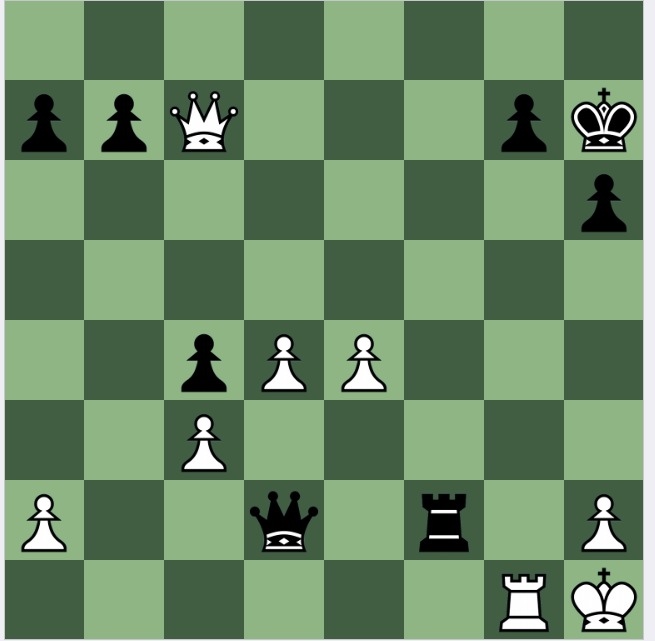
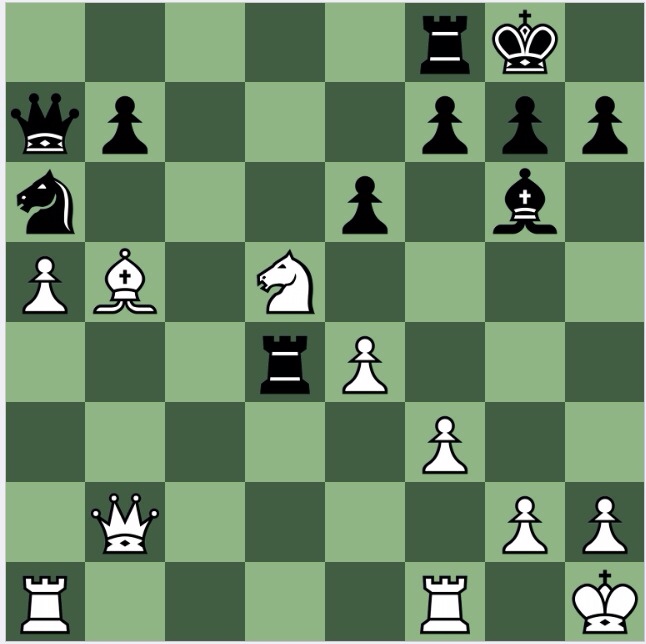
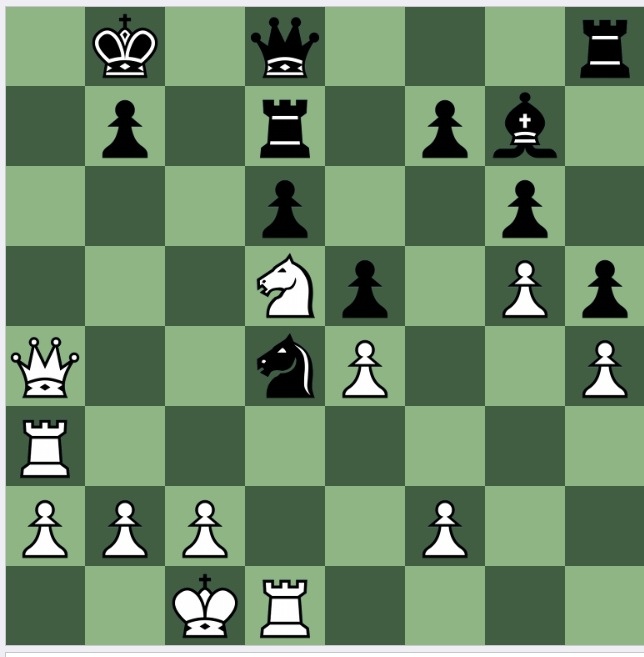
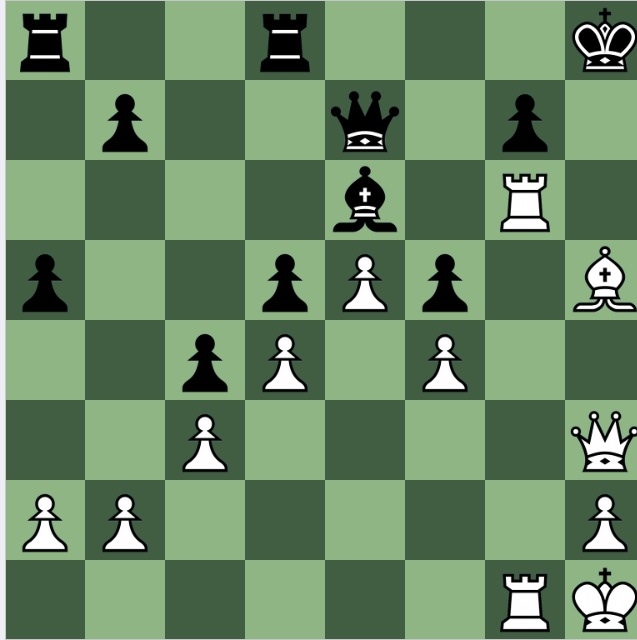
Black to play and win
A good exercise: try to be precise
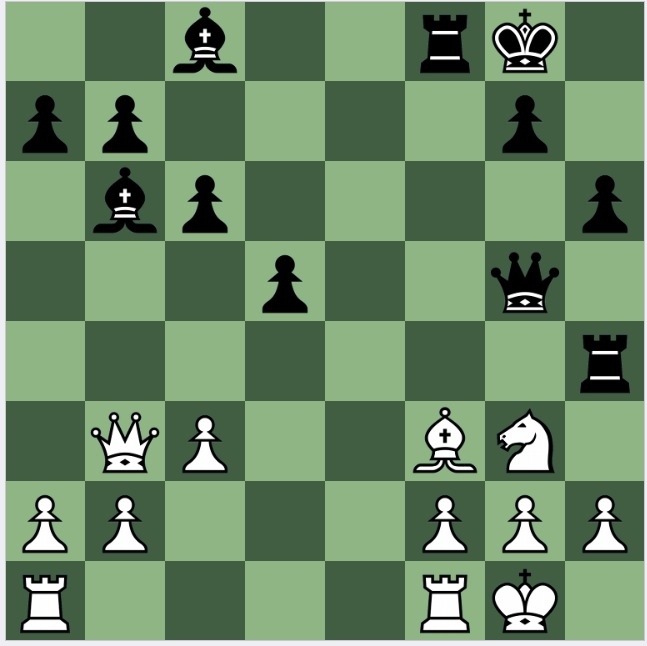
N du Pissanie v C Wolpe 1976
Solution
I felt that 1…Rf3! 2 gf[] Rh2 was the solution, and this indeed is Reitstein's solution.
I saw 3 Qb6! but felt that black would eventually win, which indeed he would.
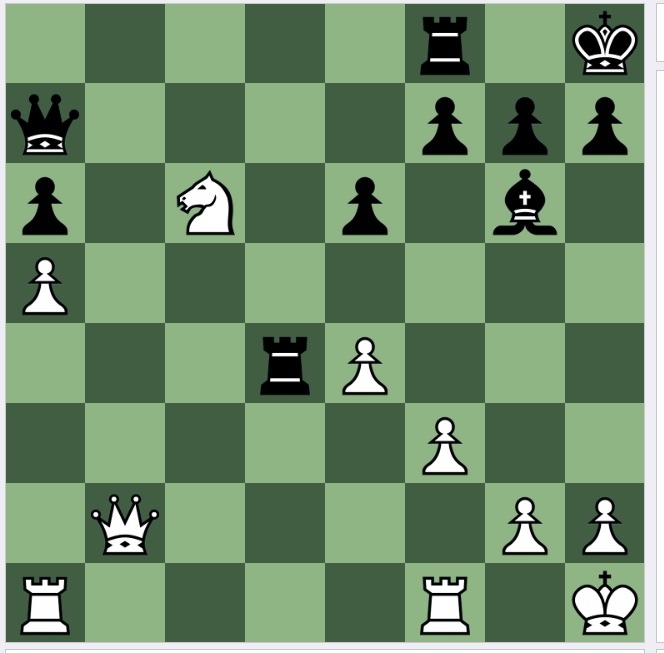
After 3…ab 4 Kh2[] the above position is reached, and after say 4…h5 5 Rfe1 (threatening Re8+) Kf7 6 Re3, black will push his pawns and, barring a mishap, will win. 'Barring a mishap' means: in practice, I could fritter away the advantage.
Reitstein doesn't give the fairly obvious 3 Qb6, instead showing how white loses after 3 Kh2: fairly trivial, check, check., check…3…Qh4+ 4 Kg2 Qh3+ 5 Kg1 Qg3+ (the f pawn is pinned) and mate follows.
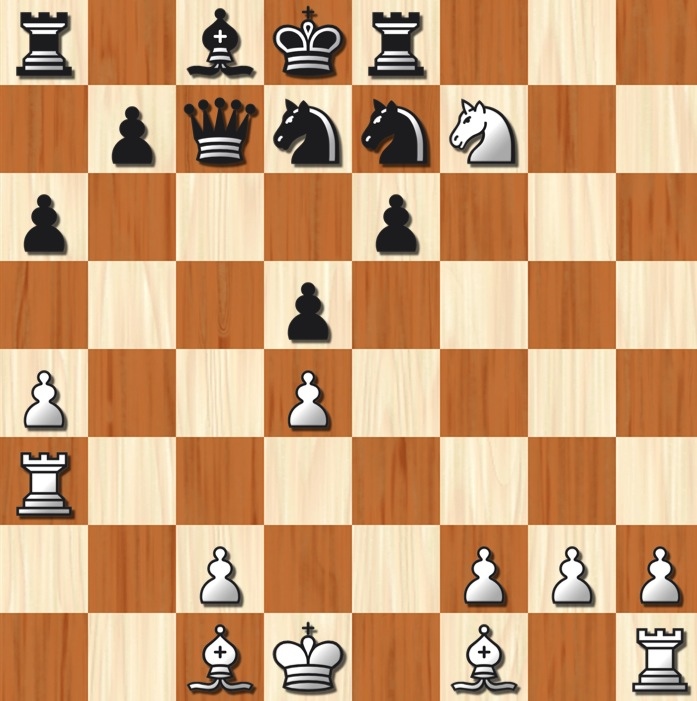
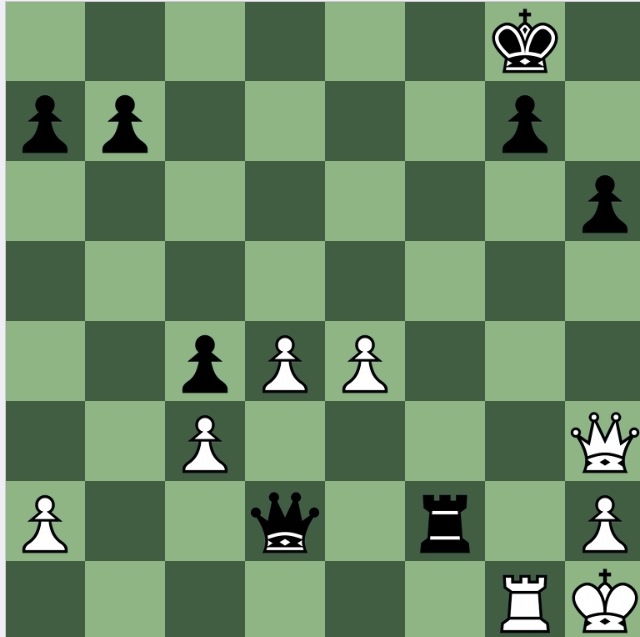
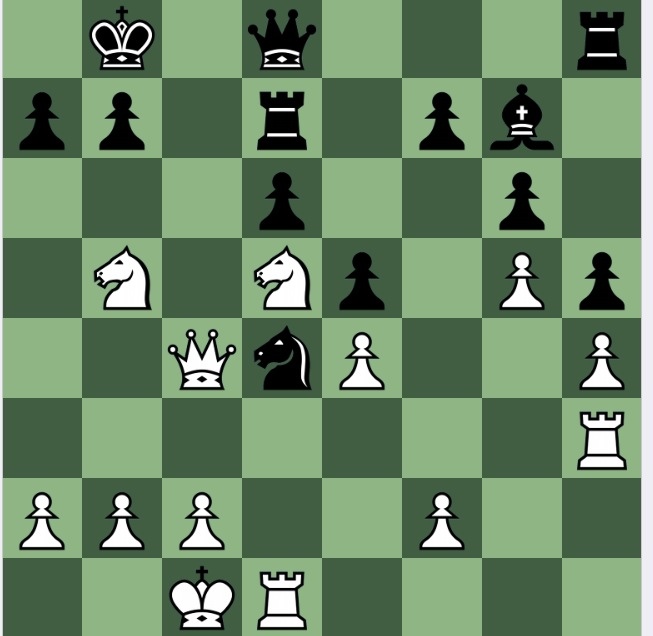
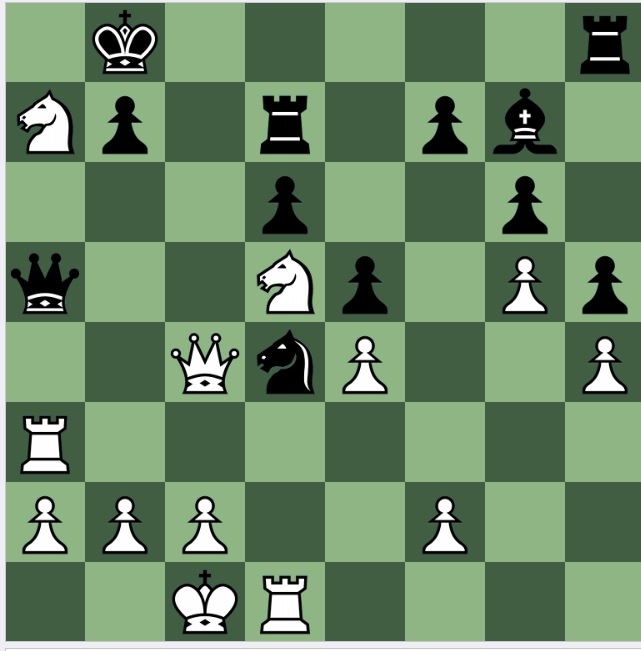
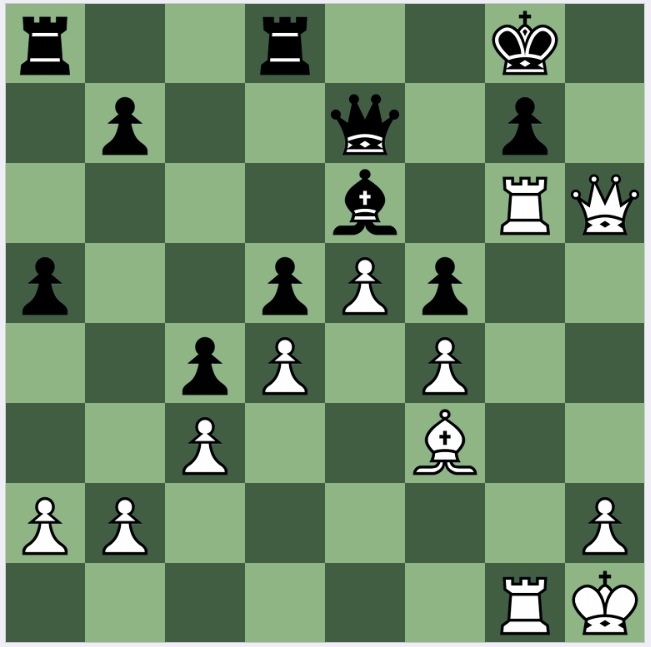
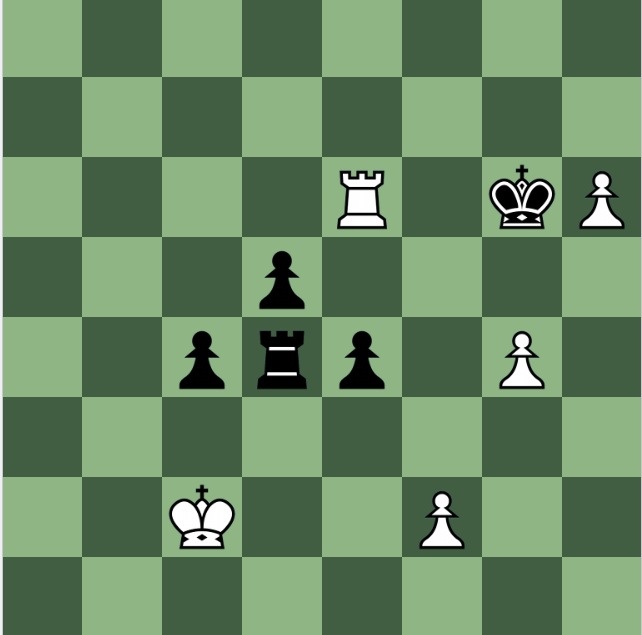
White to play and win
Does 1 Qc8 win?

Solution
In my earlier posting, I showed the correct solution, 1 Qe6+!, which wins. Fortunately I chose it over what I thought was the more or less equivalent 1 Qc8+?. I chose 1 Qe6+ for insufficient reasons, namely that it was more forcing, with one possible move, and three easily bad replies.
However, when I checked with Stockfish, I was shocked to see that 1 Qc8+ Kh7 2 Qc7 (say- it doesn't actually matter, either checking or Qc7 to defend h2) is a draw.
Black to play and draw (after Qc7)
2…Rg2!! and it a draw: 3 Rg2 Qe1+ (or Qd1+) 4 Rg1 Qe4+ 5 Rg2 Qe1+ perpetual.
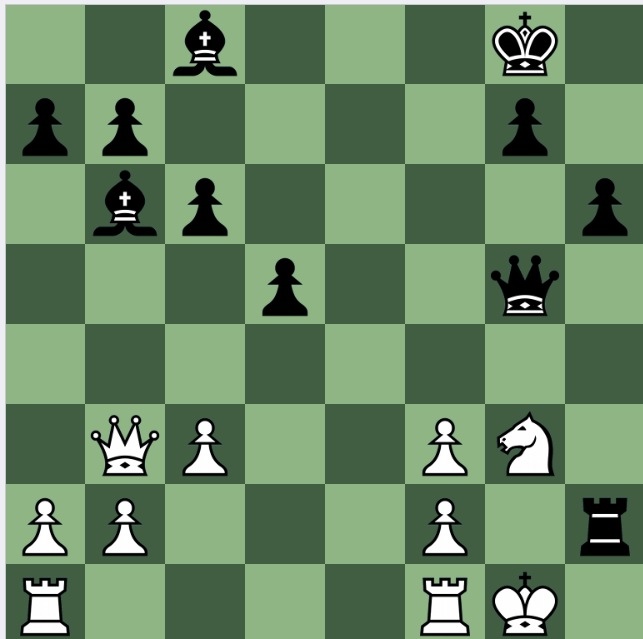
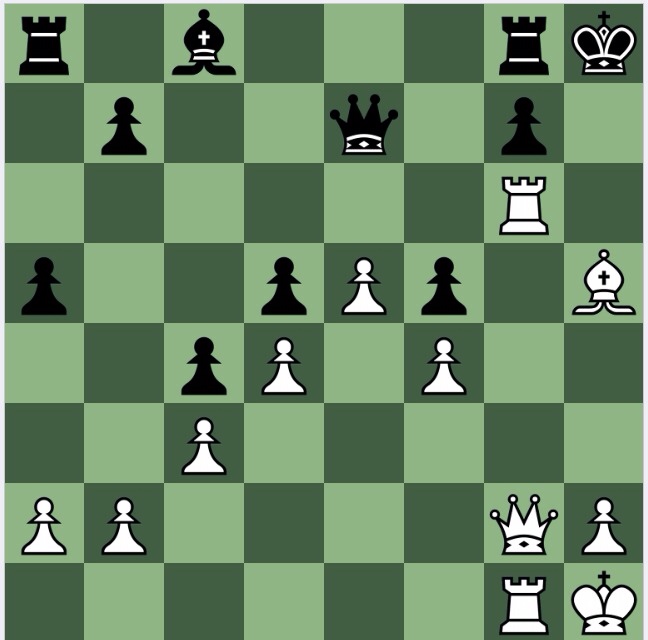
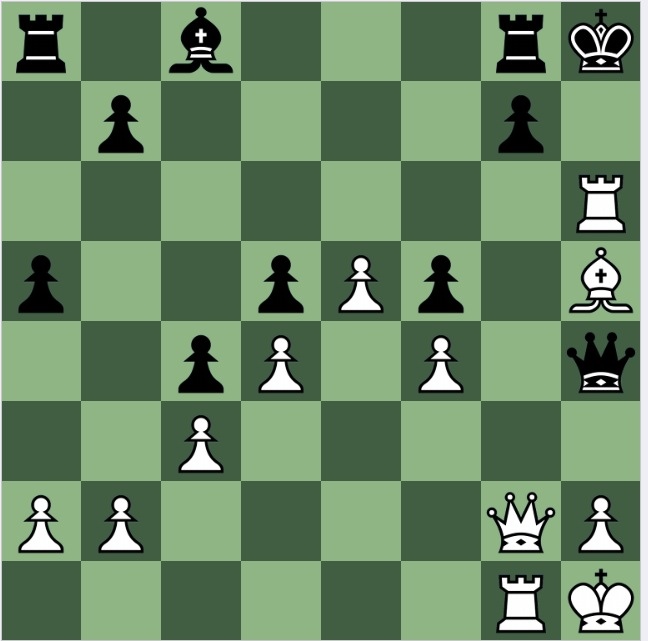
White to play and win
Position after Rf8-f2
M Blieden v BE Siegheim 1912
Solution
In the game, white played 1 Qg3, preventing Qf4, and the game went on: I don't know the eventual result. Reitstein says that white missed a winning move here, and after ruling out 1 Qh6??, which hangs the queen, it became a choice between 1 Qe6+ and 1 Qc8+.
I found choosing between the two hard, but eventually plumped for 1 Qe6+!, which was the correct choice! but I missed why 1 Qc8+ was poorer.
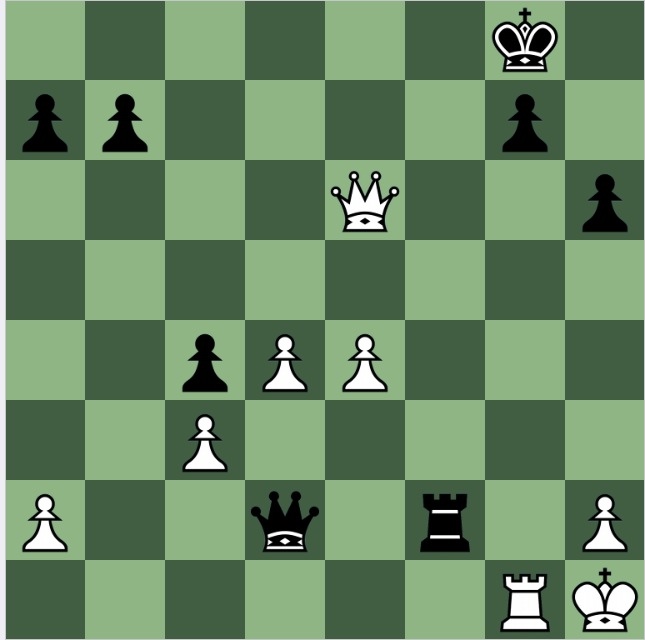
Black has four moves. 1….Kh8 and 1…Kh7 can be dealt with summarily: 2 Qe8+ Kh7 3 Qg6+ and 4 Qg7 mate against 1…Kh8, and the same mate one move earlier after 1…Kh7.
The main other thing to see is how to defeat 1…Rf7: 2 Rf1! wins the rook, and there are no good checks. So the final tax is to defeat 1…Kf8. I think in practice it isn't needed to see to the end, but just to see 2 Qc8+ Kf7 3 Qd7+ Kf8 4 Qg7+ and then reassess.
After 4…Ke8 white can either check on the back rank, but that permits the rook to retreat, or 5 Qe5+ which contains the king: clearly better, and Stockfish confirms it is forced mate, though in practice I doubt I would see its line: 5…Kf8 6 Qb8+ Kf7 7 Qg8+ and then the rook enters with check.
White to play and win
K Dreyer v JC Archer 1937
Solution
1 Ne7+ Kh8[] 2 Ba6 ba (2…Qa6 drops the Rd4; or 2…Rd7 3 Ng6+ and then the bishop retreats) 3 Nc6 pinning the Q and N: a single line variation, with no more to be said.
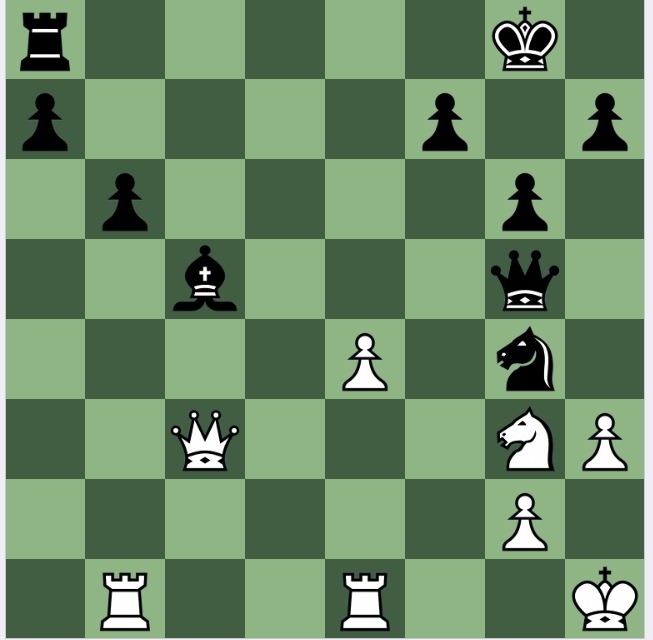
White to play and win
M Hennings v W Berson 1987
Solution
A nice puzzle. After seeing that 1 Qa4 or 1 Ra3 are too slow, and similarly that 1 Rd4 doesn't do anything, I switched to making 1 Na7! work.
The first point is that 1…Ka7 2 Qa4+ Kb8 3 Ra3 the game is over.
Or, if 1…Qa5, 2 Ra3 Qc5 3 Qa4 Qc5 4 Nc6+ Kc8 5 Nd4 + –

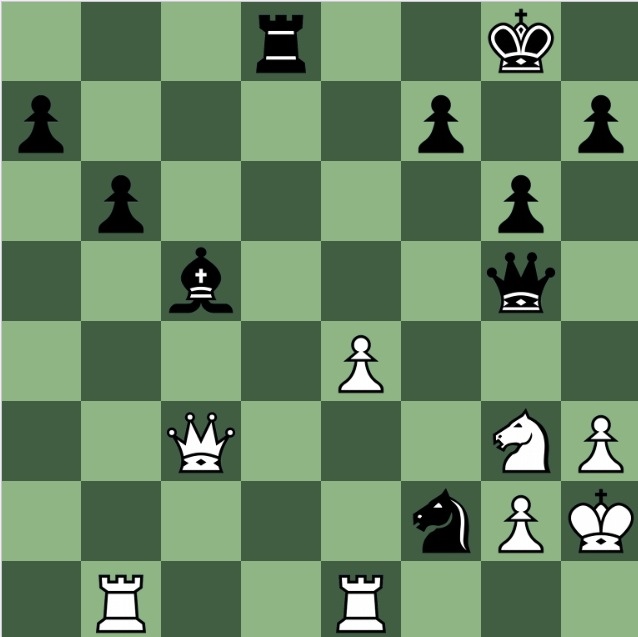
How does white win after:
1…Ra6; 1…Be6; or 1…Qh4 (the move played in the game)?
AJA Cameron v F Murray 1910
Solution
What next isn't especially obvious: 3 Re6? doesn't work, since 3…Qe6 4 Bf7+ Qh6.
1…Qh4
A slightly different finish: 2 Rh6+! and mate after 2…gh[] 3 Qg8 mate.
White to play and win
J Greben v PJ Foley 1991
Solution
In the game, white offered a draw, which was accepted. But 1 h6! wins, since if 1…Ke5 2 h7 and the pawn queens, and white's g pawn means that there is no possibility of a fortress for black. So 1…Kg6 2 Rh5 Kh7[] 3 g5 and the h pawn promotes. For example, 3…Rd3 4 g6+ Kg6 5 h7 Kh5 6 h8(Q).
The above was my solution, and is 'good enough', in that it wins. Stockfish though shows me that 2 Re6+! is stronger. If 2…Kh7, 3 g5 and the difference is that the R is very active; so 2…Kf7 3 h7 and the best that black can do is 3…Ke6 4 h8(Q) and the g pawn will decide.
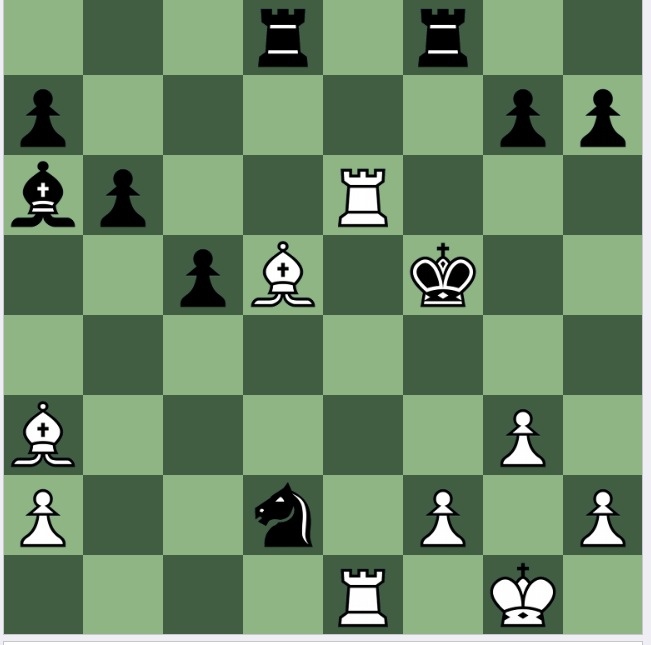
Black to play and win
B Kerr v K Hursky 1978
Solution
I was disappointed with myself on this puzzle. I chose 1…Ne3, which wins sure enough, but partly because if white returns the exchange, in any ending black has the better remaining pieces and more pawns. If white doesn't return the exchange, my plan was to advance Ph7-h5-h4. The engines show the resulting positions after 1…Ne3 as -3 or -4, depending on white's response, but 1…Nf2+! 2 Kh2[] Rd8! is cleaner, and stronger still. White can't prevent the rook entering the attack, and with one more piece, the game is over, the precise manner depending on how white tries to defend.
White to play and win
Mate in 5
K Hill v P Surgison 1983
Solution
1 R1e5+ is the obvious first move, after which 1..Kg4 is forced, and then 2 h3+ Kh3[] is a natural attempt to drag the king into his net. But then what?
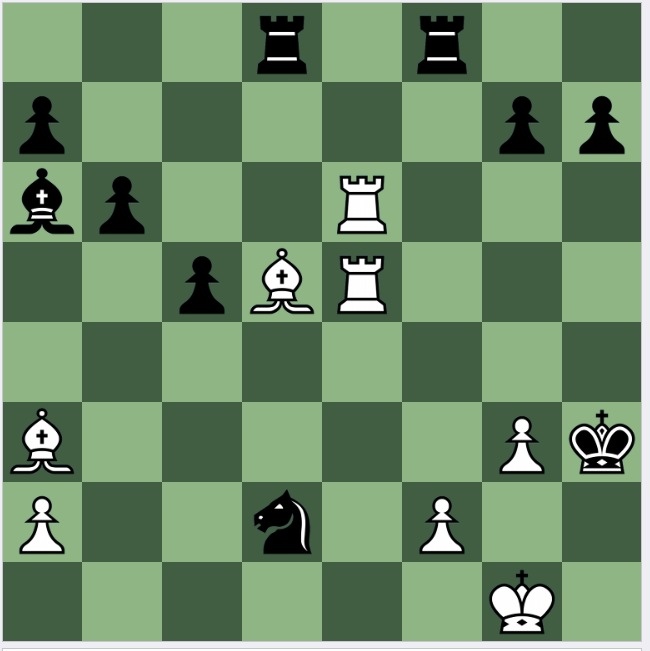
3 Rh6+ is a nice, and not too hard, clearance sacrifice, clearing the e6 square. If 3…Kg4 4 Rh4 mate, so 3…gh 4 Be6+ Rf5[] 5 Bf5 mate.
Nice: not too hard to calculate, but satisfying to be able to do so.
