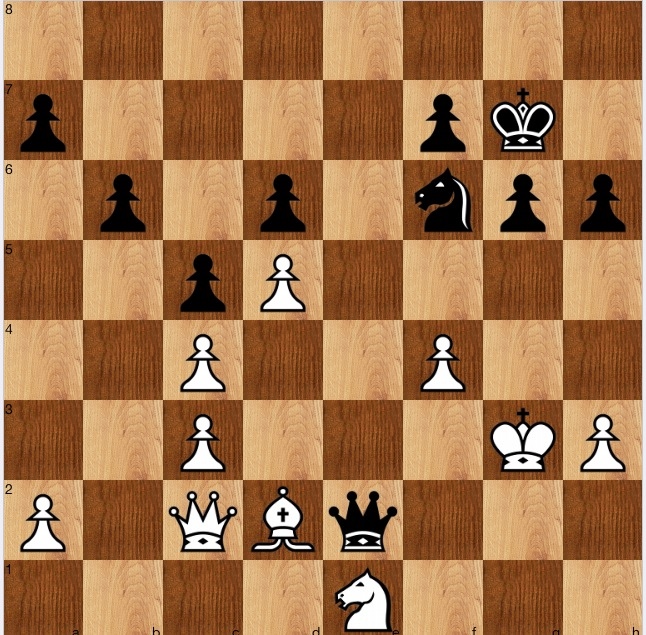
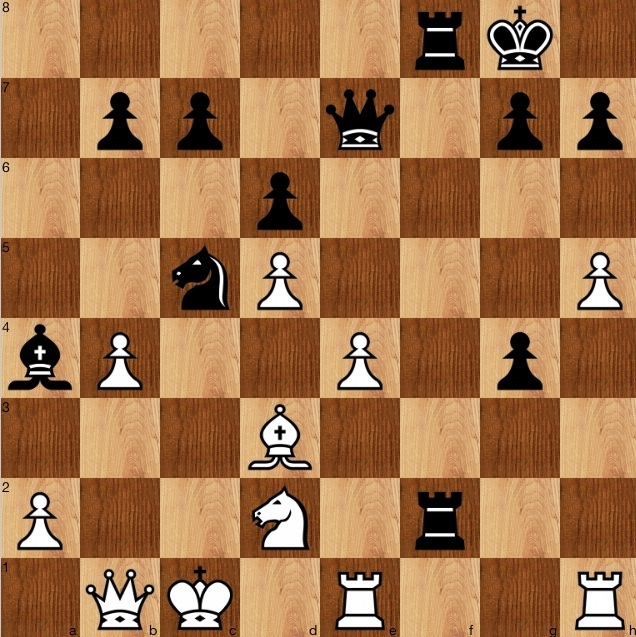
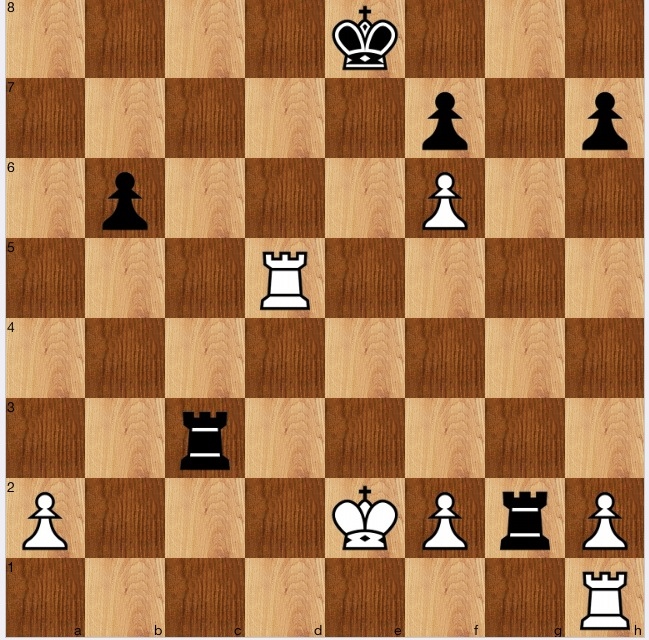
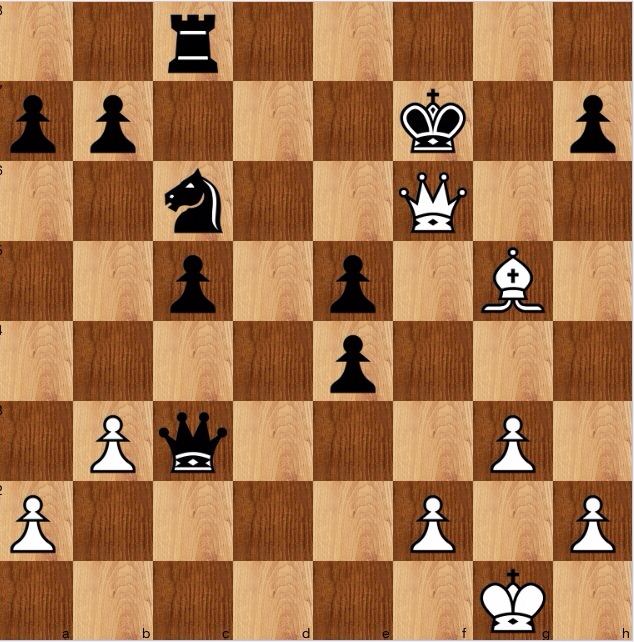
Black to play and win.
T Gannholm v DA Walker 1978
(I) black to play and win: find the line played in the game;
(2) find the even stronger line, which requires some rook dancing.
Solution
I immediately saw the solution here, the 'trick' 1…Rb3!: the only knowledge needed being that two pawns on the sixth (after 2 ab cb) beat a rook. Then 2 Rc1 Rb2+ and picks up the a2 pawn. And 1…Rb3 was played in the game, and won.
However, this is the first puzzle in the book so for where the engine surprised me. Whilst Stockfish agrees black is winning after 1…Rb3, it gives the best defence as 2 Rh1! when there is some fight left in the game. If 2…Rc3 3 Rh7+ and the rook can swing behind the a pawn, giving black some conversion difficulties. Properly played, black is winning – 2..Kg7 – but it is not entirely resignable.
Therefore, Stockfish prefers the surprising 1…Rb2! which actually relies on zugzwang. White is forced to play 2 Re2, when 2…Ke6(say) forces either 3 Kf1 or 3 Ke1. If the former, then 3…Rb1+! 4 Re1 Rb3! is an improved form of the game solution because the rook can't move to the h file. And if 3 Ke1 then 3…Rb1+ 4 Kf2 (4 Kd2 Ra1) 4…Rc1.
Very nice: dancing with the rooks.
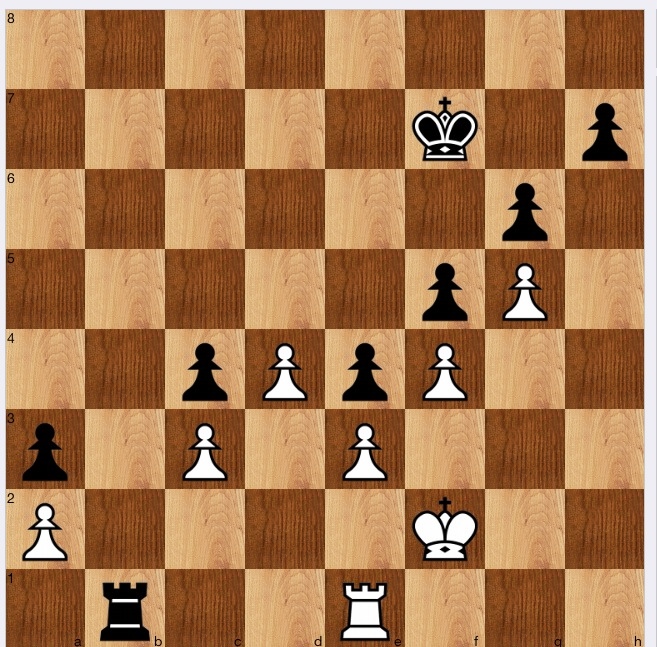
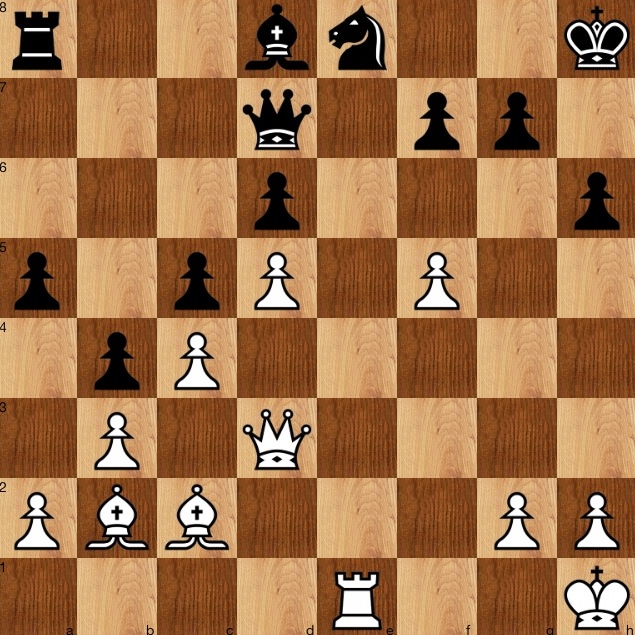
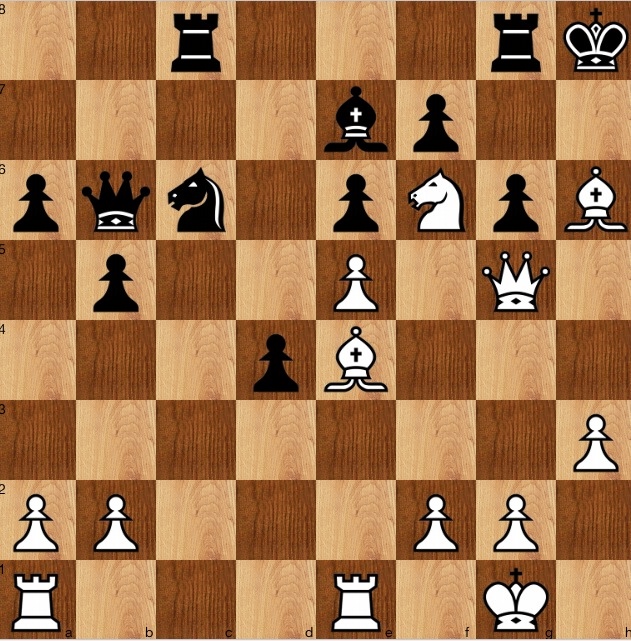
White to play and win
S Hirschowitz v M Andre 1982
Solution
Not too hard today, just a bit of calculation required based on the back rank motif, with the additional point that Ne7+ forks g8 and d5.
So 1 Qd5! Qd5 2 Re8+ Re8[] 3 Ne7+ and picks up the queen. White can also start with 1 Re8+; and it makes no difference if black plays 1…Re1+.
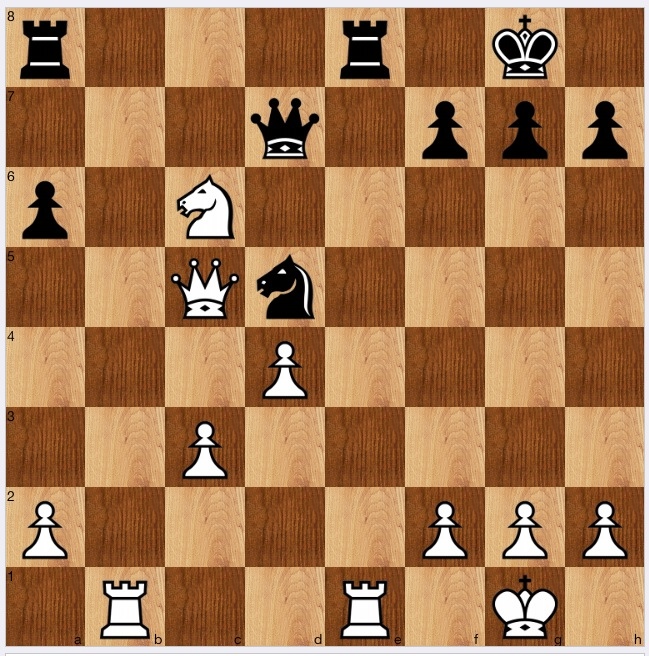
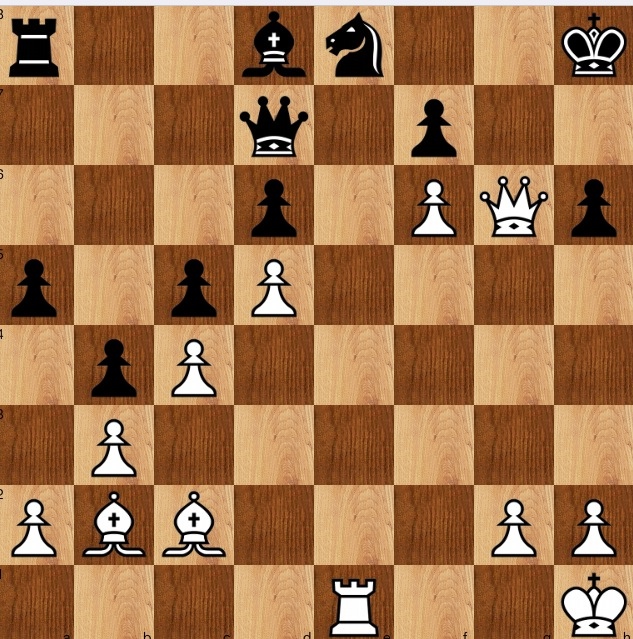
White to play and win
C van der Westhuizen v R Toblansky 1978
Solution
The black king is in a net with Nf7 ’mate' threatened. The f7 square is defended only by the Qe7, which thus is tied to its function of defence. The fact that the Qe7 is LPDO means that the decoy 1 Qb4! has a big effect. The Qe7 must be defended, or must move, when the b7 falls. It's only a pawn, but a big enough breakthrough for a good advantage.
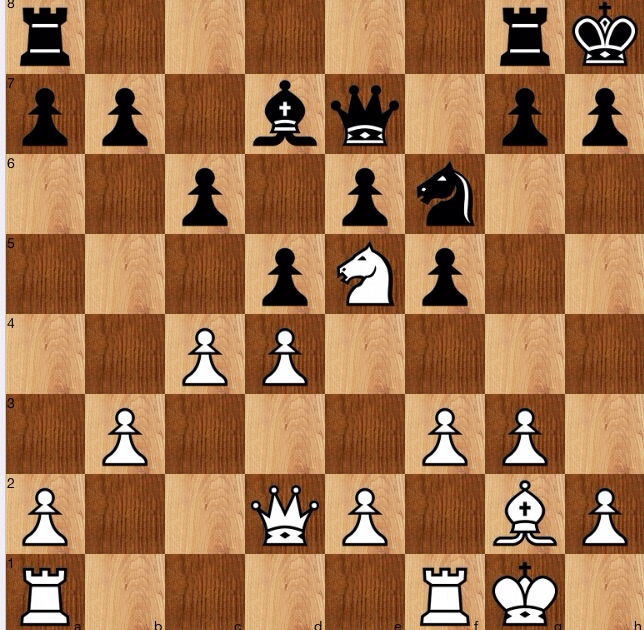
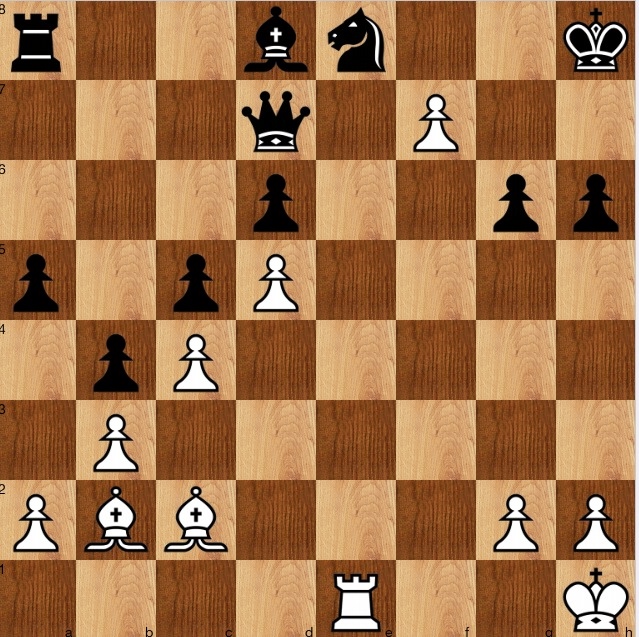
Black to play and win
PJS Robbertse v K Jankovsky 1976
Solution
The first move I looked at was 1…Rd2, but I couldn't make it work; so once I gave up on it (once being an operative word: I kept returning to it, trying to make it work) I quickly settled on the move which is the solution, 1…Qe5. Black's queen comes into c3 with winning effect.
I found the solution in a haphazard way: by way of process, first I could have followed Purdy's maxim to ignore all threats, and decide what you would otherwise wish to do if the threat could not possibly be executed: so, here, ignore threat of Pb4*Nc5. It is harder to fit Qe5 into one of his maxims, but I bet it could be said to be a threat to biff: really, it is simply improving a piece.
White to play and win
F Barry v A Cohen 1892
Solution
The first move, 1 f6! is obvious, but the main question is how to follow up after the best defence, 1..g6; the weaker defence 1…Nf6? is met simply by 2 Bf6, when Qh7mate can't be stopped.
I saw how to beat 1…g6 immediately, but even if it weren't obvious, following the Purdy maxim considering all biffs would seen lead to it, especially if you also make note of another of his maxims, to look for all jump checks. So, 2 Qg6! with the idea 2…fg 3 f7+ (jump check) and the f pawn promotes: game over.
White to play and win
BH Kerr v D Macfarlane 1982
Solution
Fairly straightforward today: after seeing that the trivial biff 1 Kd2 which also threatens Re1+ doesn't work (1..Rc6), the idea of switching the order of the moves, and playing 1 Re1 comes to mind, threatening a discovery check by either Kd2 or Kf1/3: both black rooks are LPDOs, and the black king is in a mating net.
White to play and win- a good exercise in calculation
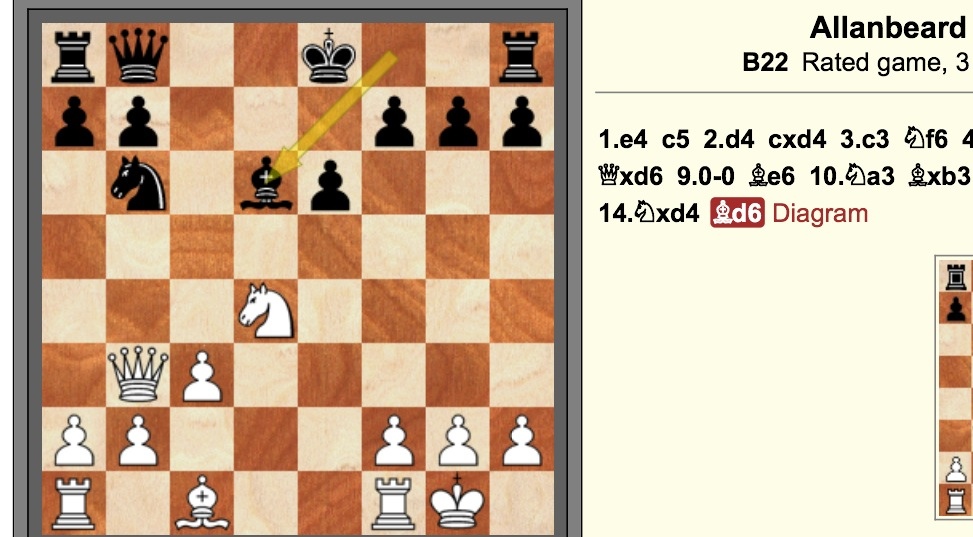
Allan Beardsworth (allanbeard) v Noxxe, Playchess 22/1/14, 3 min blitz
Solution
I was pleased to be able to see, and properly assess that the sacrifice 1 Ne6! works. I could tell that after 1…fe 2 Qe6+ Kf8 I had at least a draw with Qf5+; and that 2…Be7 would allow pin, further pin and further pressure leaving black at worst totally trussed up.
Black played Kf8, and after one repetition of Qf5+_Qe6+, I played Rad1 and then a rook lift: I chose Rd3, but Houdini shows that Rd4 is even better. The attached file, prepared with the One-click publishing function of Chessbase12, shows the main lines. As always, the computer finds some beautiful lines.
http://www.viewchess.com/cbreader/2014/1/23/Game480045437.html
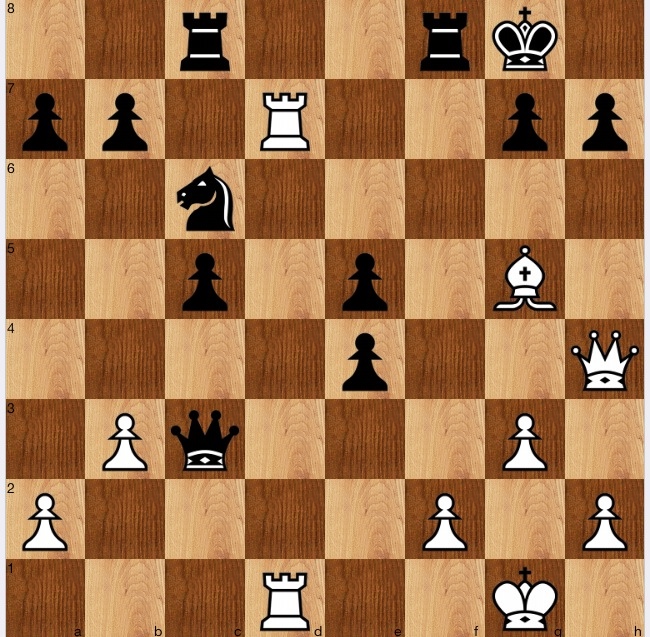
White to play and win
Solution
A calculation exercise, but not too hard. The first move is obvious, the biff 1 Rg7+, when 1…Kg7 is forced, and then 2 Rd7+. Putting a knight in the way is trivially bad, and doesn't change anything, so the only moves to look at are 2…Kg6, to check that it loses, and the probably better 2…Rf7.
So, 2…Kg6, and how to win? I sometimes find these hard, especially with bishop and queen, which can get in each other's way, but here the rook is in play too. So 3 Qh7+ Kg5[] 4 Rg7+ Kf6[] 5 Qg6 mate is in this case not too hard to find.
The better defence is 2…Rf7, and this requires some calculation. However, when you see that 3 Bh6+ forces black's king to move away from its defence of the rook, you realise it is not too hard: there is no need to look to far. 3 Bh6+ Kg8 (3…Kg6 4 Qg5 mate) 4 Qg5+ Kh8 5 Rf7 1-0.
Also, 3 Qh6+ wins, too, and this was the line I calculated: I think I have a general fault of often checking with the bigger piece (here, queen rather than bishop) and of thinking closer to the king is always good- it is better to examine all checks, and consider respective merits-but here, I was ok: 3…Kg8[] 4 Rf7 Kf7 5 Qf6+ and white is mating by force.
White to play and win (by force)
When I was solving the problem, and found Qh6+ rather than Bh6+, around here is as far as I got, but I did note that the Rc8 was LPDO and would fall after Qe6+: that, plus the fact that black had only one check, and no perpetual, gave me comfort, a 'stepping stone' to rest/end my analysis.
In fact, white has a forced mate: again, I find it not too easy to visualise. I also recall from ages ago a quote from Kasparov that Q+N combine better than Q+B, but here the Q+B does the job. 5…Kg8 6 Qe6+ Kg7 6 Bh6+ etc is one line, or 5..Ke8 6 Qe6+ Kf8 7 Bh6 mate.
White to play and win
P Aalbersberg v W Gerber 1965
Solution
There are two solutions to this problem (and more ways to win). The prosaic one is 1 Qh4 Bf6 2 Bg5+! Kg7[] 3 Qh6 mate.
The flashier one is 1 Bf8! when the best black can do is 1…Bf8 2 Qh4+ Kg7 3 Qh7 mate.
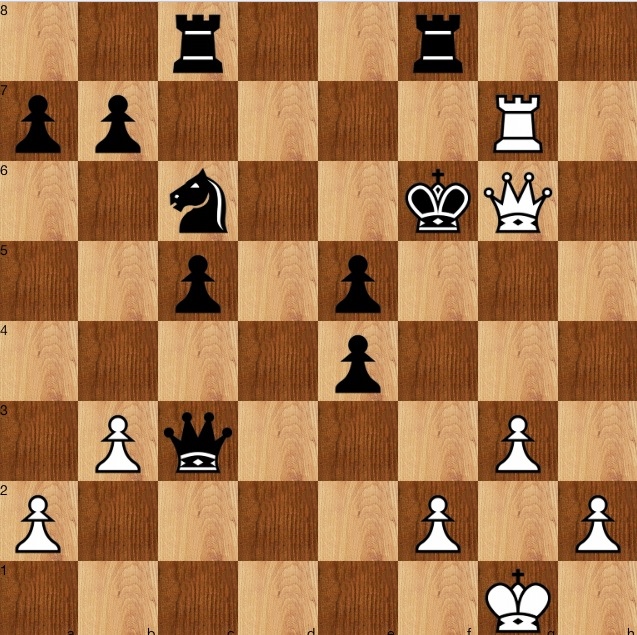
Black to play and win
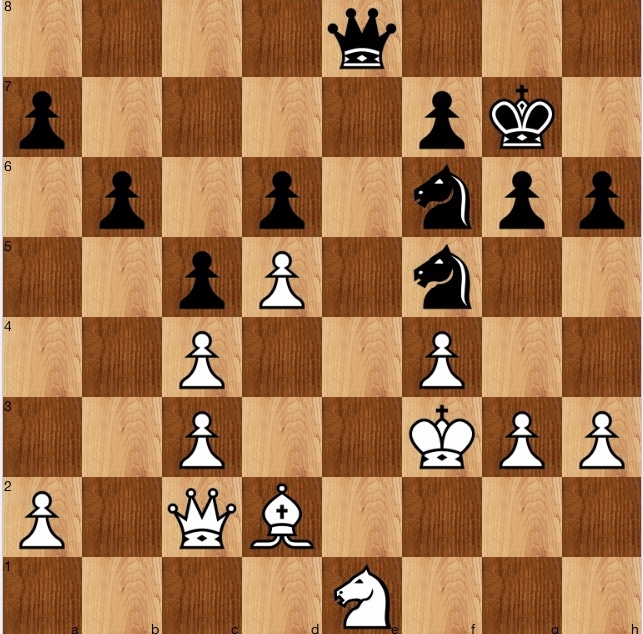
P Hills v MC Rubery1979
Solution
This is one of those positions that, where it a game, I might not even look for a tactical trick. (CJS Purdy would hate one of his readers saying this, because one of his constant mantras is to have a process, which includes the series of questions which are throughout this blog)
So, consider all biffs, and 1…Ng3! has to be looked at, and after 2 Kg3 one can see that white's king is in a bit of a net, so 1…Qe2!, with the lethal threat of Nh5+, and subsidiary threats such as Ne4+ (or Qd2 for that matter, with the fork Qd2 Ne4+).
Therefore, white can't take the knight, so black has won an important pawn, and weakened white's kingside at the same time.