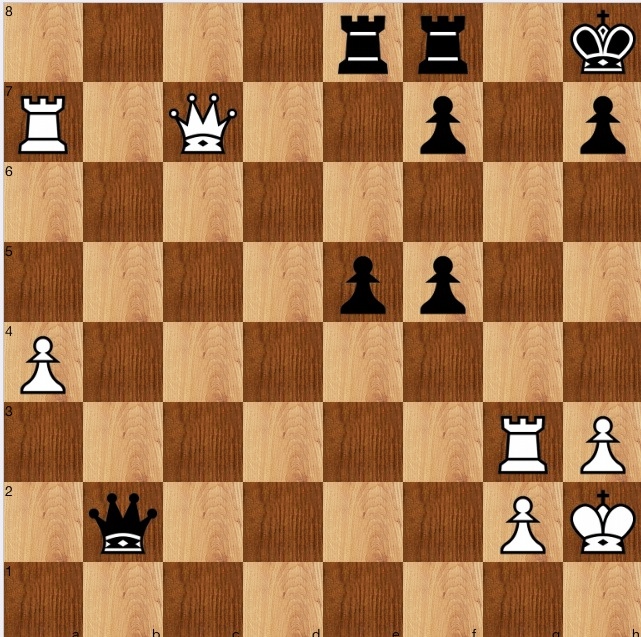
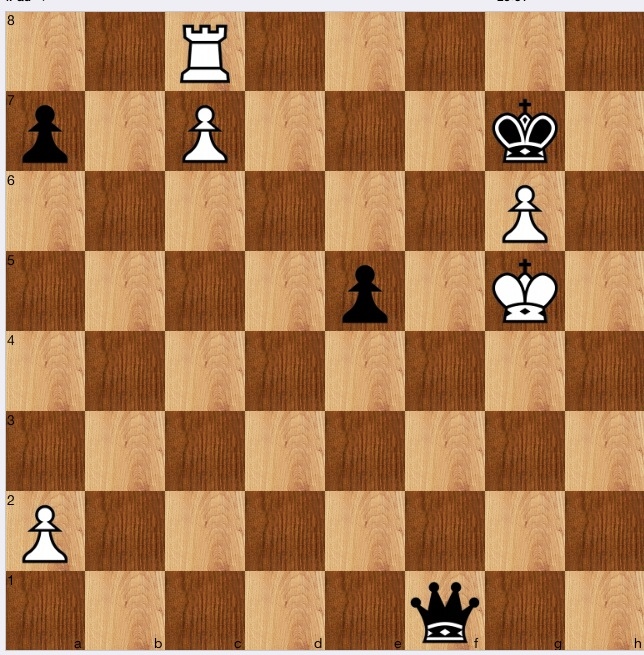
White to play and win
(a good one today, probably the best of the book so far)
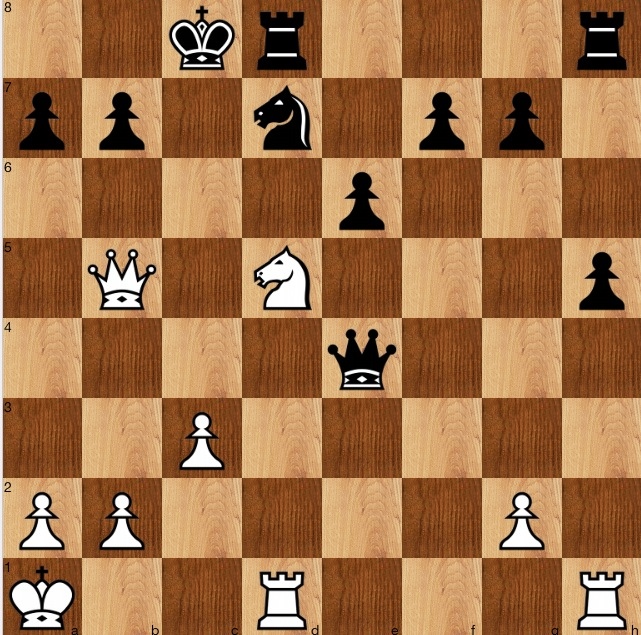
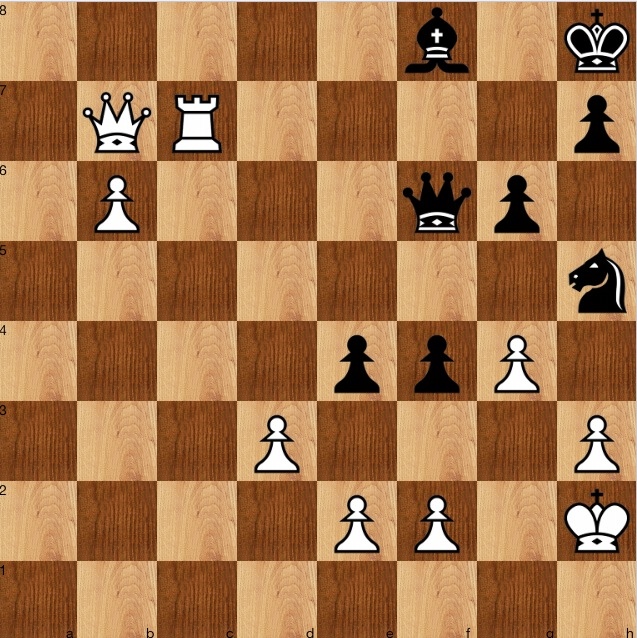
B Shipley v M De Ponte 1971
Black's last move was 0-0-0.
Solution (worth working through yourself first before reading on)
This took me a while to solve, but was a very enjoyable task.
The queen and knight aren't sufficient to win by themselves, and other than seeing and discarding Ne7+ or Qa5?, I quickly focussed on 1 Rhe1, the natural move, bringing up the cavalry [well, not quite cavalry: an elephant, perhaps]
(An irrelevant picture, just to show you can google just about anything nowadays: and to think, as a child, I always wanted, but our family never bought the multi-volume Encyclopaedia Britannica)
back to the chess
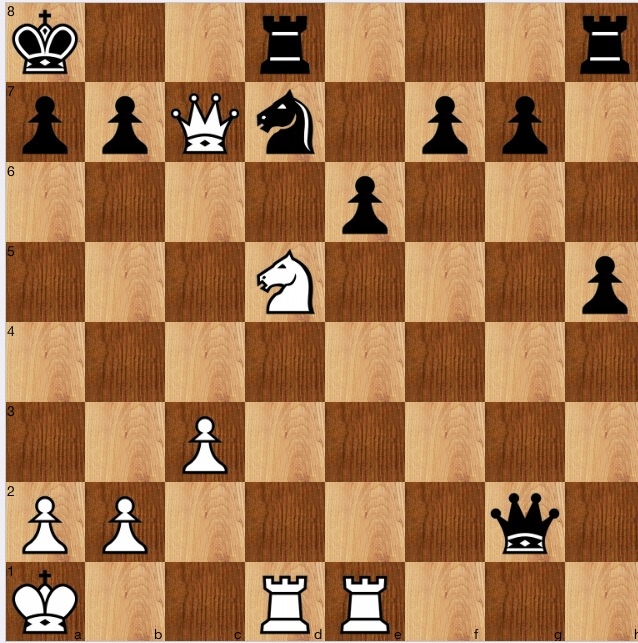
After 1 Rhe1, it can be seen that some squares are mined (1…Qf5?? 2 Ne7+; 1…Qg6?? 2 same) but the line I concentrated on was the natural capture 1…Qg2 (natural, but not the best move). Then, following Purdy's mantra of considering all biffs 2 Qc4+ Kb8[] 3 Qc7+ Ka8[], but then what?
In fact, white is losing here, but the notion of Nb6+! ab (Nb6?? Rd8+ and mate) Rd4-a4 came to mind- a back 'rank' mate.
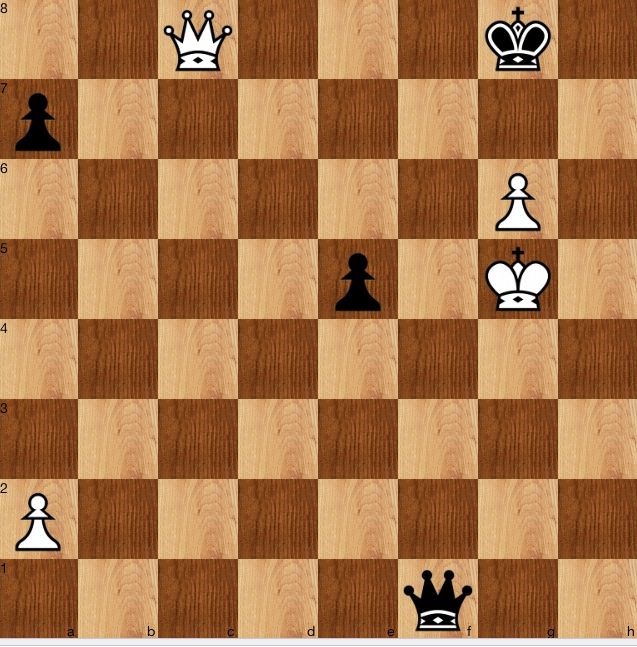
I should have been able to leap to the solution from here, but didn't. Instead, I realised that one of the functions that the Qe4 serves is to defend c4: so, 1 Rhe1 Qg4 2 Rd4 (getting the idea of bringing more pieces to the party) Qg3! (watching c7) and again it is level. However, a slight change of move order, 2 Ne7+! wins: if 2…Kb8 3 Nc6+; if 2…Kc7 3 Rd4 and now 3…Qg3 fails to the pinning 4 Red1: the small difference that the king is on c7 prevents the queen retreating to that square. As a further example of how much control white has, in the line 1 Rhe1 Qg4 2 Ne7+ Kb8 3 Nc6+, the reason it wins is that 3…Kc7 is met by 4 Nd8 Rd8 5 Qa5+! Kc8 6 Rd4 and Red1: the Rd4 prevents Qh4, defending d8, and the Qa5 prevents Qg5. Economy of forces.
However, the fact that 2 Ne7+ wins, shows that there is a need to control e7: so, 1 Rhe1 Qh4!- I think I chose g4 because on that square the queen is protected, but in this present position, that is not important. An added benefit of 1…Qh4! is that from that square, it looks at e1, so preventing the rook lift Rd4. Therefore, for instance the decoying biff 2 g3 Qg3, whilst it enables Ne7+, doesn't have any result! since the rook lift is still prevented.
All the above thoughts are quite interesting, but eventually the solution came to me. The initial biff 1 Rhe1 doesn't do much, if black responds correctly with 1…Qh4, so better the immediate rook lift 1 Rd4!.
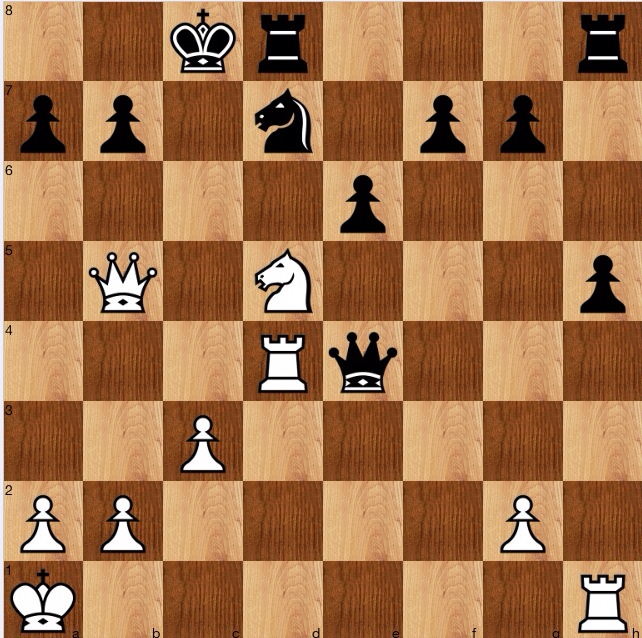
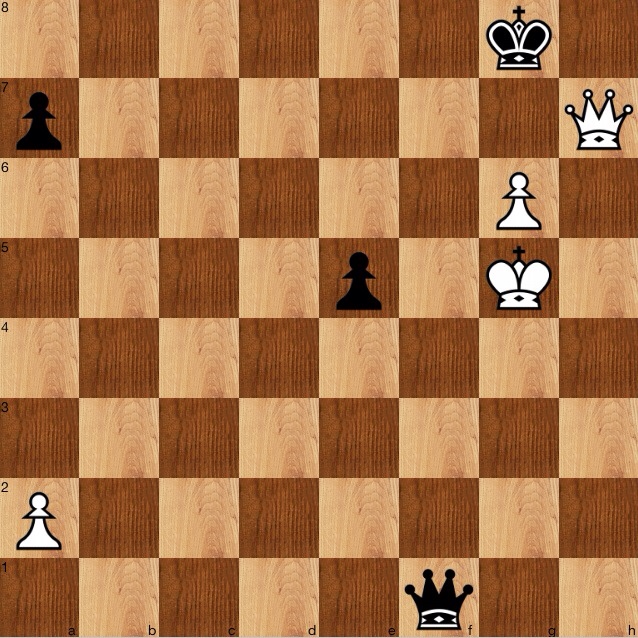
We know that f5 and g6 are mined, so the queen can't go to either of these squares (Ne7+). So, 1…Qe5 is a natural try, seeking to control c7, but 2 Ne7+ Kc7 (Kb8 is one more faster) 3 Rc4+ Kb8 4 Nc6+ 1-0. Therefore, the queen must move somewhere less useful, say 1…Qg2, when the manoeuvre we saw earlier, Qc4+_Qc7+_Nb6+_Ra4 now works.
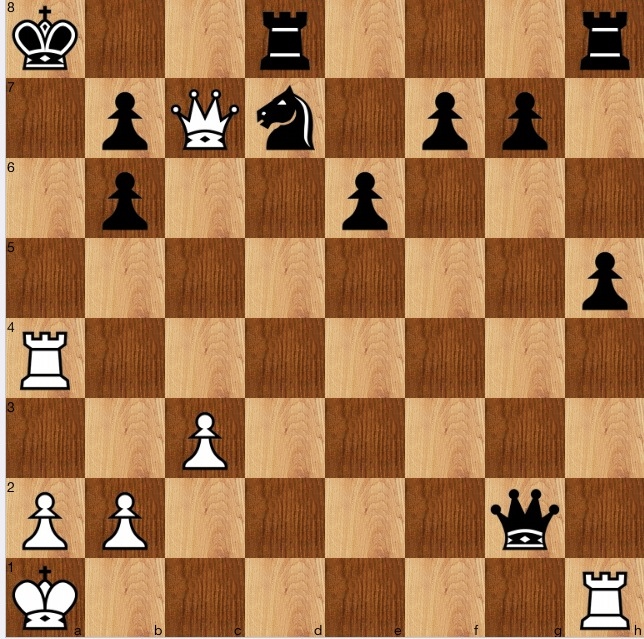
A slight fly in the ointment is that black can instead bail out with (1 Rd4) 1…ed (the biff 1…a6? doesn't work because of 2 Qc4+) 2 Re4 de 3 Qc4+ Kb8[] 4 Qf7 when white is winning, but slowly.
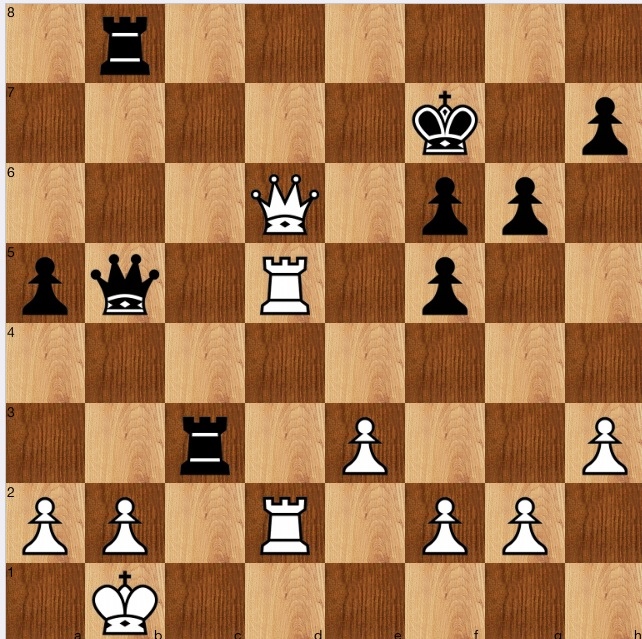
White to play and win
D Isaacson v BP Donnelly 1967
Solution
The first move is easy, 1 Rf6!. Taking with the pawn loses to Qg6+-Qh7 mate; taking with the queen struggles on but still loses after 1…Qf6 2 Rf6 Rf6 3 Qe8+ Rf8[] 4 Bc4+ picking up the bishop after 4…d5 5 Bd5+ Be6 6 Be6+: game over. The nicest one is 1…Rf6 2 Qe8+! showing that the Rf8 was tied to defending e8.
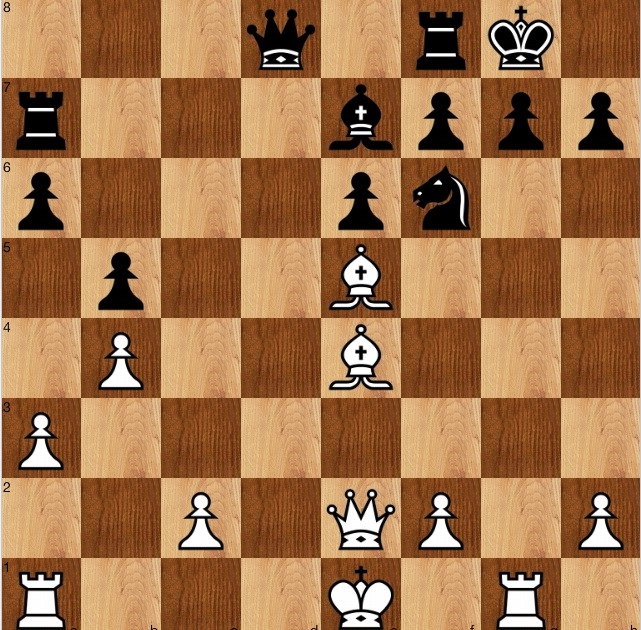
Black to play and win
W Berson v AN Rubbinsztein 1982
Solution
In a game, I can well imagine a player (for which read me) resigning as black here, since 1…Ng7 seems at first blush to be heading for a dismal defeat: strong rook and queen, pawn on the sixth. But then maybe you would notice 2 Rf7 Qd6 threatening something on the h3-c8 diagonal; or 2 Qe4 Qb6 double attacks the Rc7 and Pf2.
Knowing it is a problem, you then see motifs like pawn promotion possibilities, especially with white's queen somewhat offside, and also that after 1…f3! white's king is in a net: so, apart from threatening 2..fe and queening, black is also threatening 2…Bd6+ and Qa1 mating. White's only way to struggle on is 2 Qa7, protecting a1, but it is still trivial with 2…fe , threatening Qf2+ and Ng3 mate.
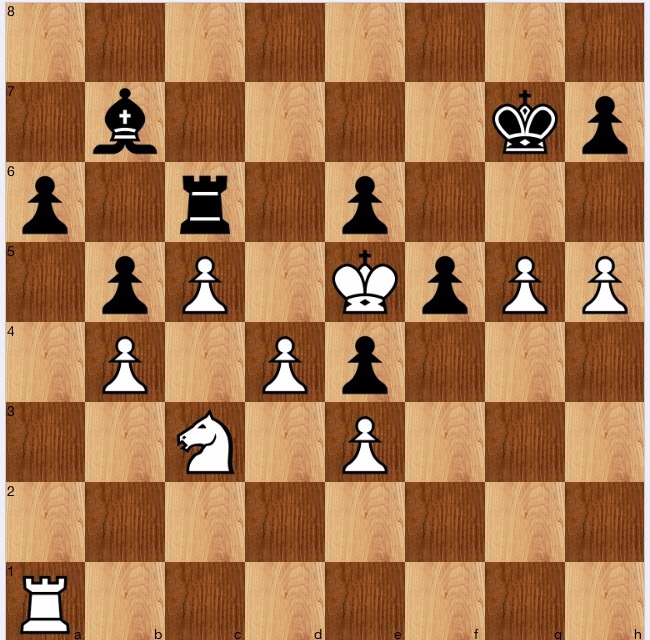
Black to play and win
FN Barnett v A Hubner 1976
Solution
This might be an 'easy' problem, and some players might find the winning move immediately, but I made hard work of it.
After trying to solve it by normal means, I add to resort to system: to examine all biffs, all threats to biff, and eventually I settled on 1…Qc4! which threatens back rank mate. Firstly, it can be seen that black's king can get a way from the checks, taking a bit of care: 2 Qd7+ Kf8! 3 Qd6+ Kg7 and then tucking itself away at h6. Secondly, 2 b3 is met by 2…R3b3+! 3 ab Qb3+! and mating (this line took me a while: I tried to make something of 2…Rc1+? 3 Kb2[] Qc3+ 4 Ka3 Rb3+! 5 ab Ra1+ 6 Ra2[] Qc1+ which does indeed 'work' but after 7 Ka4 Ra2+ 8 Kb5 the game is still on.
The final line to compute is 2 Rc1 but then the typical 2…Rb2+! mates: 3 Kb2 Rc2+ etc.
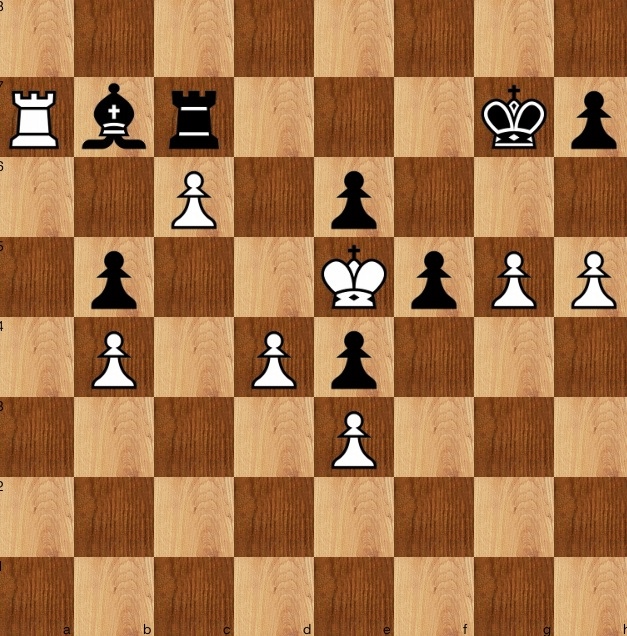
White to play and win
M Bleiden v AJA Cameron 1903
Solution
Not too hard, especially when you know it is a problem with a solution. 1 Nb5! is a fairly obvious temporary sacrifice. After 1…ab 2 Ra7 Rc7 3 d6 exploits the LPDO nature of the Rc7, and the rook ending is trivially won.
White to play and win
CCA de Villiers v P Kroon, 1971
Solution
A tougher one, today. Reitstein says that black was confident he was winning the above adjourned position, but white's sealed move was irrefutable. I mention this partly because, were it to be a game rather than a puzzle, I might have played a bland move such as a5, rather than looking for a killer blow: especially because the only winning move is a 'little' move.
1 Qc6! changes everything
Applying Purdy principles, the move could have been found: examine all biffs, and threats to biff. Here, Qc6 is a threat to biff by Qe8 (Purdy exhorts us to examine all such biffs, and not to rule them out) and a threat to biff by Qf6+.
Black's perhaps strongest reply is 1…Re6, but (applying wither of two Purdy rules: consider all biffs, or 'ignore the opponent's threat, imagine that it can't possibly be carried out, what would you like to play') then 2 Rf7! kills.
Or, black might try 1…e4, but then 2 Rf7! again: the Rf8 is 'tied' to defending the Re8, so the Pf7 is LPDO. Not that it matters, but if then say 2…Rb8, then 3 Rh7+! is a fitting finale: 3…Kh7[] 4 Qg6+ Kh8[] 5 Qh6 mate.
One of the nicest puzzles so far.
White to play and win
CP Momberg v E Fellmayr 1982
Solution
A decent exercise, with some lines to calculate.
1 Rg7+ is a fairly obvious try, and the variations are not too hard to calculate. 1…Kh8 2 Rh7+ Kg8[] then prettiest is 3 Qg4+! Ng4[] 4 Rh8 mate.
If instead 1…Kg7 then 2 Qg4+ Kh8[] 3 Qh5 (oddly, Stockfish 'prefers' Qh4, though only to the extent of one being +33, one +110: maybe my 'human' move, of bringing the queen closer to the king, is indeed 'weaker': why out the queen in a square that it can be taken (albeit there is a pin) and also on h4, the queen adds pressure to the Nf6) with the pretty point (which I missed at first, trying instead Qg5+/Qh6) of 3…Kg7 4 Qh7 mate.
Note that 3 Bf6+ (which I tried first, aiming for Qh5) loses, to 3…Bf6 4 Qh5 Bc3+, which then gives the tempo for 5…f5.
Introduction
A few years back, my younger daughter gave me a present, ‘Dear Dad, from you to me’ , one of those gift shop gifts which are very well intentionedy, but, alas, time is so short that they can often gather dust and never be completed. I decided a while ago that I wouldn’t let this happen, and would aim to complete it for Sophie, Alice and Tom, so whenever they want to, they could find out a bit more about their Dad. So, I have set up a private blog, to which only family have access, and have been posting to it since our summer 2013 holidays. Many of these postings are personal, and best kept private for the family only, but those which are less private will also be posted on my main blog.
White to play and win

J Gluckman v S Steel, 1987
Solution
I find rook and pawn endings difficult to calculate. Perhaps it is because the open board means there are too many possibilities. Here, the first two moves are obvious, what I found hard was to visualise to the end. Eventually I got there: 1 Rh7+ Kg8 ( Kf8 is similar- 2 Rh8+) 2Rd7 f2 2 Rc8 f1(Q) 3 Rg8+! Kg8[] 4 c8(Q)+.
The above was as far as I could visualise from the initial position: 'might be a win' and 'can't be losing' were my assessments. In fact, with this position on the board, it can be seen to be winning. One particular point is 4…Qf8 5 Qe6+ Kg7 (Kh8 6 Qh3+! and 7 Qh7 mate) 6 Qd7+! planning 7 Qh7 mate. So black is forced to play 4…Kg7 when white checks the queen closer, than plays Qh7+, then the pawn promotes.
A good exercise.
Black to play and win
FJM Rodrigues v CCA de Villiers
Solution
Straightforward, with the back rank mate threat. 1…Rf5!, and all white can do is decide how to struggle on, for instance with R3d1 or Rg1, when there is nothing immediate for black, but it is 0-1. If 2 Qd1 then 2…Rf1+ 3 Qf1 Qd3! is game over.
