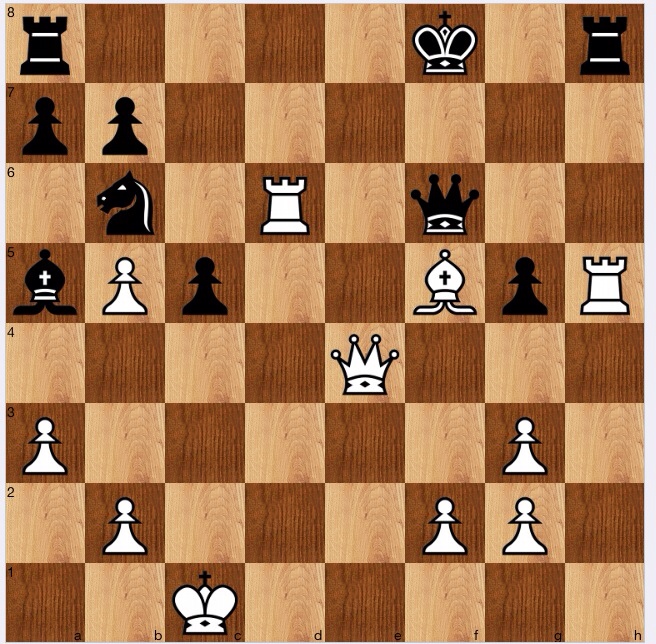
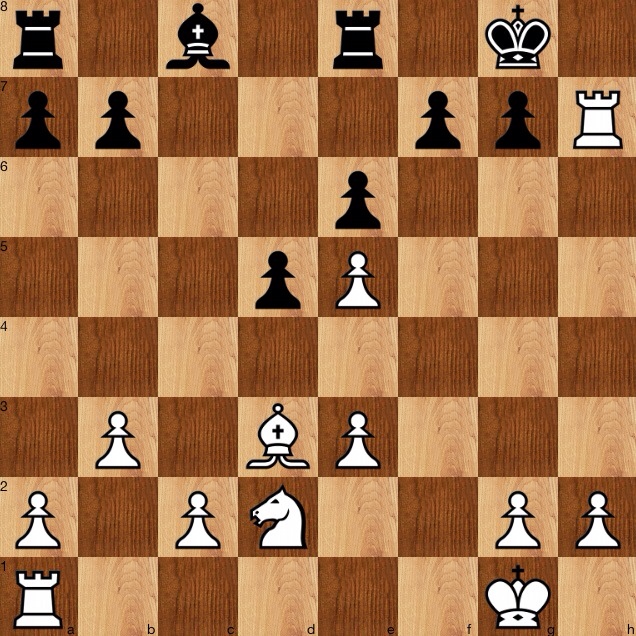
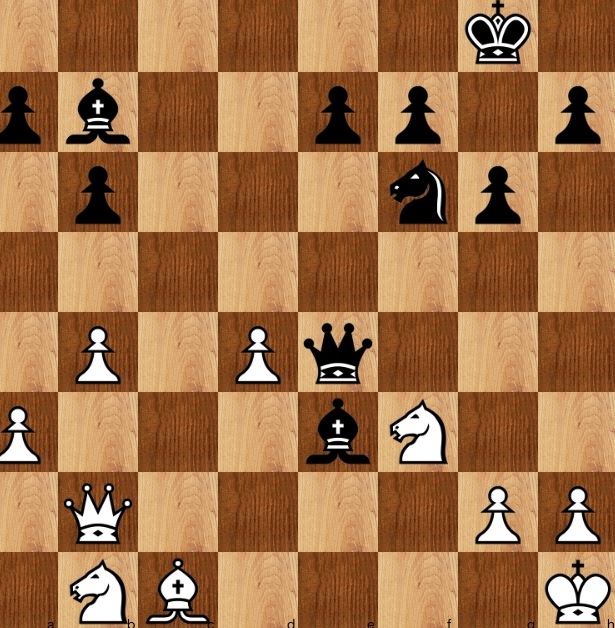
Black to play and win
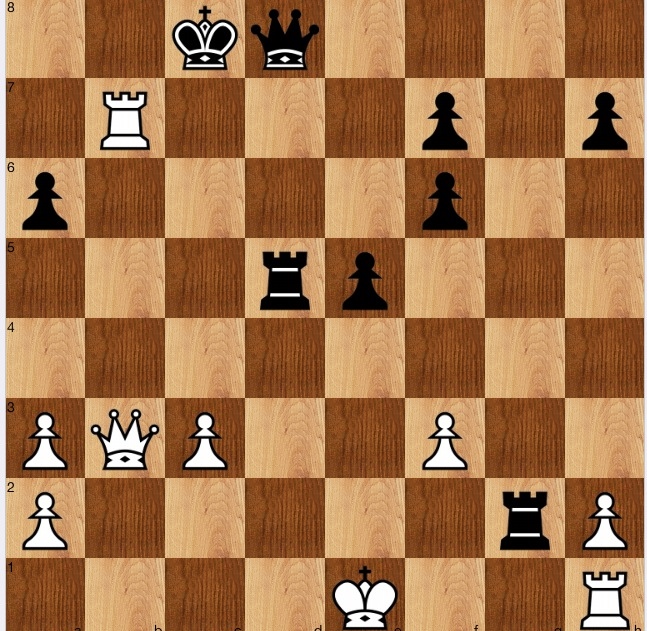
White's last move was Rb4*b7; how does black defeat it?
Solution
The solution is easy if you see it- I saw it immediately- or hard: if the latter, Purdy's maxim to examine all biffs again comes to the rescue, with 1…Rb5! having the main purpose of freeing the way for Qd2+, mating.
Another way of seeing it, perhaps, is to apply another of his maxims, to examine all jump checks or jump biffs. I have normally taken that maxim to mean jumping over an enemy piece, but I guess could equally apply to jumping over one of your own pieces: here the jump check Qd8-d2 would then be seen, and from there, the notion of clearing the d line would emerge.
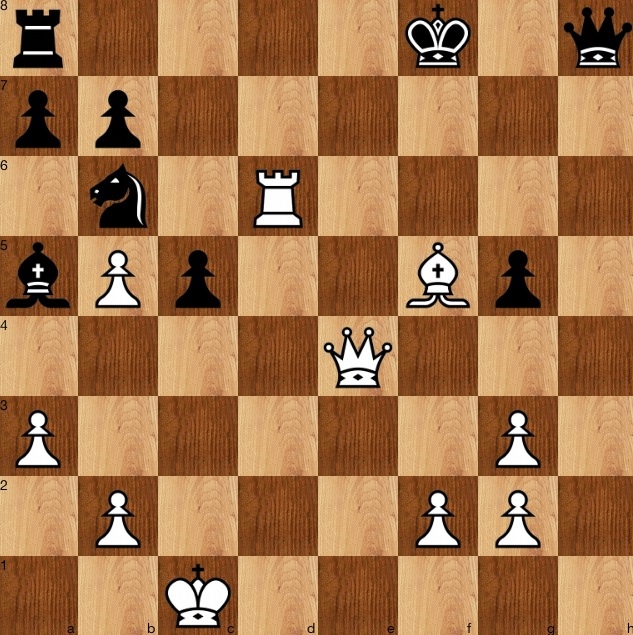
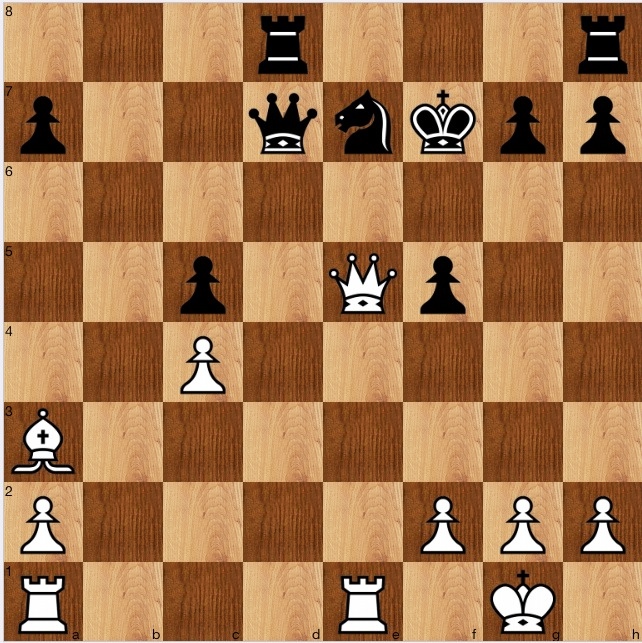
Yesterday's victory by Sergey Karjakin against Loek van Wely intrigued me. Was the endgame a draw, as I suspect, and if so where did Loek go wrong; or, was it always a win, further evidence of the fact that I have never done what I should have, namely never studied rook endgames (or that matter, endgames).
My excuses are (i) never having had a trainer (ii) being born in England, and thus a product of the English school of chess, which mainly comprises the Grand Prix attack, the Trompovsky, and 1…a6 or 1…b5; create a mess, and hope to win, and if you are losing, aim for a swindle, and if you lose, put it down to a rubbish opening. So who needs to study endgames?
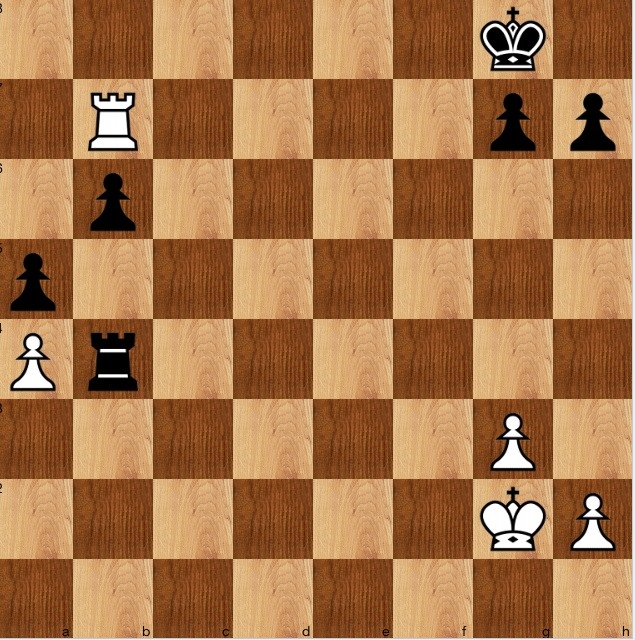
Black to play
I am blogging this now, before having made much of an attempt to understand the position, because otherwise I won't have much chance. My day had been planned out: we came home early from a night out so that I could have an early start, taking my son back to Oxford University, for the start of term. Perfect: I could be back, after a six hour or so round trip, during daylight, and more importantly, to watch the last hour or so of action on Playchess from Wijk aan zee. But, alas, said son stayed out far later than he had planned with his mates, and woke up post planned departure time, announcing he'd rather go after lunch.
This is one of those moments where parents must bite their lips, and count the positives: at least he will be home with us for a few more hours.
Back to the game, and whilst I haven't got much understanding, since I lack a basic understanding of the endgames (would rook+a+b vs rook be a win- hunch, probably, because of where white's king is) I have used the excellent web publishing facility of Chessbase12, which I recently acquired, to publish my present analysis. Readers of this blog might wish to try to answer for themselves some of the questions I have set myself to attempt to answer.
http://www.viewchess.com/cbreader/2014/1/12/Game744847828.html
Back to son now: just time to bake him a Swiss roll, and hide it in his luggage, before our travels. In reality, I am glad he is with us a few more hours.
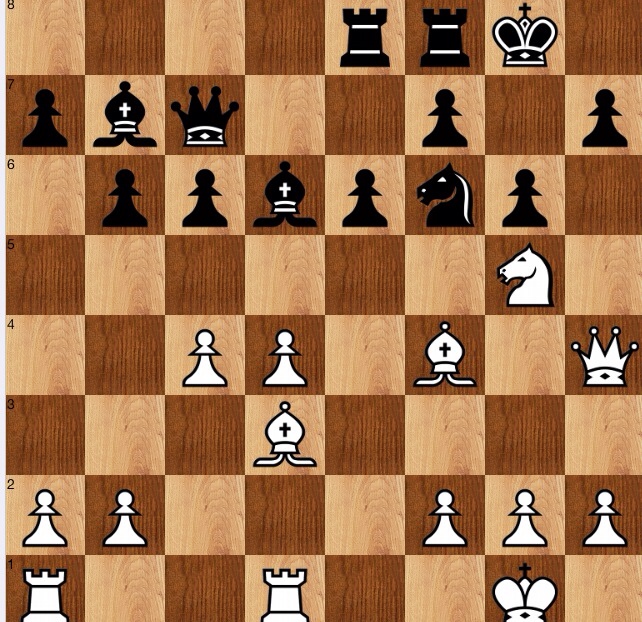
White to play and win
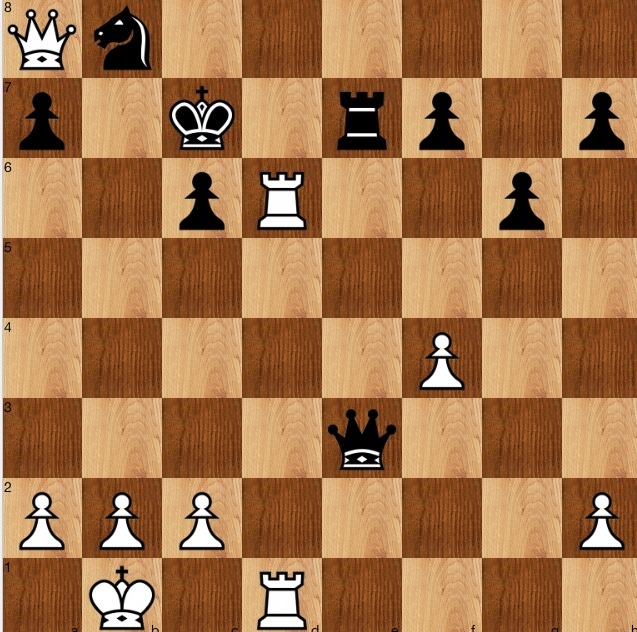
P Kroon v P Samak, 1971
Solution
This one took me a while. How to get the queen out? Then I realised:
- The b7 square is a weakness for black
- The blackqueen is tied to defending the a7 pawn.
So, biff the black queen by 1 R6d3!, and if it moves off the g1-a7 diagonal, take on a7; and if it moves say to c5, then Rb3! frees the queen. Finally, the queen is also freed after 1…Rd7 2 Rd7+ Nd7 and say 3 Qh8.
Today is the first round of the annual Tata Steel tournament, and whilst I have principally been watching the top games (a great day, with yet another rook and pawn endgame for me to study as Karjakin outplayed van Wely [i hope Alex Baburin or Karsten Müller explain it], and a mystifying victory by Caruana over Gelfand- mystifying in the sense that I hadn't a clue what was going on), the game Goudriaan-Zhao Xue was entertaining. As I write this blog, black has just won, with an endgame mate, but I think Goudriaan could have won much earlier.
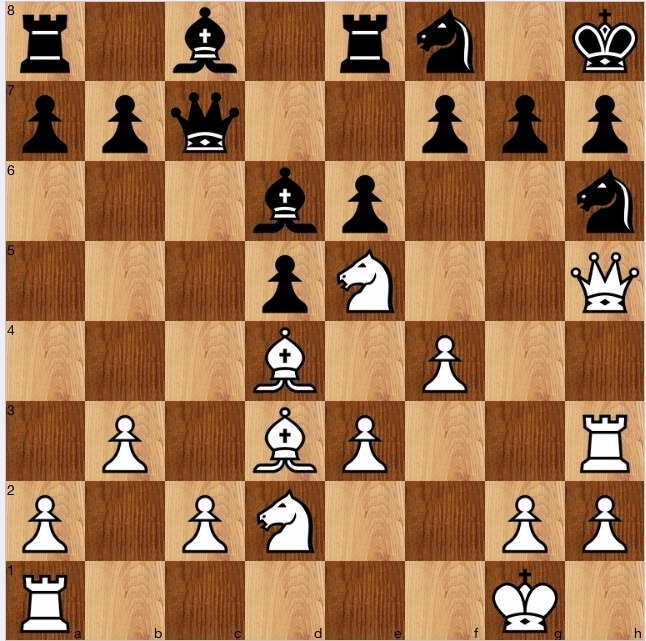
White to play and win
Solution
White played 1 Be6, and the game went on. However, 1 Ng5! is far stronger. If black doesn't take, then white is just a pawn up with a menacing knight, so 1…hg 2 Rd6!, exploiting the fact that the Qf6 is tied to the Rh8.
Then, 2…Qg7 3 Rh8+ Qh8:
This was the limit of what I could visualise, and I thought 4 Bg6 would be strong, preventing Re8: and with three pieces in the attack, I thought white would have something. I also, when appraising 1 Ng5, thought 4 Qb7 might be a bale out.
When I entered this into Stockfish, it immediately said 4 Bh3!! is +7, and playing a few possible defences reveals that this is so. If black defends with 4…Re8, white checks away, picking up the g5 pawn, and black's king can't flee to the queen side, especially via white squares, because of discovered checks on the h3-c8 diagonal. 4…Re8 5 Qf5+ Ke7 6 Re6+ Kd8 7 Qg5+ Kc7 8 Qf4+ and the checks to go on and on. My 4 Bg6 is also shown as +3, but I can now see that the g6 square is needed for a major piece, whilst 4 Qb7? is said to be equal- whether it is, I don't know.
Finally, there is nothing special on 4 Bh3!!: Stockfish says 4 Bg4!! is just as good, and perhaps it is even better: maybe in some lines the bishop can check on h5.
The game, with my brief comments is here, posted with the One-click facility of Chessbase 12.
http://www.viewchess.com/cbreader/2014/1/11/Game689994546.html
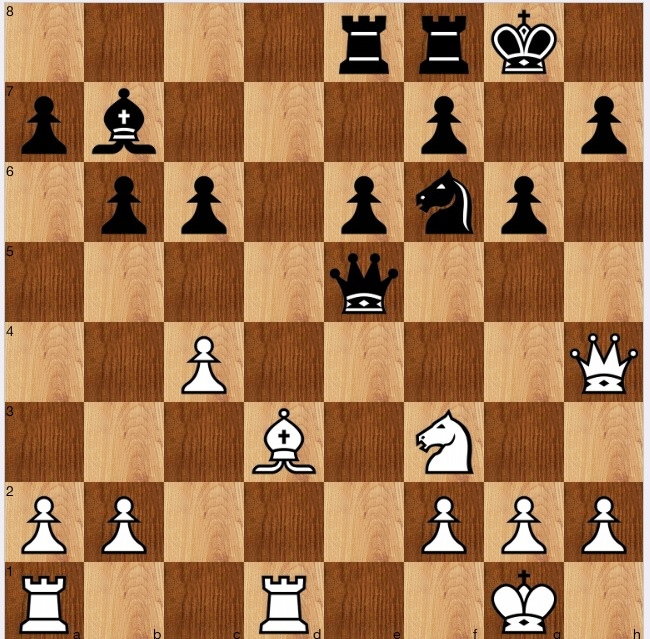
White to play and win
Solution
Not too hard, but a bit of calculation needed. 1 Qh6! with the main idea being 1…gh 2 Nf7+ Kg8 3 Nh6 mate.
It is somewhat harder to calculate the effect of declining the Q, with 1..Be5, though not too hard to see white still wins, for instance by 2 Be5 Qe5 3 Qh7+! and white emerges a piece up.
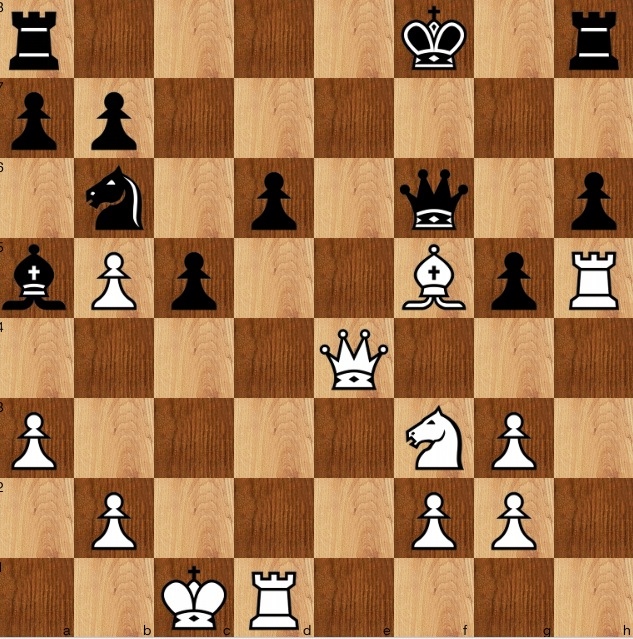
White to play and win
A difficult one- took me a long while (*) to solve it, but was pleased when I did. (**)
M Foisor v V Bianco, Hastings 2013
Solution
This was for me, a toughie. I saw it in Chess Today (issue 4,801). I would say that three quarters of the Test Yourself! puzzles in Chess Today I solve more or less instantly; half of the rest, after the standard English unit of time (the time it takes to make a cup of tea); some of the remainder I think I have solved, but then the solution proves I have made a total error, or missed a nicer win; and the balance are fiendish. This one took a whole dog walk to solve.
I had to go through step by step, using the Purdy principles, plus some of my other favourite techniques, such as John Nunn's LPDO (loose pieces drop off). These analyses resulted in:
- Nf6 is a LPDO, but alas, no easy way to exploit it;
- All biffs examined, including noting c5 bc dc, with the Bd6 pinned by the Bf4 to the queen;
- Noting that if Bd6 Qd6, the Bb7 is then another LPDO
- The Nf6 is tied to the defence of the h7 square
- Jump checks and jump biffs noted, and in particular the jump check Bh7+, which would be relevant if the g6 pawn were to move
- (Not a Purdy technique, but Aagaard's 'bringing all pieces to the party') Rook lifts didn't seem fast enough, with black ready to push Pe6-e5.
- Biffs and threats to biff: from here, the solution started. 1 Be5! biffs the LPDO Nf6. If 1…Nh5 then 2 Qh5! and as noted above, if 2…gh 3 Bh7 is not just check, but mate. So 1…Be5 is forced, when 2 de Qe5 (2…Nh5 3 g4 is a bit messy, but white must be winning) and the key move is then to biff the Q, 3 Nf3! Once this is seen, you are on the home straight in terms of analysis. The Qe5 is tied to defending the Nf6, but after 3…Qb2 4 Rb1 Qc3 5 Rb3 it must leave the diagonal.
But (**) that is not everything. Instead of 4…Qc3, black can play 4…Qa2 and at least acquires another pawn for his knight.
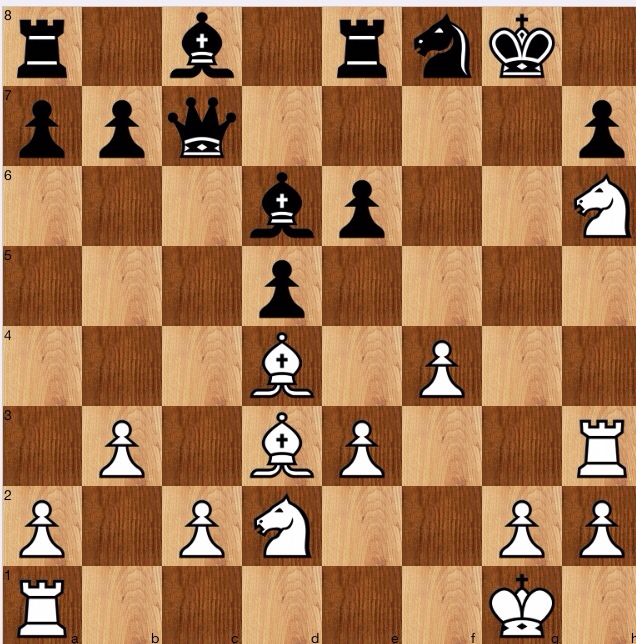
Is this a win?
Position after 5 Qf6
This position was actually reached in the game, and white did indeed win: he managed to win the a7 pawn, after which it was a mop up. Yes, white is winning, but it is the type of position that I sometimes let slip away: I wouldn't be confident of Beardsworth 1-0 Carlsen from this position.
Recap
The main problem is very nice: and the methodology worked, for me. Whether it would work in a practical game I am not so sure: I might have played 1 Be3 or 1 Bd2, and the game would go on, for instance with 1…e5.
Black to play and win
Solution
A rest day, today. 1..Qf3! is fairly obvious (it is isn't, following CJS Purdy's maxim to examine all biffs would have found it- there are five biffs, Bd4, Qd4, Qb1, Bc1 and Qf3)
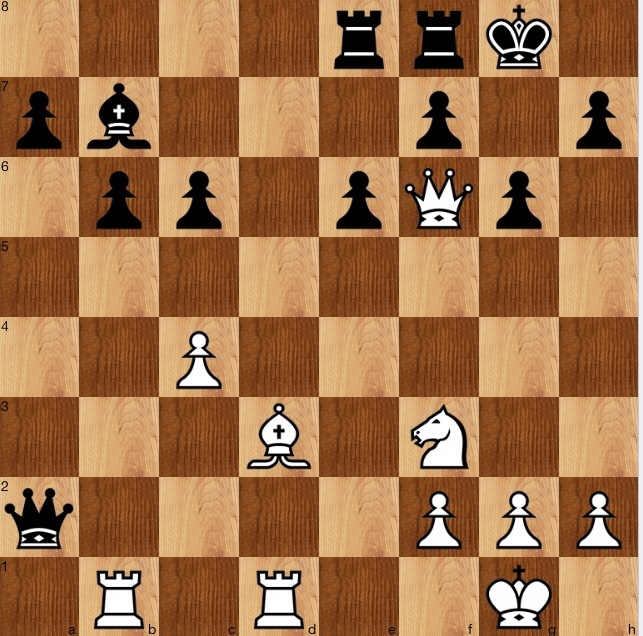
White to play and win
G de Villiers v A van Tets, Pretoria 1972
Solution
The motif is overload: the Qd7 is tied both to protecting the Ne7 and e6. So, 1 Rad1! is a natural attempt, and after a bit of calculation can be seen to succeed. 1…Qd1 2 Qe6+! Kf8 3 Qe7+ Kg8 4 Qe6+! Kf8 5 Bc5+ mates. The above is all Reitstein gives, but Black has a somewhat tougher defence, 1…Qb7.
After 1…Qb7, my solution was 2 Bc5, which wins easily enough, but Stockfish much prefers the evil move 2 Bb2 which piles on the pressure. It is quite instructive to try to get some understanding of why Bb2 is so good, and I think it is down to 'piling on the pressure'. The threat to g7 can't be met by 2…Rgh8, since that rook is tied to defending the Rd8; so e.g 2…Rdg8, when 3 Qe6+ Ke8[] (Kf8 4 Rd7) when 4 Bc3! with the idea of Ba5 and Rd8 are very cruel.
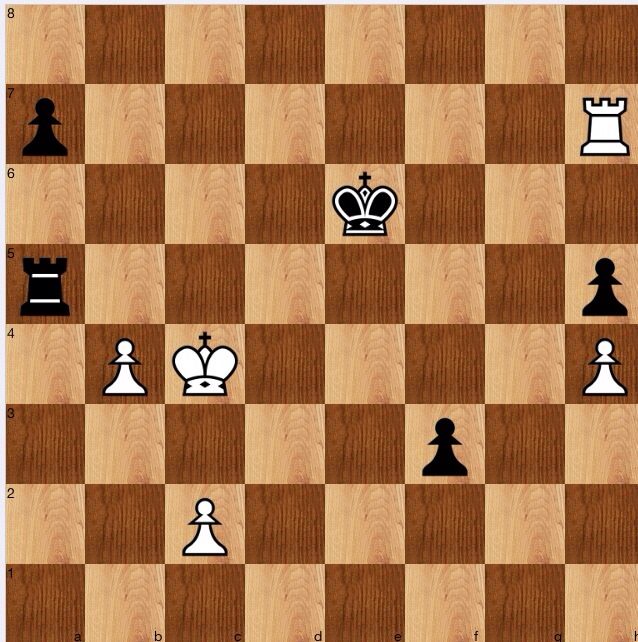
Black to play and win

White has just played 1 b4.
Worth spending some time on.
HE Price v J Tsalicolgou, SA Championship, 1975
Solution
One of Purdy's maxims is to ignore threats, and consider at least for a moment what your preferences would be if the threat could not possibly be executed.
Applying this approach, the solution 1…f3!, becomes apparent. White hasn't time to both capture the rook and bring his rook to the f file. So 0-1; one line being 2 Rh8 f2 3 Rf8 Rf5.
Or so I thought. Or so Reitstein thought. But wrongly.
If you thought the same, have another look before reading on.
Position after 1...f3
Having drafted the blog, and checked the answer – very brief, just 1…f3! and a few words, I loaded the position into Stockfish and was amazed to find -0.8. But so it is: or at least, it is not a simple 0-1. White has 2 Rh6+! when 2…Kf7 is forced: 2…Ke5?? 3 Rh5+ skewers the rook and gets to a1 in time; 2…Ke7 is a repetition after 3 Rh7+. So (2…Kf7) 3 Rd6! and white gets back in time after both 3…f2 4 Rd1 or the better 3..Rf5! 4 Rd1 Ke6! (using the trick 5 Kd3 Rd5+ 0-1- the king can't go to e2 because of the Pf3- to advance with tempo). We have a rook ending which could well be won for black, but there are still moves to be played.
White to play and win

CCA de Villiers v MC Rubery, Cape Town 1981
Solution
A bit of thought needed for this one, in the sense of finding the most precise method of exploiting the bind. When one sees that black's only (but limited) hope is to advance the a and b pawns, the idea of 1 Be1! comes to mind, and then the are also ideas such as 1…a5 2 Ba5! exploiting the fact that the Ra8 is tied to the defence of the Bc8. Finally, ideas such as h4 and Bb4 come into view, with a mating net: the precise follow up dependent on how black tries to defend, but it is hopeless for him.
