White to play and win
Solution
Not too hard today: a quick examination of 1 ef+ Bf7 shows that then the Bf7 is pinned, so isn't defending e8, so the Rc8 is tied to the first rank. So the tactic 1 Qc7! becomes apparent, so that if the Q is taken, then 2 ef+ Bf7 3 Re8 is mate. Instead, black has to play something like 1…Ra8 when it is all over after Qb7 and a few more moves. Only a little care is needed to stop black getting a perpetual check.
As it turns out, 1 ef+ also wins, h/t to Houdini, as the attached analysis shows.

Black to play and win
Solution
Fairly straightforward today. 1…Bf2+ is obvious and is about the only first move to consider (though 1…Nf2?? and 1…Qe1?? were also examined) when white has the choice of grovelling with 2 Kh1 or taking the bishop when there is a bit to calculate.
2. Rf2 Qe1+ 3 Rf1 (3 Nf1 Qf2+ and mate next move) Qe3+ setting up the standard smothered mate structure. So white must take the knight, and it is game over.
White to play and win
If black plays 1…Kg8, how does white win?
Solution
This is the end of the main variation (see my previous blog, on puzzle 234 itself: 3…Re4! 4 Ne4, when 4…Ne5 is equal). If 4…Kg8 then 5 Nf6+!! (Purdy: examine all biffs) and if the knight isn't captured, then the LPDO Bd5 drops off. So 5…gf[] 6 Bf6 and mate follows….the rook lift Rh3 happens if necessary.
Very nice.
White to play and win
(Worth spending time on, even though it is cooked: it is still a useful exercise).
Solution
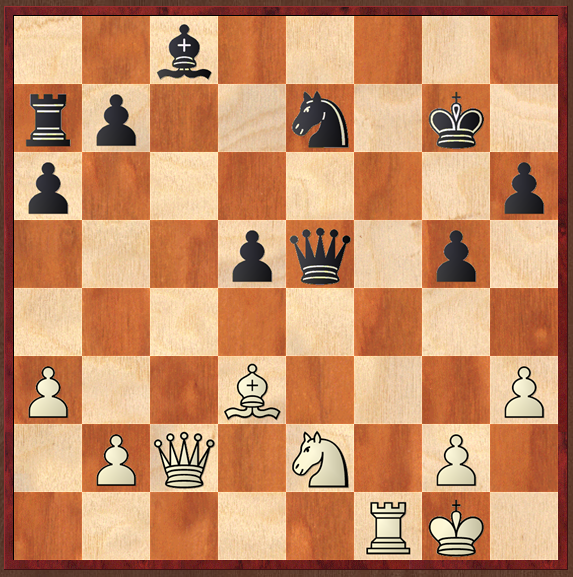
I enjoyed this one spending considerable time on it. My thinking technique was not great, though. The obvious moves are 1 Bh7+! Kh8[] ( 1…Kf8? 2 Ne6+ Re6 3 Rd5 +-) 2 Rd5! Bd5 [] but then what? I tidied various moves, non were sufficient, so went back to move one, tried alternatives (none are any good), went back to 1 Bh7+ 2 Rd5, again saw nothing, wondered whether to give up, decided I mustn't, left it a while, tried 1 Bh7+ 2 Rd5 again, and then decided to set the pieces out of the board, set a clock running, and try to solve it.
Eventually I saw that after Kh8, the Ph6 is LPDO- the g7 pawn is pinned, and rather than try to attack g7, as I had been doing, I should instead try to get Qh6+! in: but how?
I found 3 Bg6!, which is cute, but insufficient (it is level) as is the prosaic 3 Bd3, eventually settling on the slightly more forcing 3 Be4!.
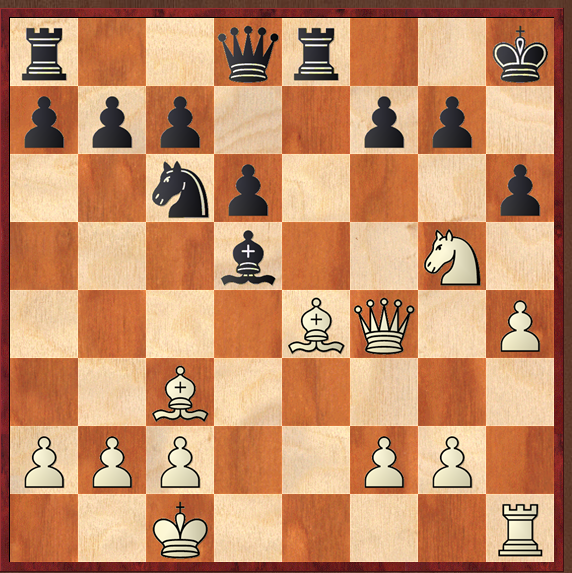
Several moves here lose for black, but the 'obvious' exchange sac 3…Re4! holds the balance. Once my time was up, I looked at the solution, and found that Steinitz played 3…f6? losing: Cordingley gives 3…Re4! as better, so he too knew the problem was cooked. Disappointing.
White to play and win
Solution
Not too hard, but not easy either, since there are several lines to calculate. I was torn between 1 Nd6+! And 1 Qd6!, and chose the flashier, but I felt they were equivalent! and they were. In the game, white chose the flashier, but then missed a hard to see mate in 2, instead playing the obvious mate in 3. Of course, Houdini, not I, find the mate in 2.
Mate in 2
White to play and win

Solution
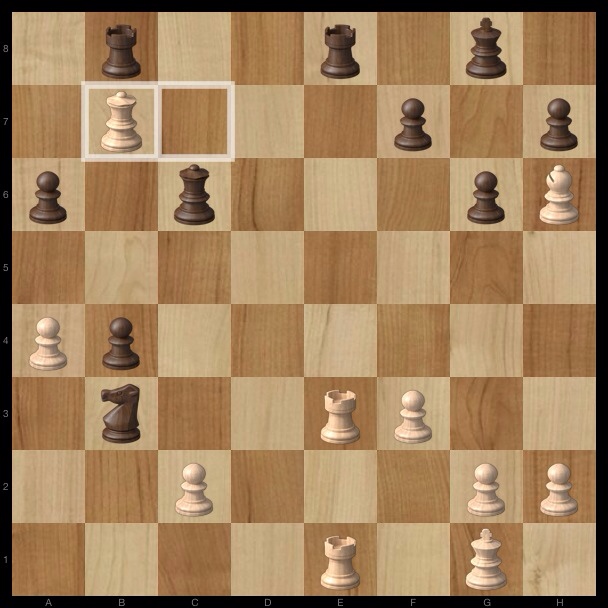
Anyone who has played open Sicilians will immediately think of 1 Bb5+! ( my teenage devouring of Sacrifices in the Sicilian, the Batsford book by David Levy, pays dividends) when 1…ab 2 Nb5+ Qany 3 Nd6+ Qd6[] 4ed looks over powering.
Black can defend however by 4 … Nfd7 but it doesn't take long to see that 5 Ne4 Qany 6 de is very strong: the threat of Nd6+ Nb7 overloads the queen- it can't defend both the Bb7 and the Ne5, so 1-0.
I think in modern practice black might defend more stubbornly with 1…Kf8, though 2 ed Nd5 3 Be5 should be sufficient – black can pin the Nd4 with Rd8, but white has time to defend with c3 if needed, or can move away.
A nice enough puzzle: the first move isn't challenging, but seeing it through to conclusion is a good exercise. I suspect also that 1 ed might be equivalent or similar; and that Houdini might find further depths.
White to play and win
Cordingley, unusually, asks a further question: how does white meet the threat of Nf4+?
Solution
Fairly trivial this one, especially given it is puzzle; but even if it weren't, black's dire threats calls for desperate measures, and following Purdy's maxim to consider all biffs, 1 Qg7+! comes to mind, when 1…Ng7[] 2 Nf6+ leads either to overwhelming advantage after 2…Qf6, or mate after 2…Kf8 3 Ba3+ Bc5 4Bc5 mate, or 2…Kh8 3 Rc8+ Ne8[] 4 Re8+ Kg7[] 5 Rg8 mate.
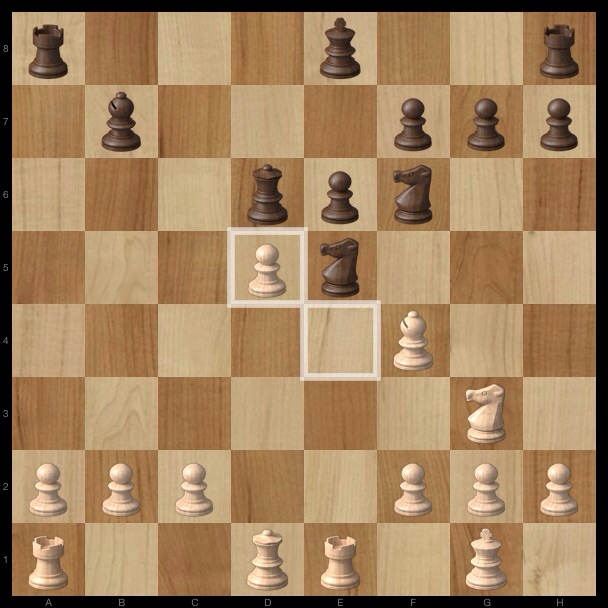
After 2...Kf8
After 2...Kh8
Alas, the game score (Wolfgang Weil v Constantin Raina, Munich Olympiad 1936) is neither in Megabase 2012 nor could I find it at chessgames.com or elsewhere on the Internet.
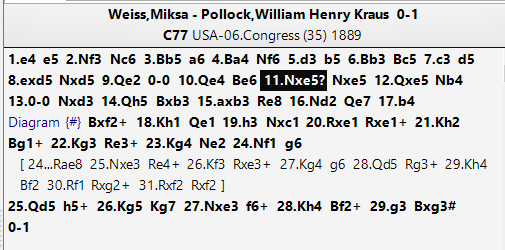
White to play and win
(One not to spend much time on: it is cooked)
Solution
I spent a good while on this one, trying to make 1 Bh7+ work, but failing, then trying to make 1 f4 work, but finding nothing convincing.
In a game I met give up and play 1 Nf3 and think I was worse. In fact, Houdini surprises me by suggesting white is somewhat better- if black advances f6-f5, Houdini isn't worried (I wish I had his nerves of silicon) and in one or two trial lines I worked on, Houdini manages to exploit the weakness on e5.
However, knowing it is a puzzle, I plumped for 1 f4, which isn't bad, but in fact black can defend better than in the game. One of the stark lessons from all these Cordingley exercises is that defence is so often imperfect- I knew this anyway, but this series of exercises has confirmed that.
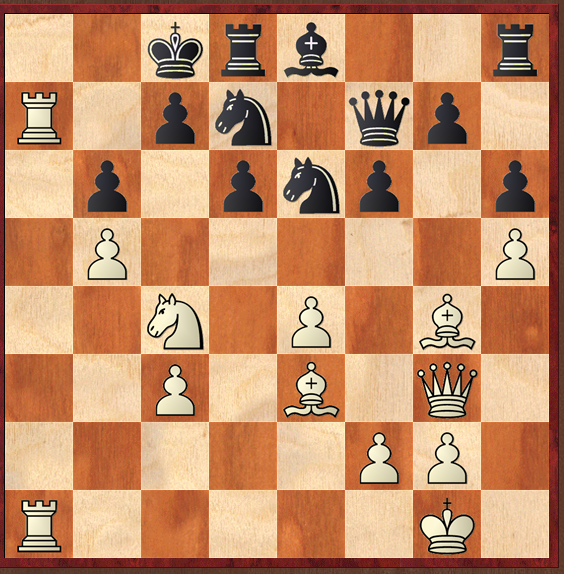
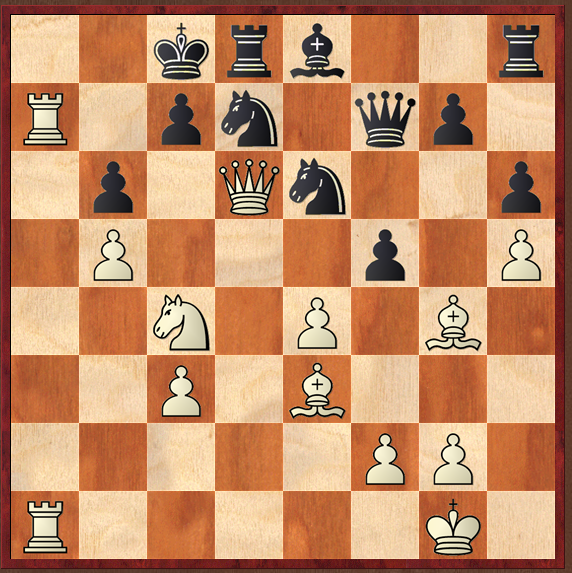
A fairly forced line gets to the position below, where 1…d4! holds the balance: it frees black's queen up from defending c3, by preventing Qc3+.
I should also add that black isn't compelled to take the knight on his first move. Instead, the surprising but nice 1…Nf5! forces simplication to a defendable endgame.
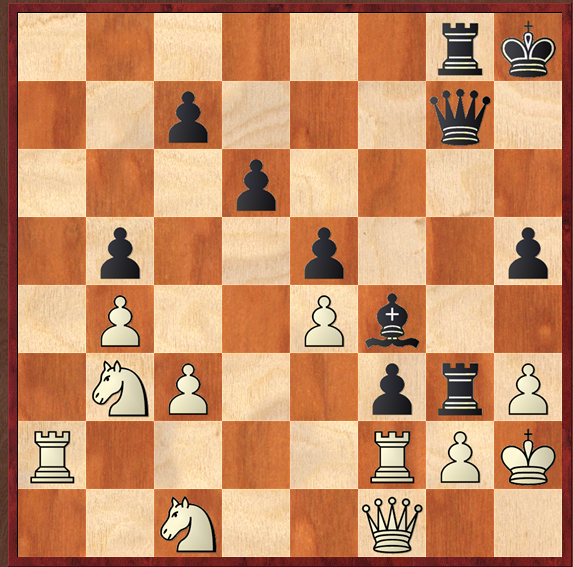
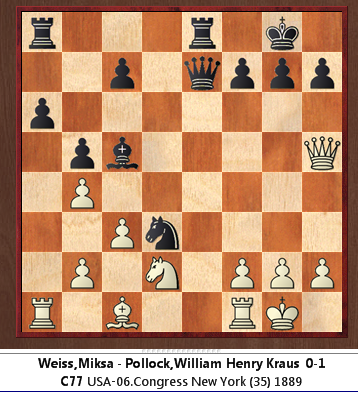
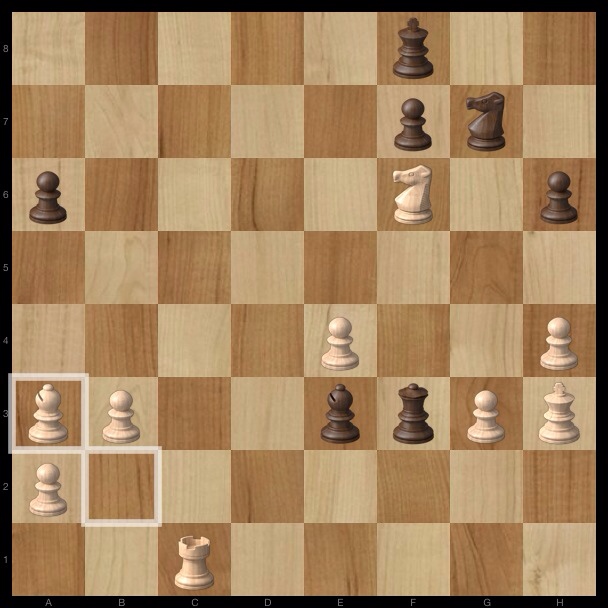
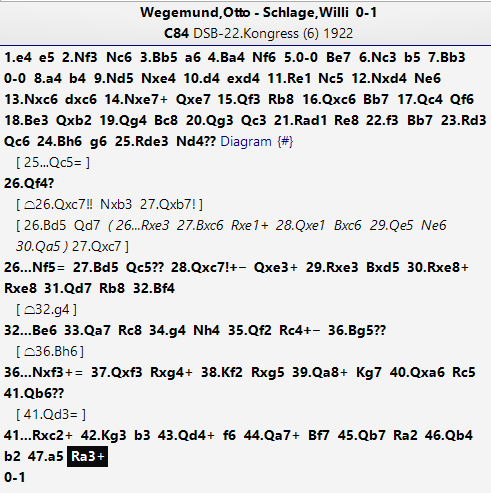
White to play and win
Solution
Clearly, the main task is to exploit the threat of back rank mate; and very quickly I started to look at ways of decoying the Qc6 from its function of defending the Re8.
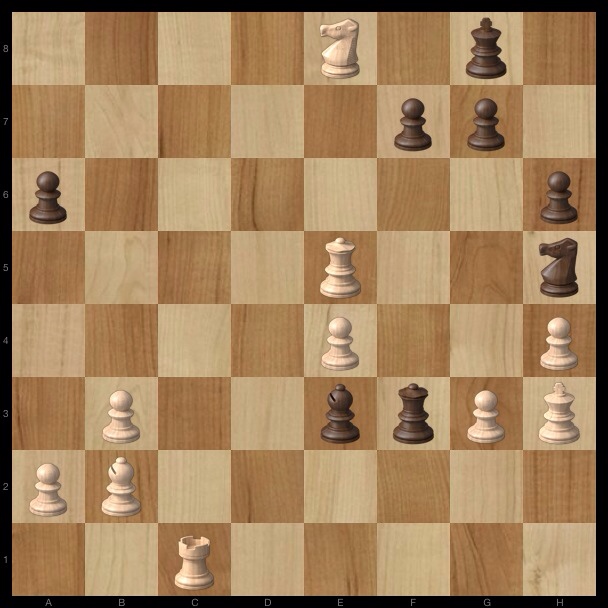
The move I first thought of was 1 Bd5, which is good enough to give white a sizeable advantage: 1…Re3 2 Bc6 Re1+ 3 Qe1 Bc6 4 Qe5 Ne6[] when objectively white is winning though I guess in a practical game at least at my level, all three results might be possible.
(I guess here 5 Qa5 wins the a-pawn, since 5…Rb6? 6 Be3, and 5…b3 can't give enough counter play since the permanent threat of back rank mate ties the Ne6 down: so +- )
However, 1 Bd5 Qd7! is a tougher nut to crack, since if white exchanges both pairs or rooks, and then takes on b7, he loses to the knight fork Ne2+; and if he doesn't change rooks, and plays 2 Bb7, then 2…Re3 3 Re3 Rb7 4 Qe5 Ne6 defends everything, and 3…Nf5 might be even better. 1…Qd7 stumped me, until I looked again at the initial position, and found 1 Qc7! is a winning decoy: and then I saw (1 Bd5 Qd7 2 Qc7 still wins, but that shows that 1 Bd5 is pointless.
So, 1 Qc7! and if 1…Nb3 2 Qb7! echoing the famous Adams-Torre. If then 2…Qc5, pinning the rook, then 3 Kh1 is a pretty unpin, and is game over.
In the actual game, white missed the decoy idea, and the game went on. In fact, he found the idea a few moves later, was winning, blundered into a draw, and then blundered again into a loss.
Black to play and win
Solution
Fairly easy. 1…Ne4 is the sham sacrifice that you first want to look at, and if white takes the knight, black's attack is overwhelming. White could refuse the offer, and move his Rd2, but then black will win by advancing his pawns. I should also mention that 1…d5 is extremely strong too.
I think this is one of those occasions were there is no need to to too deeply. For instance, the position below is clearly overwhelming.