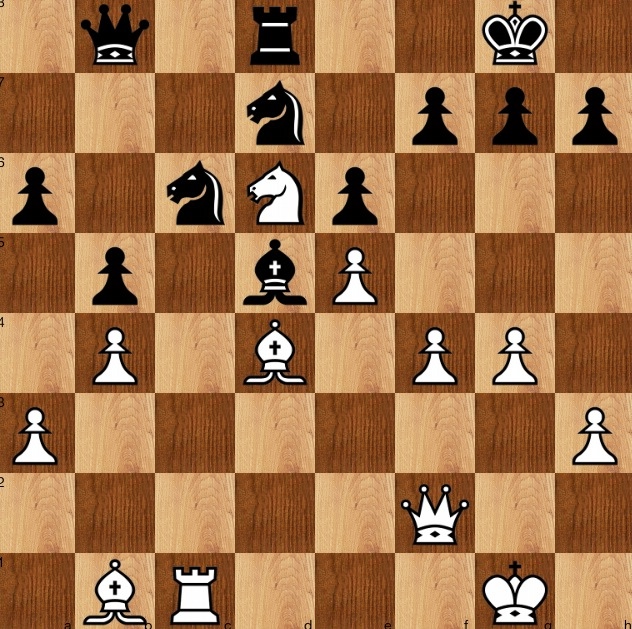
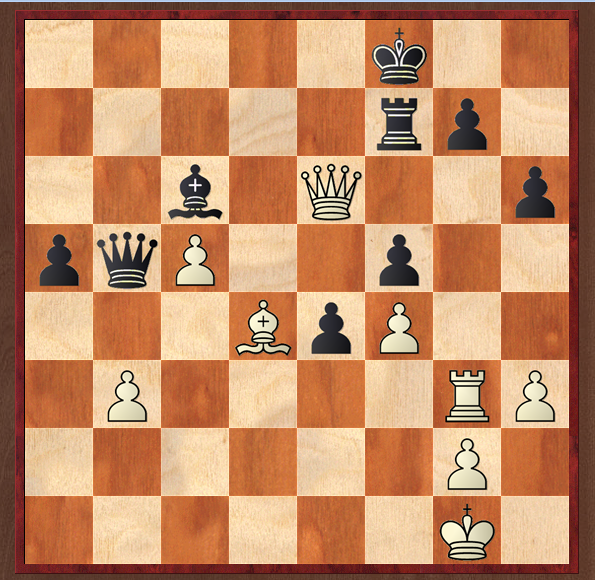
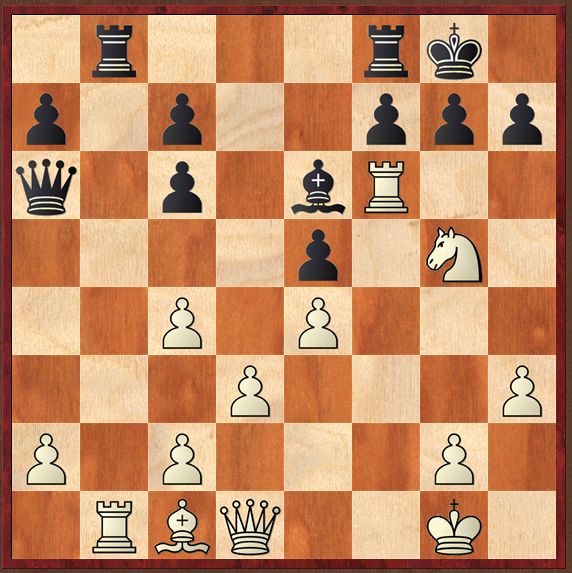
The following position, from the game Banusz-Pap, ch-HUN 26/11/12 stumped me. From time to time I get very behind with my reading of Chess Today, keep old issues in a drawer, and then pull them out in preparation for a journey or other spare time. This puzzle was in CT4414 last year.
White to play and win
Solution
Now that I have solved it, I think is easy enough, but it took me two sittings.
I got distracted by the lure of complexity. 1 Rc6 Bc6 2 Qh4 when black has several ways to defend, ..h6, …g6 for instance. And I got excited by 2…g6 3 Nf7!! being pleased with myself to find 3…Kf7? 4 Qh7+ Kf8 5 Bg6 when black is helpless, and can't prevent mate- if Ne5 to free up the second rank then white has Bc5+.
I got drawn in to solving more variations. What if 2…h6? Should white then play 3 Qe7 or f5?
I went round in circles. Is 1 Rc6 necessary? Could the rook be used in another way?
No, I am not referring to the Talking Heads 1981 song, but because it is now in my head, here are the starting lyrics:
You may find yourself living in a shotgun shack
You may find yourself in another part of the world
You may find yourself behind the wheel of a large automobile
You may find yourself in a beautiful house with a beautiful wife
(I have three of these: and as a clue, I don't live in a shotgun shack nor another part of the world)
Below is my summary of the last quarter of the puzzles in Cordingley's book.
My assessments of the puzzles is at times subjective, but will hopefully serve as I guide. Depending on a player's level, he or she could concentrate on the easy, normal, or favourite puzzles. The ones marked Aagardian- my made up word (after GM Jacob Aagaard, who writes fantastic books for the strong player who wishes to improve) for ones capable of extensive analysis; and the ones marked Cooked, are worth looking at for people wanting tough exercises.
White to play and win (or not)
(Don't waste your time on this: it is cooked: maybe a quick look, and then read my comments)
Solution
What a disappointment! The last puzzle in the book, and I had hoped for a while, building up to the last day, that it would be a good day. But my daily project ends damply: I had a look at a few obvious moves (breaking through on the g file is the obvious plan) and somehow guessed it was one of those long lined Cordingley solutions which depend on a defensive inaccuracy. And, surprise surprise, it was.
The attached file contains various lines: not much more to say, today, alas.
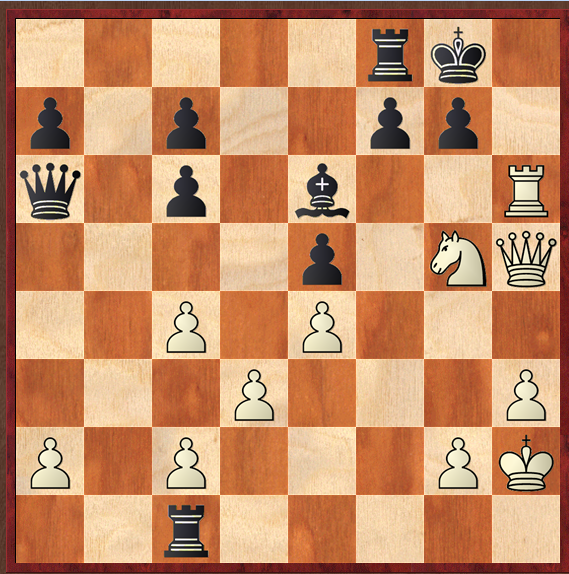
White to play and win (or not, as it turns out)
Worth looking at, even though it is cooked. Finding the best lines for both sides is a good exercise.
Solution
It is fairly trite to see 1 Rf6 Rg3? 2 Rb5+! and not too hard to see that line through to mate. But better to find a stronger defence for black, and I couldn't really break down 1…Rcc7!
In fact, Houdini could break it- I got mesmerised by too many very similar but different lines ( I have realised a few times in this Cordingley journey how hard accuracy is in Q+R attacks). But Houdini suggests an even stronger defence 1…Be6! when black is probably not worse. He has counter threats against the Ng3 and pawn g2, and access to the white king in some, lines on the a2-g8 diagonal.
1 Rf6 Rcc7 2 Rc6
White to play and win (or not, as it turns out)

Whilst cooked, it is not a worthless exercise. Try to find the move played in the game (not too hard, in my view) and then try to find black's best defence (which wasn't played) and also how to defeat black's poorer defence.
Solution
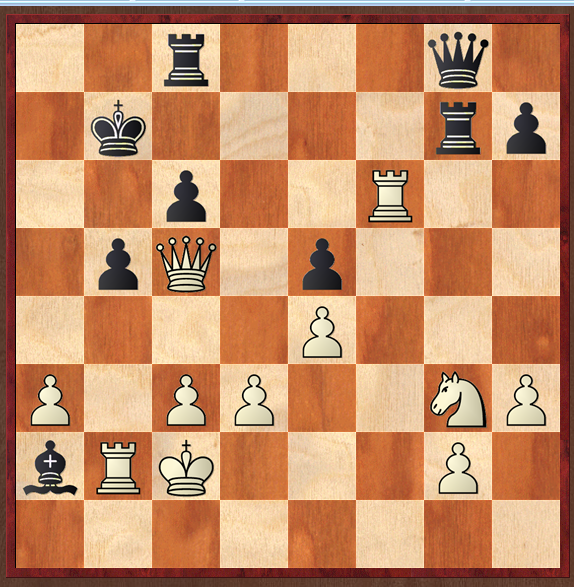
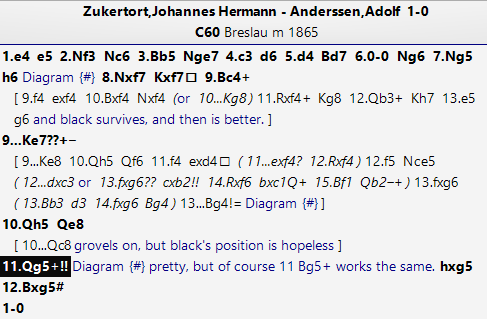
1 Nf7! is an obvious biff, which needs to be calculated. The choice of first move is made easier in that there are no sensible alternatives, since retreating the N can't be a winning solution. So 1…Kf7[] and either 2 f4 or 2 Bc4+ have to be considered the former well met by 2…ed, keeping the f file closed. So 2 Bc4+ is the move and I would fairly quickly fix on 2…Ke8, merely giving 2….d5 a quick look to see if it helped in any way, and hardly looking at 2…Ke7- because of the tangle it puts black's pieces in. I would only revert to 2…Ke7 if 2…Kd7 clearly failed.
In fact, Anderssen played 2…Ke7?? and after 3 Qh5 Qe8?? (Black is lost, but this loses in two ways) white played 4 Qg5+! which is pretty, but not too hard, especially since 4 Bg5+! also mates in 2.
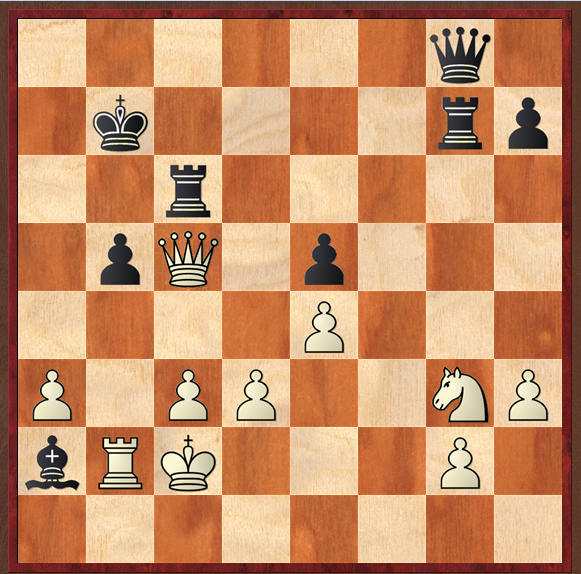
I am not sure what Anderssen missed. After 2…Ke8! 3 Qh5[] Qf6 the least that can be said is that Black is not losing horribly. In fact, if then 4f4, then 4…ed keeps the f file closed. He may have missed the nice lines which arise when the Nc6 is on e5: then, Bg4! comes with venom.
Houdini assesses black as slightly better in the initial position, and also in the resultant position.
White to play and win

Solution
An interesting one today. After an initial examination, noting that white only has two pieces in the game, and noting that the Qb5 is tied to the defence of the Bc6, I quickly decided on 1 e4!, the move played in the game.
In fact, Houdini also likes 1 Rc1! which is I think based on zugzwang: eventually the Bc6 must move, and the c5 pawn permitted to advance, or white gets his rook into action on either the a or b files. But 1 e4! Is more forcing, and leads to the position below after 1..de 2 Rg3 Kf8.
Here, in my visualisation, I stumbled. I thought white's best line would be 3 Rg7?! Rg7 4 Qh6 which does indeed pick up the Bc6 when the overloaded queen comes to defend the Rg7, but after 4…Qc5+ 5 Kh2 Qe7 6 Bg7+ Qg7 7 Qc6 the queen and pawn ending might not be won.
I am not sure whether even in a game I would find the stronger 4 Bg7+! Of course, I would see it, but I wouldn't be able to see that after 4…Rg7[] 5 Qf6+ Rf7[] it is forced mate on the black squares. I think the mates- for there are two-are hard for me to see, I am ashamed to say. But they are pretty- at least the one starting 6 Qd8+ is- and worth seeing.
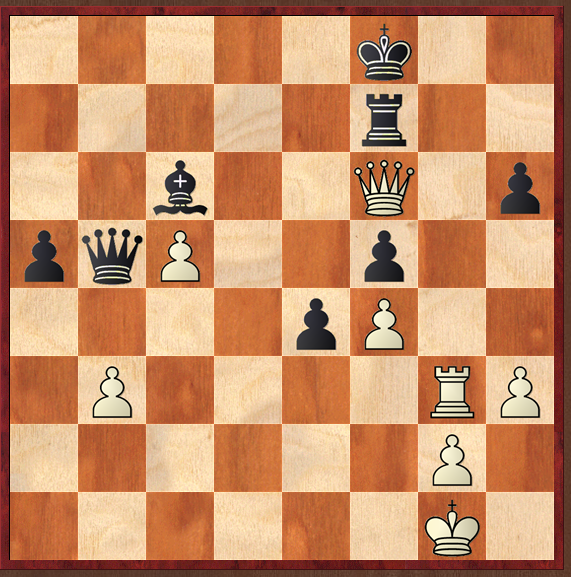
White to play and mate
As a footnote, the game score in Megabase must be wrong since black would otherwise have left a rook en prise.

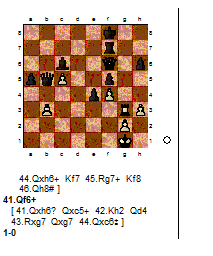
White to play and win
Solution
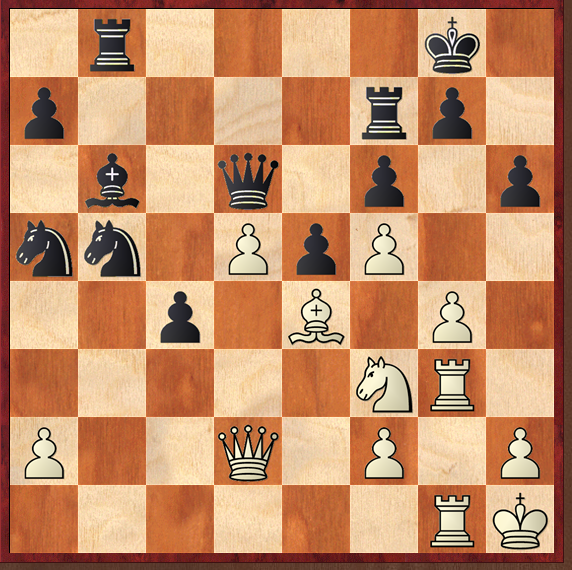
A fairly easy day today. The sac 1 Rf6! begs to be played, and all that is needed is to assess the position after 1…gf[] 2 Bh3+ Rd7, and to also see if 1 Bh3 is even better (it is worse, giving black the alternative of 1…Nd7).
Whilst I can't see 'to the end' after 2…Rd7, it is not to hard to assess that after 3 Bd7+ 4 Qg4+ and probably 5 Nd5 white's position is very strong.
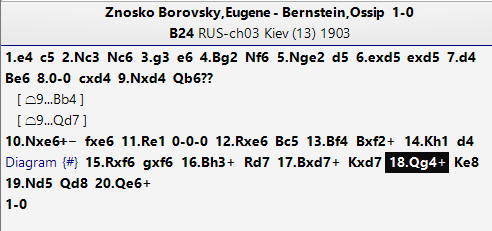
Addendum
It is interesting to see how soon black's position became lost. It is in the diagram below, where 10…Qb6 is the losing blunder. I wouldn't immediately after assessed it as such, but having looked at it a bit further, the Q is off-side on b6 and black's white squares are too loose. Interesting.
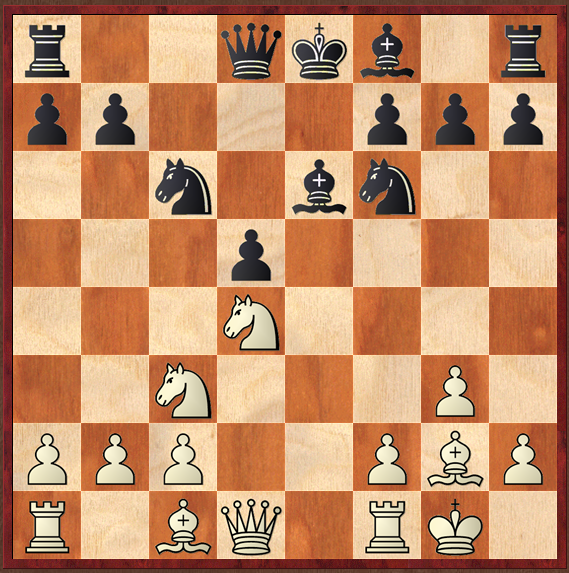
White to play and win
Solution
This is a position from one of the lines in the analysis of puzzle 245. White wins by 1 Qg6+!!.
Maybe as a standalone puzzle it is not too hard, but in the prior moves, white had to decide how to attack black's king, and because of Qg6, the route was Qd1-e1-g3.
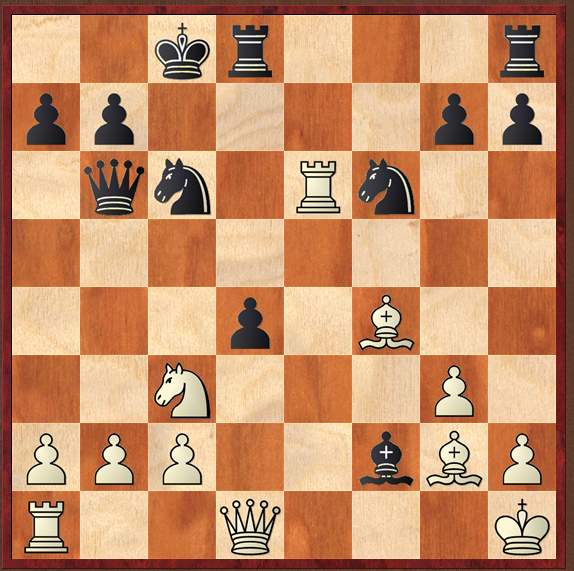
White to play and win
A really good exercise, capable of examinination at many levels: probably cooked, though.
Solution
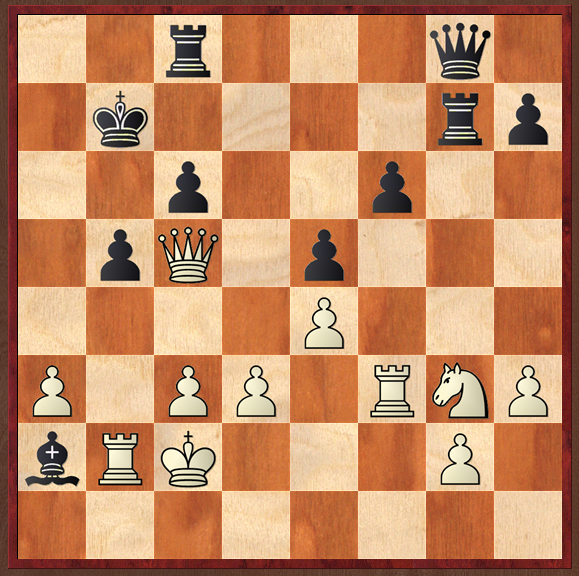
I really enjoyed this one. Partly because I sometimes play the Four Knights opening at blitz (it ensures I get my pieces out, even if I rarely get any advantage from the opening by playing it) and this is quite a dream position from the 4Ns.
Black's queen is offside, and the solution 'has to be' 1 fe, with only two lines to consider. Firstly, 1…Rb1, when after 2 ef all that white has gambled is rook for knight and pawn, and any aggressively minded player is bound to think that a worthwhile loss for the prospects of attack: and my analysis shows that white is probably winning, though both sides made mistakes in the actual game.
The other line to be examined is 1…de!, the exclamation mark because I thought it was, and indeed it is, the better defence. Then 2 Rf6! Rb1 3 Qh5!? Rc1+[] 4 Kh2 and I thought 'white must be winning', since 4…h6 is met by 5 Rh6!.
It is 'so obvious' that Cordingley doesn't even consider …h6, giving instead Rfb8 and then an error strewn path to mate- error strewn thanks to Houdini, of course.
However, Houdini also shocked me by telling me that after Rh6!, gh! is at best a draw for white- and so it is- white must bale out for a perpetual.
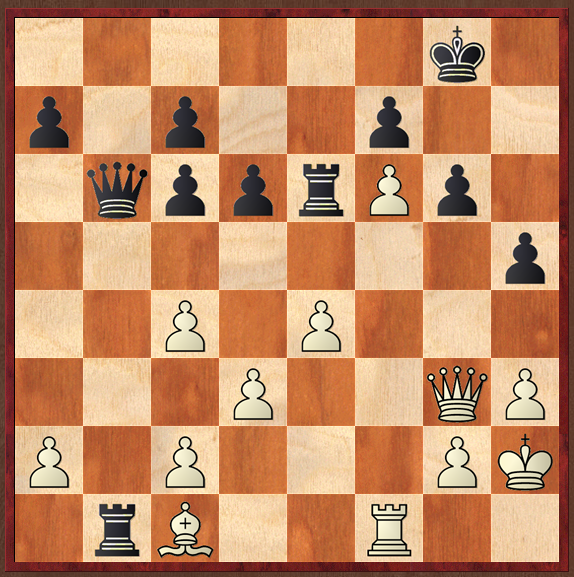
Returning to the line after 1…Rb1, positions like the one below are reached (see the attached analysis). I found it remarkable until I examined it further that such positions are simply winning for white. In time, he will break through on the e file, or, if black prevents that, by the pawn lever g4: in effect, white is a piece up, since black's bishop doesn't contribute to the game. Very instructive.
One of the positions in the analysis is so beautiful that I have posed it as a separate puzzle in a separate posting today.
Meanwhile, despite its limitations (because h6! draws), this is one of my favourite Cordingley puzzles. The attached analysis goes into more detail.
