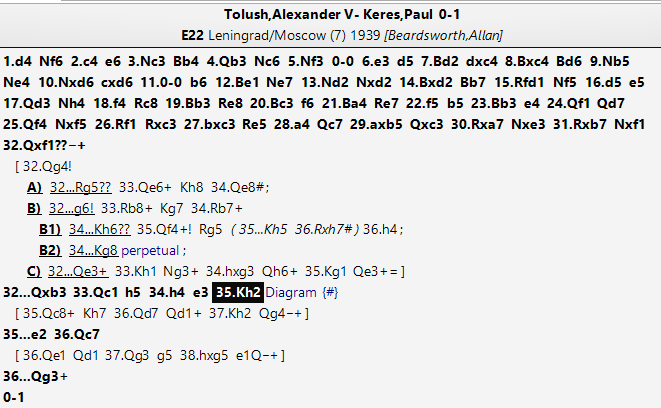
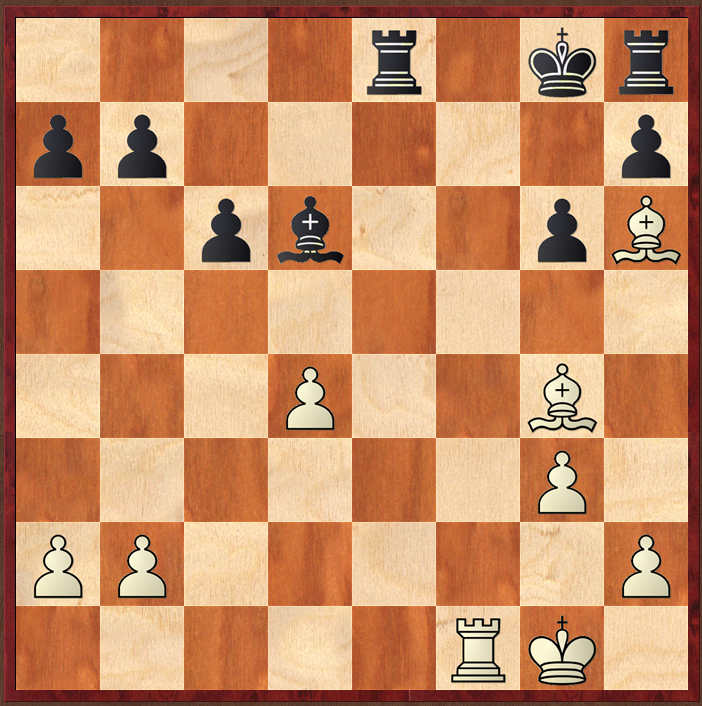
A few days ago, I blogged about this ending, from the recent Russian Women's Championship game Gunina-Goryachkina.
White to play and win
I saw the game in Chess Today issue 4715. I thought the ending was mis-played, analysed it in my previous blog, and then wrote to Alex Baburin, edition of Chess Today. By return, Alex kindly told me that he had written about the endgame in issue 4727, which I have now read, and happily every comment of mine (that is, every move I thought was a blunder) was confirmed by Alex's analysis.
A useful exercise, and a reminder of how difficult pawn endings are.
White to play and win
Solution
This one was interesting. At first, there didn't seem anything at all for black, the bishop is attacked and must retreat, say to d6, when it is all to play for. I looked for surprise moves like Bb3-alas, illegal, and f5 doesn't do much. So what could it be?
For some reason, I struggled, and had to put the position away, and look at it another time, and nothing appeared at first. So I tried to follow Purdy, and look at factors in the position. Firstly:
Purdy on nets, pins and ties, Fine Art, vol 2, pg 205
Some things are hooey,
and most others lies;
But forks you mustn't miss,
nor pins, nets, ties.
So, what does this position have? White's queen is in something of a net, and there is a geometrical alignment, of white's king and queen, and hence the prospect of a pin, on the e file.
Purdy on threats, In Search of Chess Perfection, pg 289
You must see all real threats. That means you must also see the unreality of real threats…. When in doubt, you can always save time by remembering it is really your move. Try then the following way of thinking:
Imagine the threat could not possibly be executed. Then what would be my best move? Try out each attractive move separately, considering each one as follows. Visualise the whole position as it would be after this move of yours, and then work out whether the opponent would gain by executing his 'threat'.
This latter piece of advice is very apposite here. If we ignore white's threat of ab, what would we like to play…and 0-0-0! comes immediately to mind. And then it can quickly all came into place. Very nice, and a good example of use of method.
There are some nice lines, including a discovered smothered mate.
White to play and win – and a further special question, just for today.
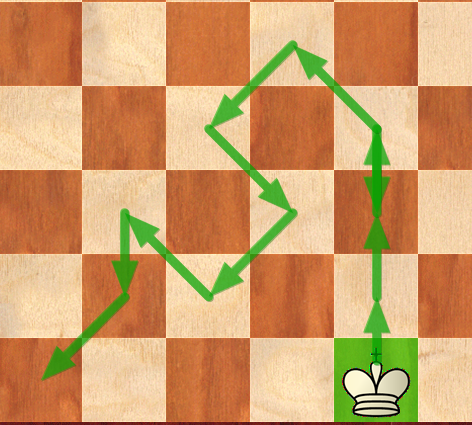
Extra question: the white king is on A1: make a guess of its route from e1 to that square.
Solution
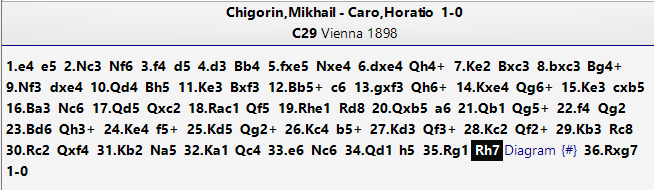
A rest day today. 1 Rg7! is pretty obvious, and black resigned once it was played. If the rook is captured, 2 Qh5+ mates quickly. There is not much more that could be said.
The obviously trick question about the king's route to a1 is more remarkable. The king didn't long castle to c1 and then shuffle sideways. Instead, its route is shown below. The opening was a Vienna Game, with the white king brought very much out into the open.
White to play and win
The following is a position which really interested me, and I would suggest is worth exploring.
Source: Chess Today, issue 4715; Gunina (2506) – Goryachkina (2436), 63rd Rus ch. w, Nizhny Novgorod (1) 5/10/13
Solution
From time to time, I get behind with my daily reading of ChessToday, and this has happened recently. In such cases I try to take a bundle with me when on a trip or holiday, as last week. I enjoy many aspects of this daily newsletter but particularly the problems. On the bunch of papers I took away with me this time, most I solved with little difficulty, but the attached position stumped me. I cut the position out, and had it with me for my flight home.
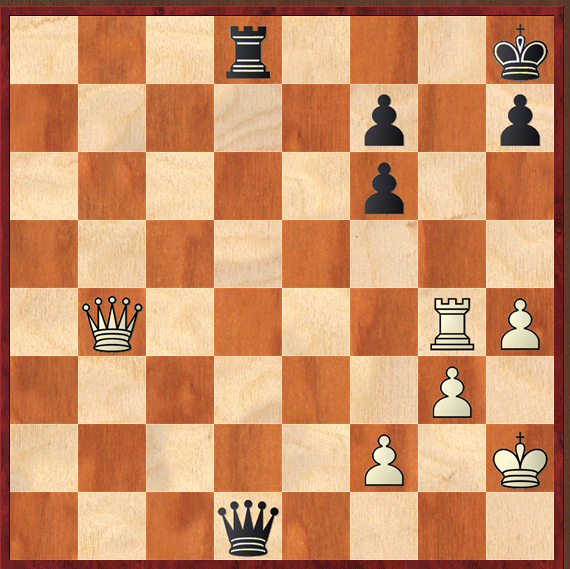
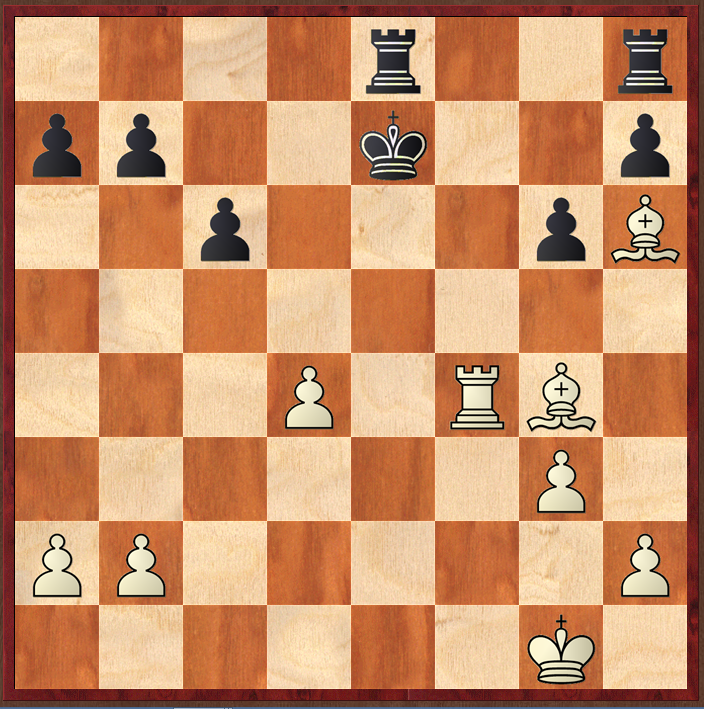
The move I wanted to play was the terrible 1 Rd4, which only works against the equally terrible 1…Rd8: when 2 Qf8mate follows. But the motif of back rank mate proves illusory, and eventually I settled on 1 Qe7! being the solution, which indeed it was. The main sideline is 1….Qd6 2 Qf7 Qf8[] 3 Rg8+! which is a pretty way to emerge two pawns up in a pawn ending; but the main continuation is 1…Qg4 2 Qf6+ Kg8 3 Qd8+ Kg7 when the question is 'to exchange queens or not'?
To swap or not to swap?
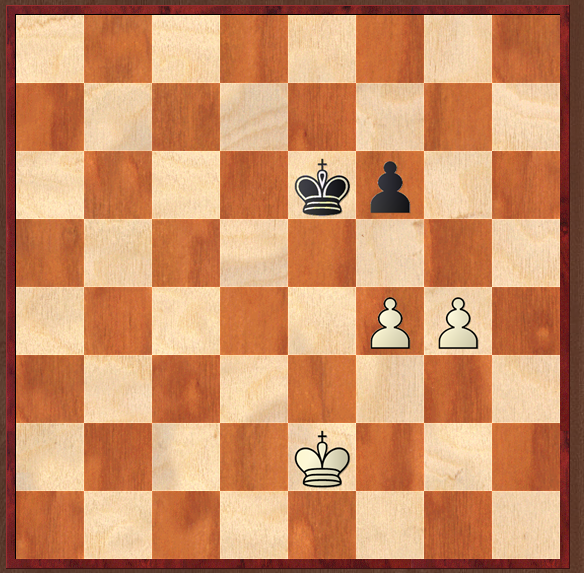
I intuitively knew the best move had to be 4 Qg5+! swapping queens off, but was also aware of the advice to never simplify to a pawn ending unless you can calculate it to the end. And yet I couldn't calculate it precisely, and not being a Russian schoolboy, has some doubts that the position with 3P v 2P was a win, with one pawn being doubled. However, I also sensed that keeping queens on by say 4 Qd5 might not be sufficient for a win: eventually black would have a checking field day. So I plumped for 4 Qg5+!, calculated ahead a bit further- 4….Qg5[] 5 hg[] Kg6 6 f4[] h6 7 fh[] Kh6 and stopped: this was about all I could see from the initial position in my head, and there was no way I could be sure that it was winning.
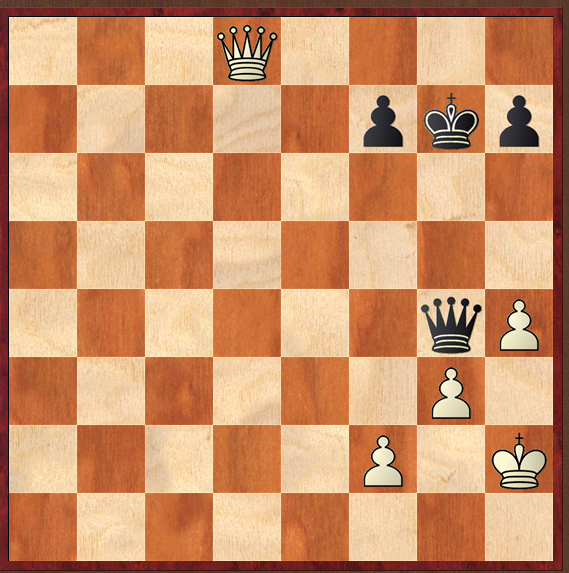
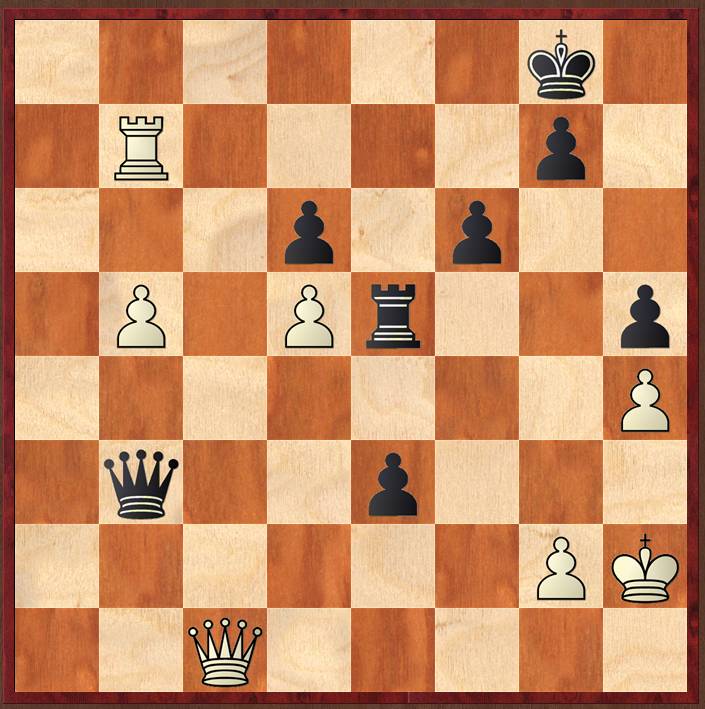
White to play: is it a win?
So, I looked at the solution, saw I was spot on, and was pretty pleased with myself. White won the above ending sure enough.
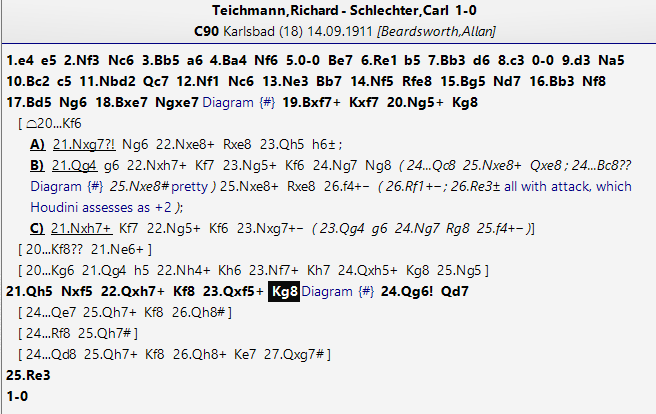
The pawn ending
I think it is a sign of age, but in recent years I have become more interested in studying endgames, including basic ones: alas, never having had a trainer or anyone to guide me, my childhood talent developed in a totally unstructured way, and apart from a cursory dipping in to Reuben Fine's Basic Chess Endgames- the only endgame book I had as a child- my knowledge of endgame theory is woeful. But I decided to play the pawn ending out against Stockfish- I was on a plane journey returning from holiday in Turkey, and it seemed a good way to pass away some of the flight.
So 8 g4, a few other natural moves, and, suddenly, draw! Or 8 Kh3, a few moves, and again draw! I played Stockfish many times, got plenty of draws, and not many wins (fortunately I never lost to it). What was going on? I do have some vague recollections of the theory of corresponding squares, but very woolly. Eventually I got the main things in my head: eg to wait for black to occupy h5 before playing Kf3; the need to go around- to the centre/queenside, rather than try to squeeze through on the h file (there is no room) and some nuances about placement of king, and some tricks black has such as f5! In the position Ke4 Pf4 Pe4 ke6 pf6 with black to play. In many lines, there is also the winning motif of waiting for black's king to be adjacent to his pawn before bringing the white queen in, as in the following diagram: whoever attacks the pawn first, loses.
I then looked at the game continuation again, and seeing that the players' both did many things different to what I expected, decided to look with Houdini, and my attempts at an annotation are in the attached PDF .
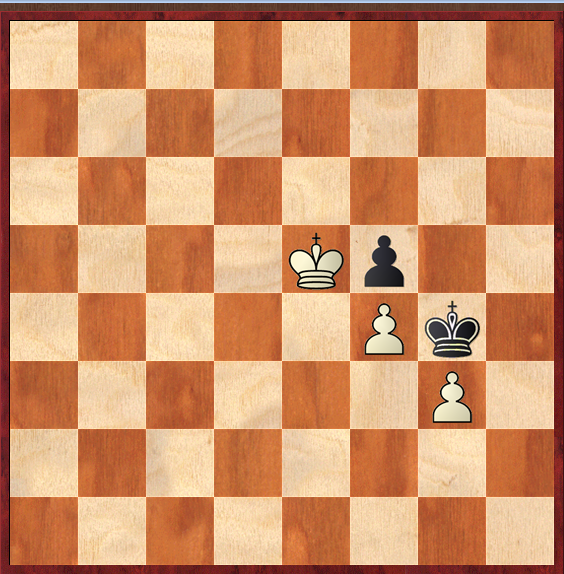
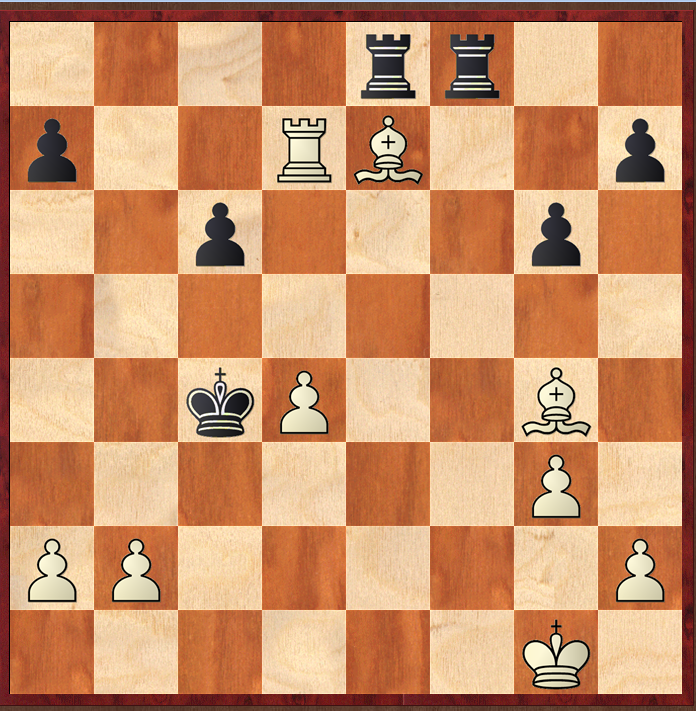
If I am right, and I may not be, the pawn ending was a catalogue of errors, and the last error was in this position.
The last blunder
Black played Kd5?? whereas Ke7! I think draws. Black mirrors white's king, so if eg then 2 Ke1, then Ke8!.
I wonder if my analysis is right?
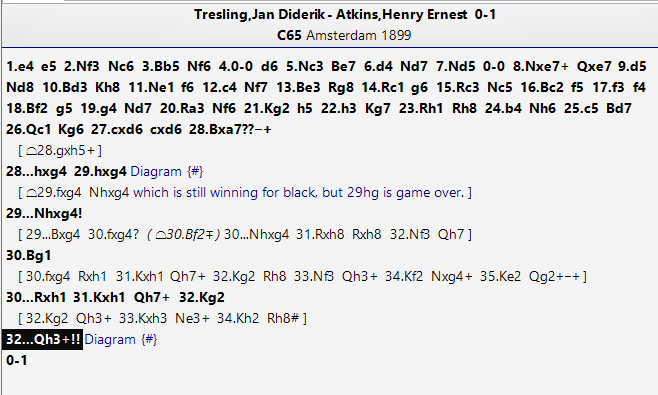
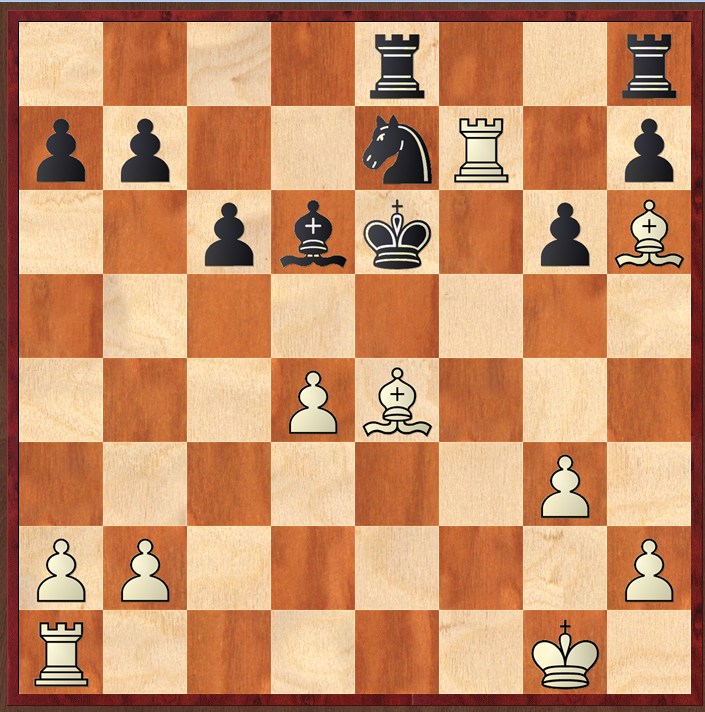
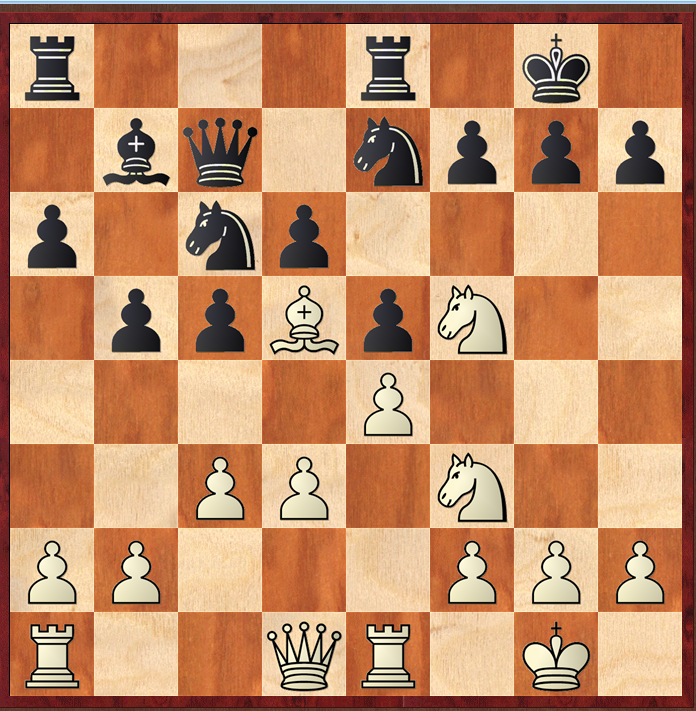
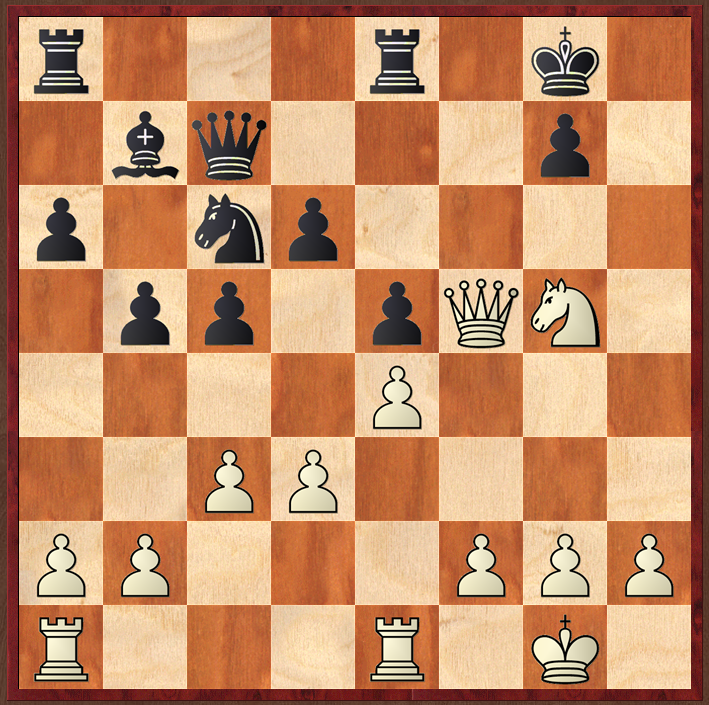
Black to play and win
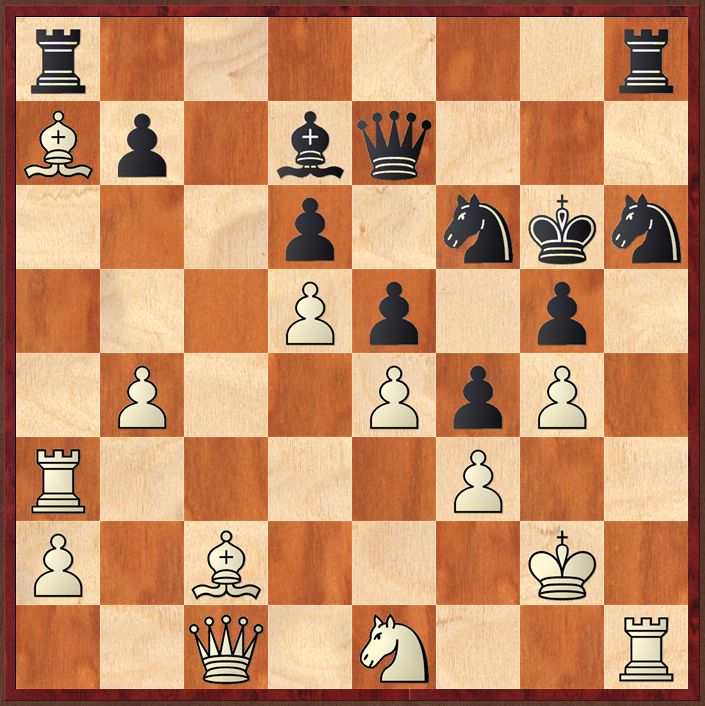
Solution
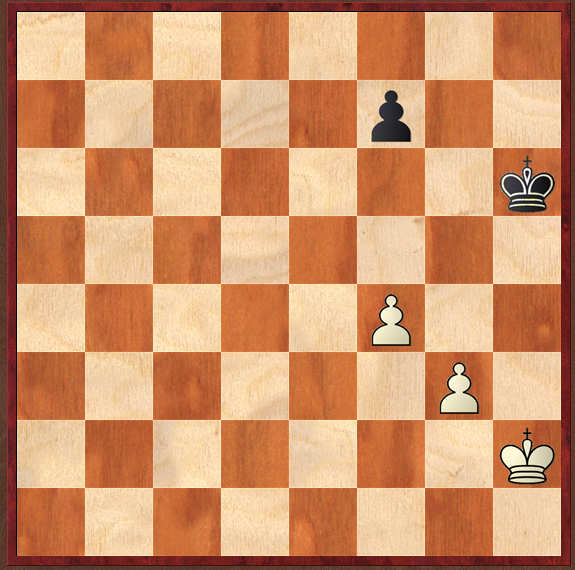
I flirted around with this, seeing 1…Nhg4 straight away, but not being convinced: and then looking at 1…Ra7 to try to control e3, but that fails, and 1…Bg4 does nothing…so I returned to 1…Nhg4! and looked harder. As soon as I saw the concept of Qh7 then it all came together, though I didn't see the pretty game continuation.
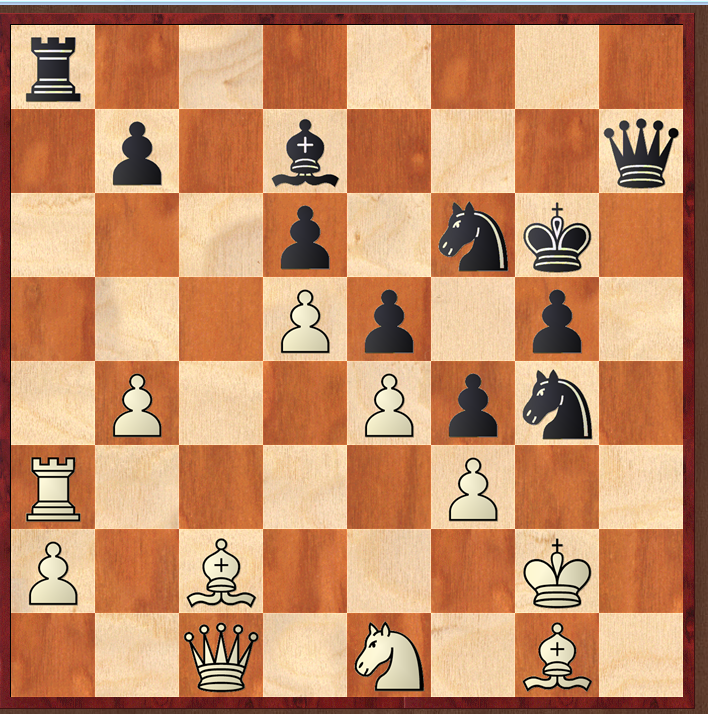
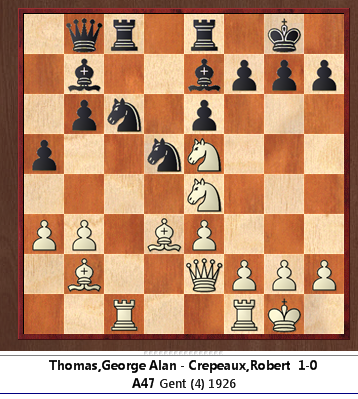
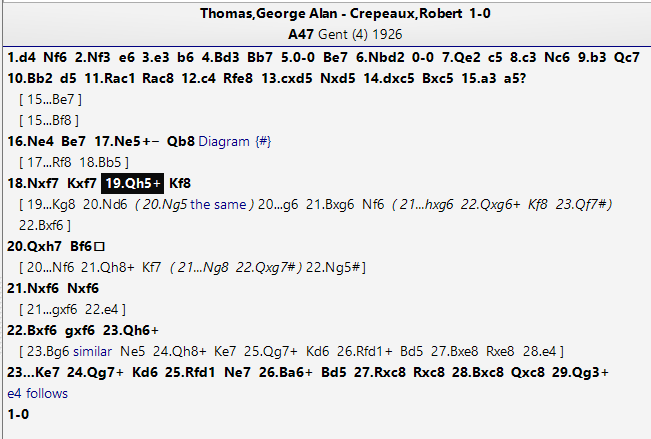
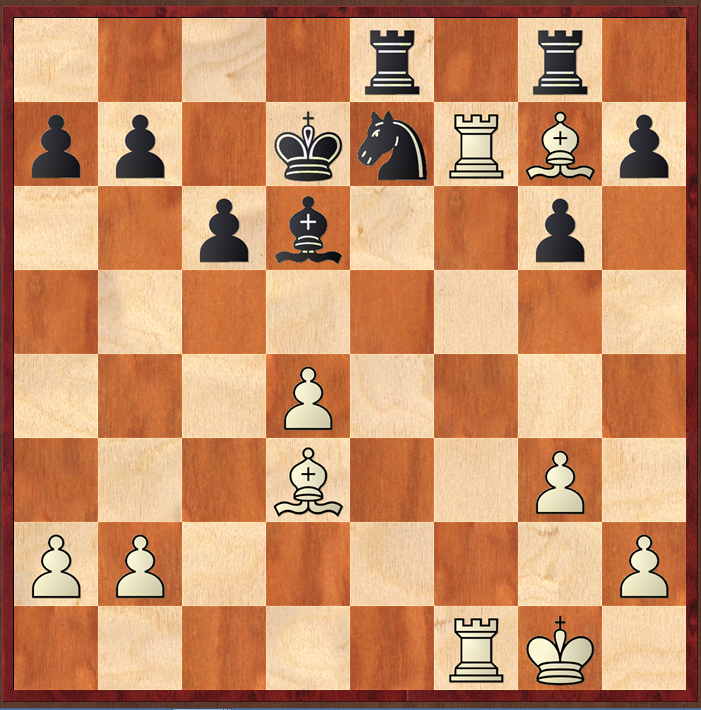
White to play and win
Solution
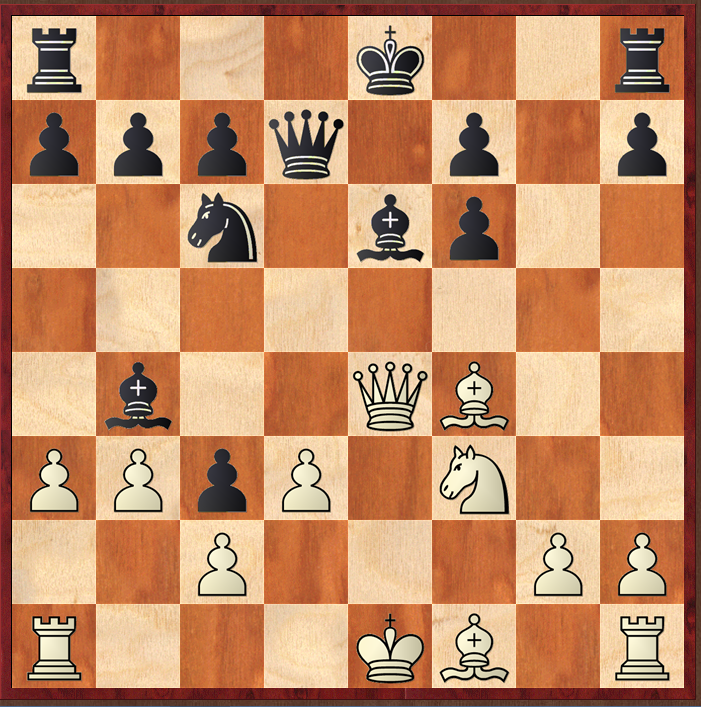
Not the hardest of puzzles today, but some calculation needed, so a good one.
I first tried to throw away my Ne4 with Nd6 or Nc5, but more or less immediately saw that the Ne5 was the one to discard, with 1 Nf7! being decisive. Black must take, when 2 Qh5+ follows, and only 2…Kf8 has any difficulty-especially when you can visualise that the Ne5 having gone, the Bb2 is hitting g7.

After 2..Kf8, white takes on h7, and then sees what black does. His advantage is overwhelming, and black's only choice is how to prolong the game for a few moves.
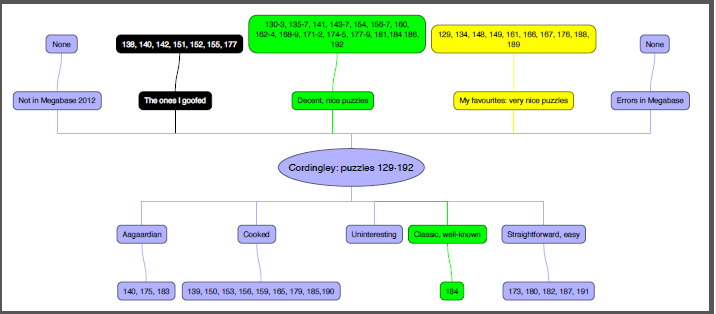
Rather belatedly, here is my summary of the third sixty four puzzles in the Cordingley The Next Move is daily exercise.
Black to play and win
Solution
The puzzle about this puzzle was…why is it a puzzle? Then I realised, that it is nor 1…e2 2 Qe1, when the win is trivial, but 2 Qc7 trying to mate black which is why the puzzle is included in Cordingley's book. However, 2…Qg3+! is a fairly standard decoy sacrifice, when it is game over.
A fairly trivial puzzle today.
White to play and win
(One worth spending some time on, and, maybe, looking at the hint if necessary, before looking at the solution).
Hint
If this were 'guess the move' what would the guess be? Think in terms of 'if there is a flashy conclusion, even with poor defence' what would it be? There is a boring way that black could continue the game, but the actual game continuation is nice.
Solution
I enjoyed this one, greatly. First of all, it doesn't look like a typical puzzle, there are two few pieces on the board, and no obvious LPDOs. But the obvious first move is 1 Raf1 developing the remaining piece, and seeking to protect the Rf7, with also perhaps threats to the king: but with the equally obvious reply 1…Nf5.
What to do next took me a while: Rb7 is natural, but looks insufficient for a problem: and at first 2 Bf5 didn't seem good enough. Then I saw the 'mating' line, and knew that I had honed in on the solution. But first, black could always 'chicken out' and play 1…Kd7 instead, when I thought the game would just 'go on', but Houdini tells me that white's advantage is overwhelming after Bg7 biffing the rook, and then Bd3 removing the bishop from harm's way. Still, Houdini's +5 advantage in the position below does seem odd to me, though doubtless if I were to do what I should but never will, and play some training games starting from this position, then I would begin to appreciate the assessment.
Instead, after 1…Nf5, the above position is reached. 2 Bf5+ Kf7 3 Bg4+! (exclamation because it is better than Bh3 for an oh so subtle reason, explanation to follow) Kg8 and then what?
In my solving of the puzzle, I saw 4 Rf6, which is good enough and wins, but 4 Bd1!! Is even stronger- hence Bg4 rather than Bh3: why are retreats so hard to find (unless you are Houdini)
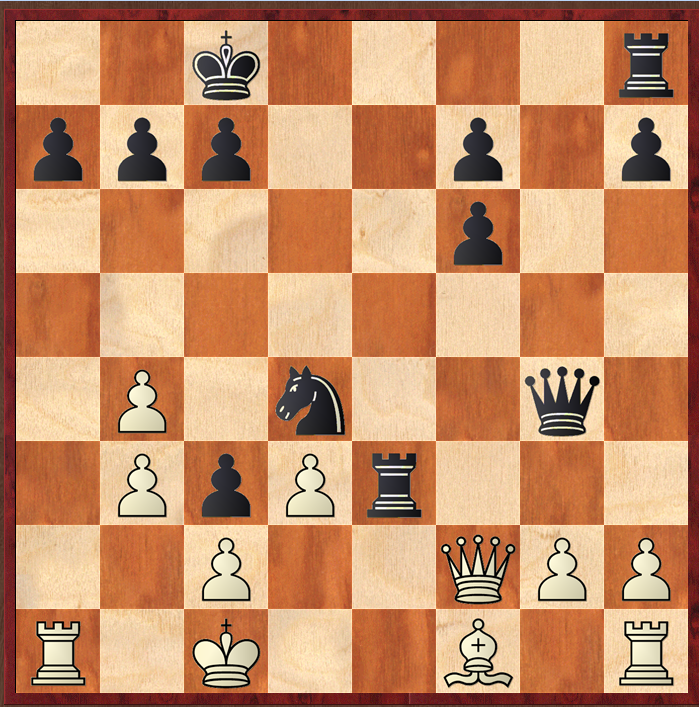
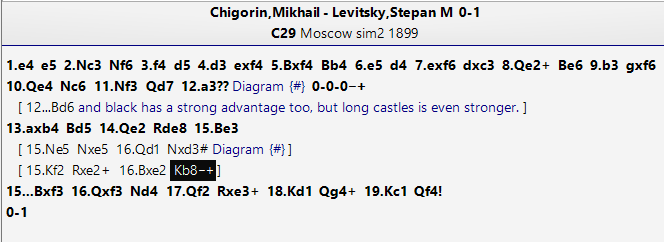
However, Chigorin improved, creating luft for his king by 3…Bf4!, a move I hadn't seen, resulting in this position after the bishop is captured and white has checked the king.
If I saw this game in a match I was watching, I would assess it as 'all to play for'. Houdini tells me white's advantage is decisive. The combination of the pair of bishops, the rook, and black's exposed king and back ranked rooks proves too much.

Depending on how black defends a combination of checks leads to mate or decisive gain of material. If, like me, and perhaps like Chigorin (I presume he foresaw Bf4 when playing Nf5, and that he mis-assessed the resultant position) it would be a good exercise to work out various mating lines.
White to play and win
Solution
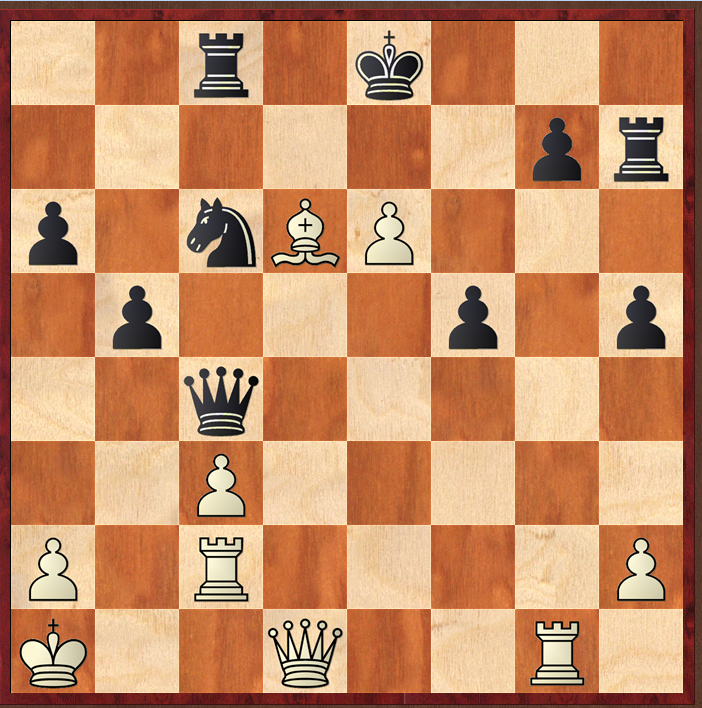
No prizes for the first move, 1 Bf7+ which is obvious, nor for the next two: 1…Kf7 2 Ng5+. This puzzle is merely an exercise in calculation in that position, against the four possible king moves. The first, 2…Kf8?? Is trivially bad, 3 Ne6+, winning the queen, but worth noting because the Ne6 fork comes up in many lines.
The second retreat, and the more obvious one, 2…Kg8 is slightly harder to crack, though not too hard because the tree of analysis is like an American redwood (long, but not many branches) and 3 Qh5 Nf5 4 Qh7+ Kf8 [] 5 Qf5+ Kg8 (5…Ke7 6 Qe6+ Kf8 7 Nh7mate or 6…Kd8 7 Nf7+ +-) when 6 Qg6! is cleanest- it is quite nice seeing how each of black's attempts to defend are then mated (the threat being the rook lift Re3-Rh3-Rh8+ decoy sacrifice).
Position before 6Qg6
That leaves 2…Kf6 or 2…Kg6. The latter is weaker, when 3 Qg4 comes with tempo, so 2…Kf6 is tougher. It is still best met by 3 Qg4, with a build up by either a rook lift or by f4. In my calculation from the original position I chose 3 Ng7?! which is good, but loses some of the advantage, though in practice once 2..Kf6 was on the board I might well have played a better move.
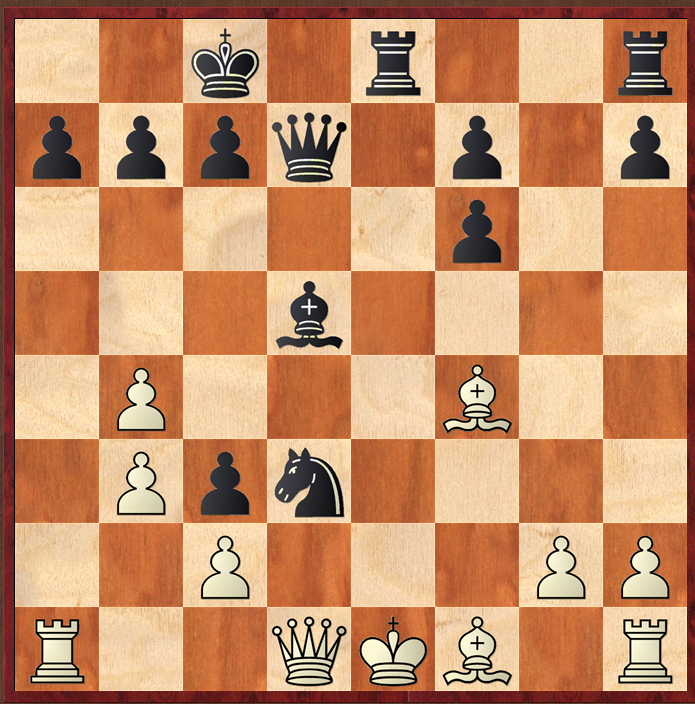
In the analysis below, line B is a pretty mate. Found, need you ask, by Houdini.