White to play and win
Solution
I found this one fairly easy: the move my hand wants to play is 1 Bh6, and after 1…gh 2 Nh5- improving the knight, rather than 2 Qh6, when black can defend with 2…Qg7. But after 2 Nh5 the h6 pawn can't easily be protected, and white can easily bring more pieces to the party, such as Qf4, and in some lines, if black's queen moves to e7 to protect f6, there is a winning pin on the e-file, exploited by Bf5 etc.
White to play and win
Solution
Straightforward this: clearly the main motif is back rank motif, and one has to find a way of breaking black's support for the Re8. My first try was 1 Rd4, which doesn't work, I glanced at 1 f3 which similarly fails, and then looked at 1 Be7: which I saw worked, because capturing is mated after 2 Qe7 Re7 3 Rd8+ etc.
Nothing much more to say really: all over in 30 seconds or less today.
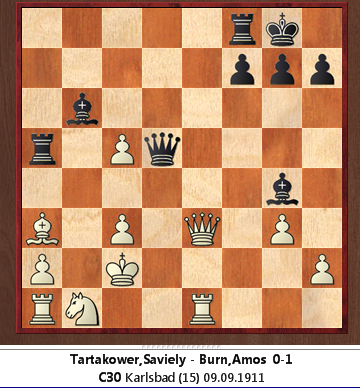
Black to play and win
Solution
I messed this one up. Alas, I saw the winning move, 1..Bg2, but not the follow up, despite the fact that the move I chose, 1…Qe3, has a very similar purpose: threatening Rc1. My line was very strong too, but 1…Bg2 was more forcing. In the game, black chose an even weaker move, and drew.
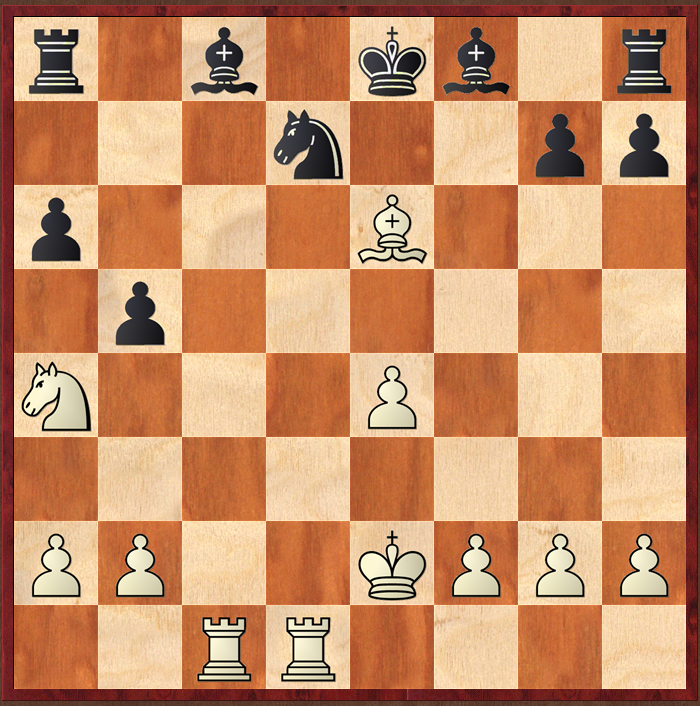
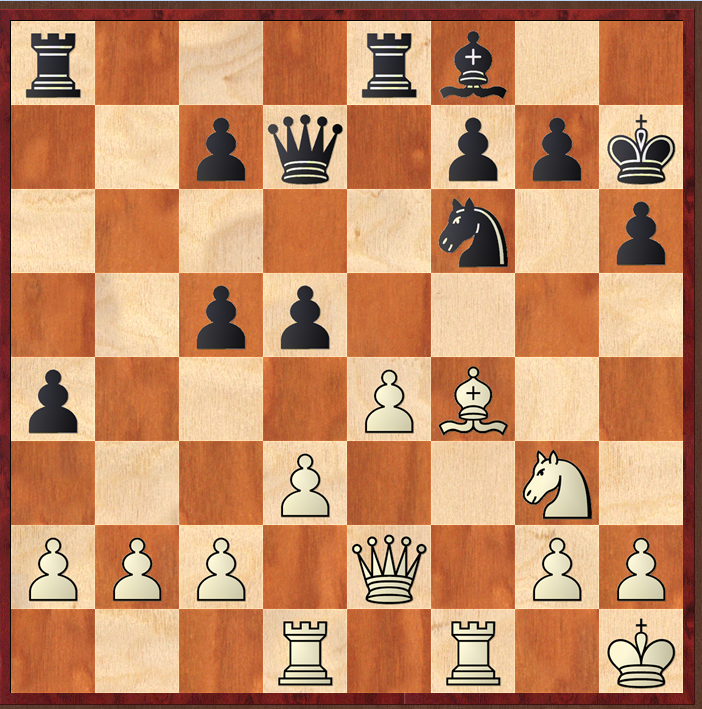
White to play and win

Solution
(I) pre Houdini
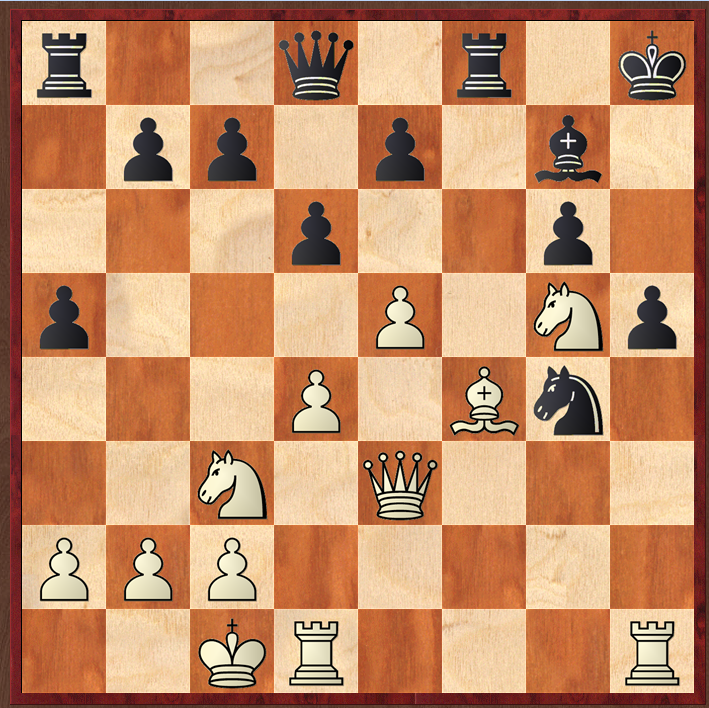
I solved this one, but, ahem, in a circuitous route. First, I tried in my head, without success. I noted the LPDOs Ra8 and Rd7, but couldn't land a double attack; saw there were some signs of a back rank mate, and also the black queen was out of play and in a bit of a net, and yet 1 Re6 fails to 1…Qe6. I also saw the jump check-mate Qh8, so made a mental note that if the Q leaves h6, then maybe Ph6 could since, the g7 pawn is pinned. But nothing really. So at first, I settled on just an 'improving' move, 1 Qe4, which turns out to the move that Tartakover played.
So, I set the position up on my board in our lounge, to work on later. Walking past, 1 c6! came to me, and- wait for it- I had misplaced the Rf1, having it on e1, so my idea with c6 had been to threaten 2 Qa7 winning both queen side pawns. I noticed 1…Qc6 with the same pin on my LPDO Queen, noting that 2 Qb4+ Qd6 is a defence, so put it aside to work on later, but did notice the idea (still with the rook misplaced) of 2 Re7! when black's only move is 2…Rd5, since 2…Qd5 loses to 3 Rd7. When I came back to it, in the book, I realised my error in misplacing the Rf1, but thought I should have a look at 1c6 again, on Purdy's 'consider all smites' maxim.
Firstly, I thought 1…Rd6 would be the most solid defence, and, indeed, Cordingley's answer (for 1 c6! Is the move) says it also loses, but that the analysis is lengthy- without giving variations. I suspect 2 Qb4-b7 should win, and yet I wouldn't win the position after 2 Qb4 against Carlsen- by which I mean there is plenty of scope for error. Similarly, 1…Re7 has the same answer in Cordingley, and has some merit, since white's Re5 is the better piece.
However, 1..Qc6 has to be analysed: in a flash, by comparison to my erroneous variation, I saw 2 Re7!, the idea being to find a way for white to move his queen by giving check, so that he can then take the black queen. So 2…f6 3 Rg7! Rd6 4 Rg8+! came to me pretty quickly, since the desperado rook can't be taken, and, very nicely, the end of the combination is that the LPDO Ra8 falls off.
I find it really interesting that most of the factors initialy identified- the back rank mate, the two LPDO rooks-come to feature in the solution (the Rd7 LPDO in the line explaining why 2…Qd5 fails). It is perhaps indicative of the fact that in many positions the solution hangs by a thread: a small nuance here or there can often make all the difference between a line working and it not. Very instructive.
(2) after help from my friend Houdini
Houdini supports the above: 1 c6 does win, assessed as 2.85, and no corrections to my lines, but 1 Qe4! is said to be even stronger, 4,43. The lines are incredible. After 1 Qe4 f6 2 d6! hits the LPDO Ra8, and after 2…Rad8 3 Re7 precise, computer, moves mate or lead to overwhelming material advantage. I should say that the lines with rooks and queens are impossible for me to see, but the white squared and back rank weaknesses lead to a forced win.
Black to play and win
Solution
Not much to say. Black's position is overwhelming and 1…Ra3 is I think obvious, with the follow up dependent on white's response. 'Wins in all lines' applies here; moves such as 1…Bf5+ is still as good.
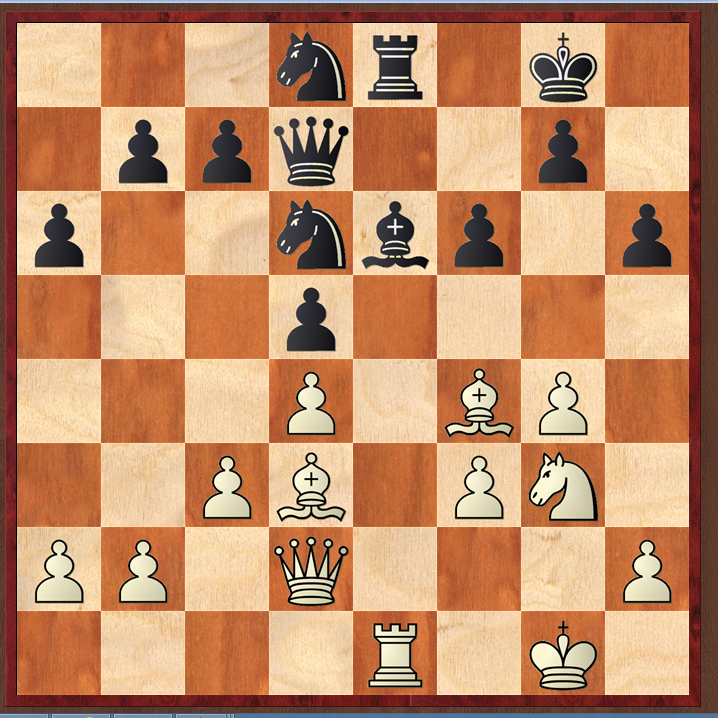
White to play and win
Solution
The puzzle is from a 3 minute Playchess.com blitz game yesterday. I was pleased to see that 1 Bh6! might be strong, with the g7 pawn being tied to the defence of the Nf6, so that 1…Kh6 is forced, when 2 Rf6! shatters open the king's defence, and it is more or less intuitive that white will have a perpetual. After a quick glance for something else rather than 1 Bh6, I realised that after 2 Rf6! the queen is LPDO, and then I saw checking until the queen gets to g4 or h3 must give a discovered check possibility. And this is how the game panned out, and I am pleased to say that Houdini didn't wreck the concept.
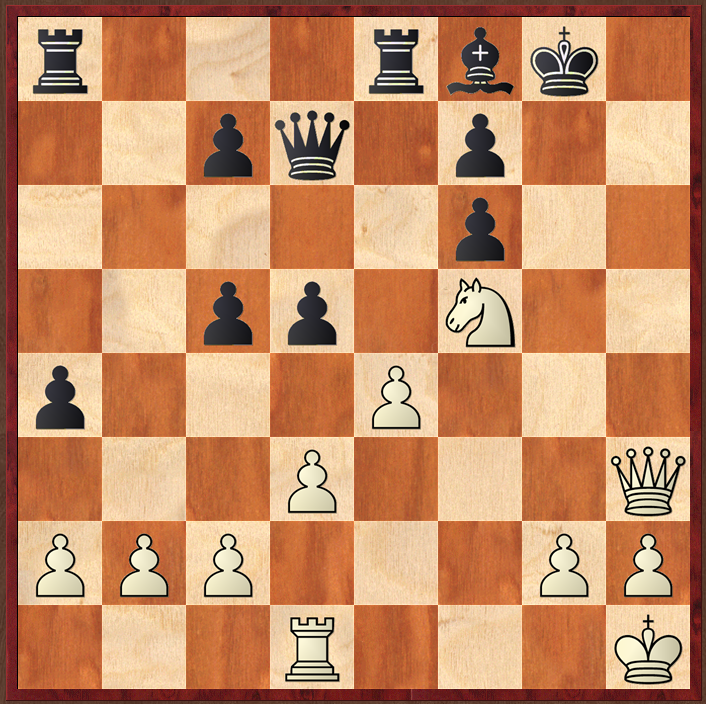
So, I wonder if this Cordingley training is helping? Probably not, but maybe?
Black to play and win
Solution
Fairly straightforward, depending on how far ahead you decide the solution is. Personally, I don't think there is a need to go too far. 1…Ne4! is a fairly routine desperado, and if the knight is captured, then the rooks are exchanged, and 3…Rg8+ is curtains: just a bit of checking is needed to see that white can't escape.
So, the knight can't be captured, and a quick check shows 2 Qf3+ or 2 f6+ are harmless.
White to play and win
Solution
The first move is obvious (especially given it is a problem), 1 Rh5+ when 1…gh 2 Qe4 is game over. So, a better defence is 1…Kg8 when 2 Qh3 gh 3 Qh5 Nh6 4 Qg6 wins. One point is that if the king goes to f8, then Ne6+ forks it and the queen. In fact, it is not much of a problem since moves such as 2 Qe4 and 2 Qf3 also win: with some cute points in some of the lines, as shown.
I have never written about hunny bunnies before; in fact, never thought of them before. But as of today, as of reading the Daily Telegraph today, I think there might be more to life than tax.
My eye was drawn to this article in today's paper.

I have never seen Loaded magazine, but think its content is less cerebral than Taxation or Chess. I doubt I would like it, but when I saw its owner was a Paul Baxendale-Walker I thought 'I know that name'. A Paul Baxendale-Walker was a prominent solicitor (and it appears, a barrister) ten or twenty years ago, specialising, according to my recollection, in planning concerning remuneration and trusts. His firm continues to exist, and he has a Wikipedia entry.

(I wish businesses who use chess in their marketing would pay the English Chess Federation something – it badly needs funding)
If you read Paul's summary on their web page you will see his is former barrister and solicitor, though from Wikipedia he still practices tax. When I was reading the article, and wondering 'could it really be the same person' I recalled that he had appeared, I think on Panorama many years ago, with a pipe. Nothing is hidden on the Internet and sure enough here he is:

The caption is from the google images search.
If I were told that a former prominent tax solicitor owned Loaded magazine and was in Court being sued by a former honey bunny, well, would I have believed it? No, I wouldn't, but 'tis true.
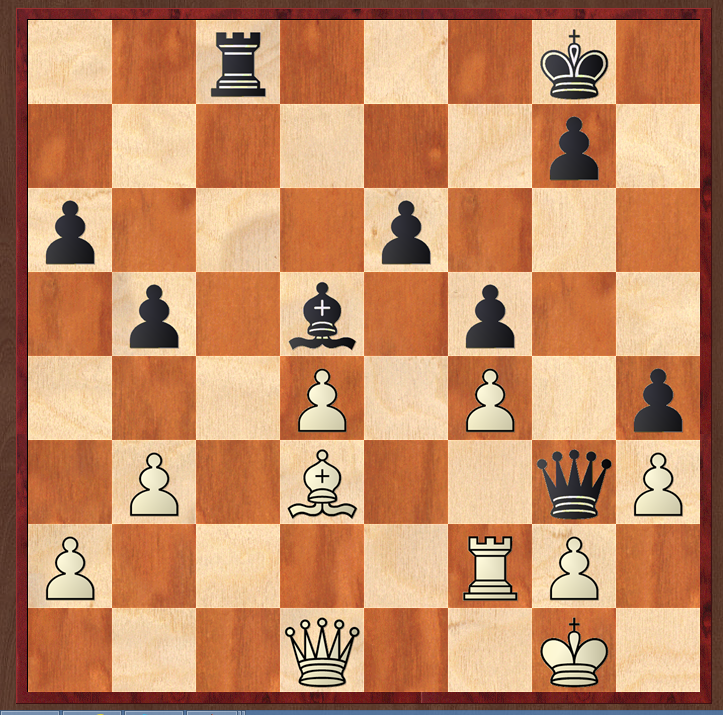
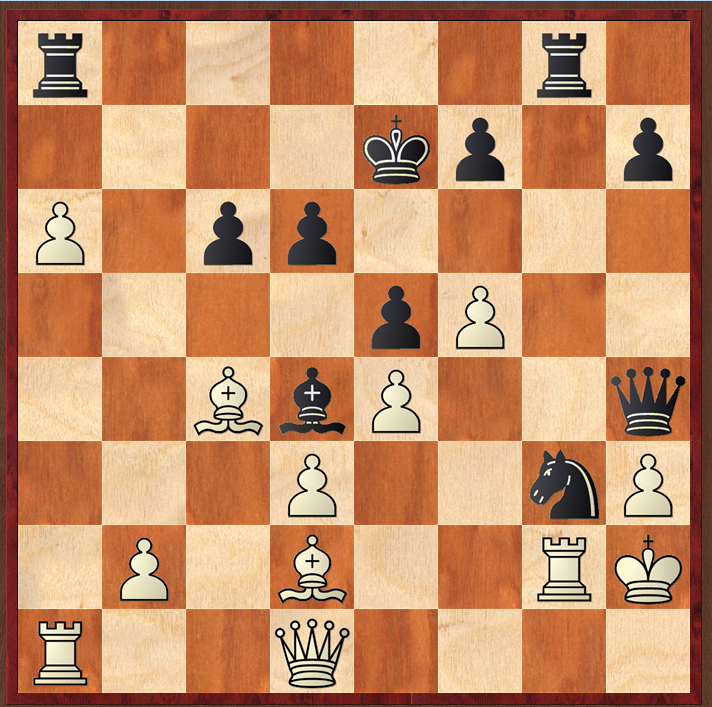
White to play and win (sort of, but not quite)
Solution
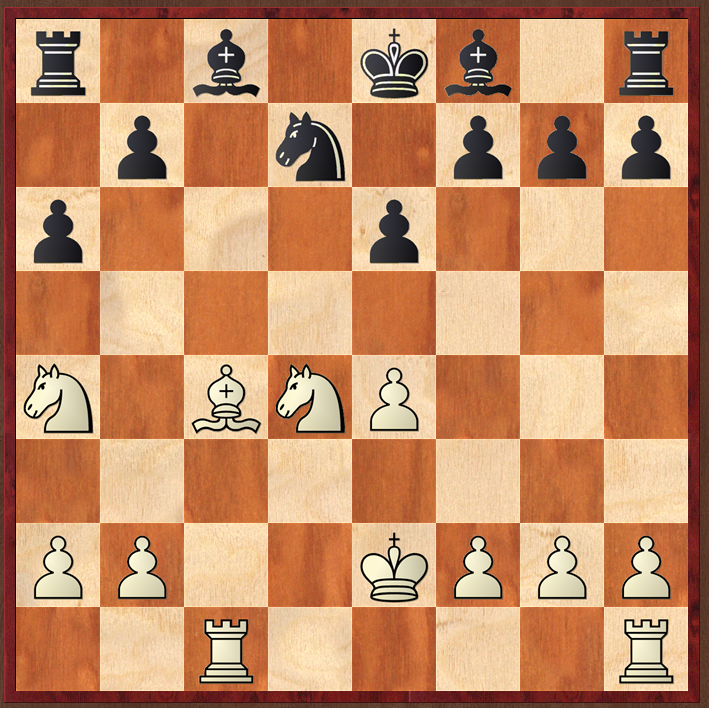
I struggled with this one, not being able to find a win after various tries such as Ne6, Be6, Nb5, Bb5-basically four ways to throw a minor piece away. So, in a game, I would surely have played 1 Rhd1, just bringing a piece out. I would never have guessed this was a 'solution' but it was indeed the move played.
When I looked at the solution, I was confounded. Does it really win? I set the pieces out, and played through some lines, and it is quite curious to me- though maybe it shouldn't have been- that 1…b5 2 Ne6! fe 3 Be6 is so strong.
It doesn't actually win, though. Black's next move in the game, 3…ba, is weak, after which the game is lost, but 3…Bd6 or 3…Ne5 would still mean there is a game. So, the problem is somewhat cooked, but is nevertheless interesting, showing the power of development.